Thursday, March 29, 2018

Watercolour Sprays

Hi everyone.  Sharing two cards that are the same except for the die-cut and sentiment.  After a card class I had a few weeks ago, there was a left over piece of watercolour sprays on mixed media paper.  This is a combination of several colours ... I believe red, brown, magenta and a little gold on top.  I love the dramatic look of these colours together.

Two easy cards where I just cut my already sprayed piece of mixed media paper in half to create a panel for each card.  Backed it with a piece of black card stock that was only about 1/8" bigger, creating a very thin frame.  Added a black die-cut (this is a longer die-cut, but I just ripped off the bottom few leaves), and stamped a simple sentiment.

Here's a close-up of both cards ...


and ...

Thanks for coming by for a visit!


Stamps:  Thanks Sentiment - Where Your Heart is (Simon Says Stamp); Happy Birthday Sentiment - Penguin Party (Create a Smile)
Paper:  Mixed Media paper (Strathmore 140 lb. 400 series); Black (Stampin' Up!); White (Neenah 110 lb.)
Ink:  Black (Memento)
Accessories & Tools:  Sprays made from Liquid Watercolour concentrate (Dick Blick), Flower Frolic die (Penny Black); Meadow Leaf die (Poppy Stamps)

Sunday, March 25, 2018

March Rudolph Days

Hi everyone.  Today I'm playing along with March Rudolph Days challenge.  The challenge runs every month from the 25th to end of month.  It's Anything Goes Christmas and run by the lovely Mo (Scraps of Life by Scrappymo!)

I'm made another card using this sweet die-cut of trees from Memory Box.  I love this die.  So easy to place a colourful background and stamp a sentiment.  This time I went one step farther and stenciled "falling snow" with white embossing paste.  I first placed my tree panel over my card base to get the positioning and stamped my sentiment (in blue).  Removed the panel, placed a piece of temporary tape over the sentiment as a mask and then stenciled with embossing paste over the front of the card.  Used diluted white acrylic paint to splatter some falling snow on the tree panel.  Once the embossing paste was dry, removed the mask and adhered the tree panel, popping it up for extra dimension.

Here's a close-up ...
Easy, peasy card!

I hope you'll come play along at Rudolph Days.


Stamps:  Snowglobe Sentiments (My Favorite Things)
Paper:  Watercolour (Arches 140 lb. Hot Press); White card base (Neenah 110 lb.)
Ink:  Watercolour sprays - Blue, Green, Magenta (Dick Blick); Distress Ink:  Salty Ocean (Tim Holtz)
Accessories & Tools:  Evergreen Window die (Memory Box), Falling Snow stencil (Simon Says Stamp), White embossing paste (Dreamweaver), palette knife, white acrylic paint

Challenges:
Rudolph Days - March

Wednesday, March 21, 2018

Wildflowers

Hi everyone.  The CAS Watercolour March Challenge - Garden is winding down.  Just three more days to play along. :)

Today's card combines four flower images to create my garden.  Three of the images are from AliExpress and I have included the links below.  I love the size of these images as they can be used on their own or combined with other images to create a focal point, or used as background filler.

Links to stamp sets:
Orange flowers
Blue flowers
Yellow flowers

I stamped the images in Sahara Sand ink (very light) and then used my fine waterbrush and distress inks to watercolour over top.  I used Spiced Marmalade, Broken China, Mustard Seed, Shabby Shutters and Peeled Paint for my garden.  I filled in the bottom a little with green to make it appear as grass and then stamped some ground flowers.

I used my wonky stitched rectangle (NBUS) to die-cut the panel and then popped it up on my card front with foam.

Here's a close-up ...
I hope you'll play along if you haven't had a chance yet.  Come join us!


Stamps: Wildflower stamps (AliExpress); Sentiment - Friendship Garden (Fiskars)
Paper:  Mixed Media paper (Strathmore 140 lb. 400 Series)
Ink:  Sahara Sand (SU!); Distress Inks:  Spiced Marmalade, Broken China, Mustard Seed, Shabby Shutters, Peeled Paint (Tim Holtz)
Accessories & Tools:  waterbrush, Wonky Stitched Rectangle (CUTplorations)

Challenges:
CAS Watercolour March Challenge - Garden

Tuesday, March 20, 2018

Glass Bead Roses

Hi everyone.  I had to make one more acetate card before the CAS Mix Up March Challenge - Acetate closes.  The challenge is winding down.  There's still four days left to enter.


Susan has us playing with acetate this month and I have shared three cards each using Acetate in a different way - one card with Alcohol Inks, one card with dry embossed Acetate, and one where I have used Acetate to cut a stencil using a die.  There are many other ways to use acetate on cards ... check out the challenge blog to see some video tutorials.  It's a very versatile product to have in your craft room.

The card above uses a Rose stencil.  I used a piece of acetate from the same background as this card.  I do love this combination of colours, and it looks so pretty with the glass bead gel through the rose stencil.  A bit difficult to get a good picture because of the transparency, but the texture and shine is very unique to this amazing product.   If you ever get a chance to buy some, it's worth it.  I use Golden Brand glass bead gel, but there are other brands.

I backed my panel with a piece of copy paper to show off the colours of the alcohol inks.  I added a white embossed black banner at the bottom.

Here's a close-up

I hope you'll come play along at CAS Mix Up if you haven't had a chance yet.


Stamps:  Fond Expressions 2 (STAMPlorations)
Paper:  White card stock card base (Neenah 110 lb.); Black (SU!)
Ink:  Alcohol Inks:  Wild Plum, Red Pepper (Ranger); Tangerine (Pinata); Versamark
Accessories & Tools:  acetate sheet, Rose stencil (CUTplorations), glass bead gel (Golden), white embossing powder, heat ool

Challenges:
CAS Mix Up March Challenge - Acetate

Saturday, March 17, 2018

Holly Christmas

Hi everyone.  We are over half way through the month, so today's post is a reminder about the CAS Christimas March Challenge - Holly.

This time I'm using a holly die (Penny Black) and some patterned paper.  Those of you who follow me regularly know that patterned paper rarely makes an appearance on this blog.  I tend to make my own background designs, but I couldn't resist picking up the "festive & frosty" 6"x6" pad of Christmas papers from Penny Black.

I challenged myself to try to use up the patterned paper with no leftovers.  I'm pretty happy that I managed to make four cards from the 6"x6" holly paper. :)  I'm sharing three today, and one more posted later.

Here's a close-up of above ...
I cut several layers, starting with a thick white card for the base layer, then a complete image again in baked brown sugar card stock, the leaves out of the patterned paper, and the berries from real red card stock.  I used the matching inks (and gumball green for the patterned leaves) to sponge over top to add a little shading and dimension.  Then I glued the layers together.

Here's a couple more Holly cards using the same holly paper ...
... and ...
There's still one week left to play along with the CAS Christmas March Challenge - Holly.  Check out the beautiful reminder cards from the Designers by clicking HERE.  Then some join us!


Stamps:  Joyful Greetings (Paper Smooches); Snowglobe Sentiments (My Favorite Things)
Paper:   White base (Neenah 110 lb.); Baked Brown Sugar, Real Red (SU!); festive & frosty (Penny Black)
Ink:   Baked Brown Sugar, Gumball Green, Real Red (SU!)
Accessories:   holly & berry branch die (Penny Black), sponges, white gel pen, Holly Bouquet die and Holly Vine die (both from Memory Box), white half pearls coloured with red copic marker, wink of stella, glossy accents, white embossing powder, heat tool

Challenges:
CAS Christmas March Challenge - Holly

Friday, March 16, 2018

Rose Garden

Hi everyone.  We are already more than half way through the month of March, which means it's time for a reminder post for the CAS Watercolour March Challenge - Garden.


I used a stamp that I have had for AGES.  Might be from my first year of stamping.  It's made by Ditto and I don't even know if they are still in business.  I love the fun, whimsical style of this stamp, so thought I would throw caution to the wind and just "slosh" (a la shirley-bee) on some watercolour. :)  This fun card only took me about 10 minutes to make.  :)  That's gotta be a record for me.  And I love how this sweet garden turned out. :)

I stamped the image in archival ink twice, sloshed on some diluted Disress Inks (Candied Apple for the flowers, Twisted Citron for the leaves).  The I took a fine brush and added some blades of grass at the bottom in both Twisted Citron and Mowed Lawn.  Stamped the sentiment to match the flowers and popped my card front on the base.  Easy, peasy and fun.

Here's a close-up ...

While I was at it ... made a second card using orange for the flower and a darker green for the leaves.  This time I only stamped the image once, so it's narrower.


Check out the reminder post on CAS Watercolour to see the more inspiring Garden Watercoloured cards from our Designers and wonderful Guest Designer Nonni.  Then come play along!


Stamps:  Flowers (Ditto); Sentiment Sampler (Paper Smooches)
Paper:  Mixed Media (Strathmore 140 lb. 400 Series); White card base (Neenah 110 lb.)
Ink:  Archival Black (Ranger); Distress Inks:  Candied Apple, Twisted Citron, Mowed Lawn (Tim Holtz)
Accessories & Tools:  paint brush

Challenges:
CAS Watercolour March Challenge - Garden

Thursday, March 15, 2018

Acetate and Embossing Paste

Hi everyone.  We are already over half way through the month, so this is a reminder of the CAS Mix Up March Challenge - Acetate, hosted by my talented friend Susan (Cardmaker's Garret).


And it's also our 2nd birthday.  Come celebrate with us.  Prizes for Winner and one random draw of all eligible entries.


I'm having fun with this challenge.  Today's card uses acetate as a "window" for my card.  I have used a wildflower stencil and white embossing paste over top of the clear acetate, and then sprinkled with iridescent glitter embossing powder.  Once the paste was dry, I set the glitter embossing powder with my heat tool.

I've attached the window to the inside of my card front and popped it up over a watercolour tissue paper background.  This background was made by watercolouring tissue paper (see my video tutorial HERE) using Inka Gold.  I've used slate blue and gold.  It's pretty and shimmery.  I stamped the sentiment (NBUS stamp set that I just bought) using a matching yellow gold ink.

We are thrilled to have Cathy (Cathy's Card Spot) as our Guest Designer this month.  Please check out the challenge blog to see Cathy's reminder acetate card, along with the reminder cards from the rest of our Designers.  Then come play along!

I'm also heading over to the CAS Watercolour gallery with this card as the challenge this month is Garden.  I love my garden of beautiful wildflowers with my watercoloured background. :)


Stamps:  Watch Bloom (Memory Box)
Paper:  White card base (Neenah 110 lb.); white tissue paper
Ink:  Delicata Gold (Tsukineko)
Accessories & Tools:  water mister, Inka Gold in slate blue and gold, acetate sheet, Wildflower stencil (Tim Holtz), White embossing paste (Dreamweaver), Iridescent embossing powder (SU!), heat tool, Rectangle Nestabilities die (Spellbinders)

Challenges:
CAS Mix Up March Challenge - Acetate
CAS Watercolour March Challenge - Garden

Monday, March 12, 2018

Colouring with Zigs

Hi everyone.  Today I'm sharing two cards that are watercoloured using zigs.  Each card is the same stamp images ... both are heat embossed.  The one above is heat embossed in gold.  It's actually the second one I made, but these are my favourite colours so HAD to post it first. :)

I added a layer of orange watercolour and then a layer of pink on top to create lots of variations in the colours.  I only used one colour of green for the stems and leaves.  To finish, I tore a piece of vellum and heat embossed "hello" in gold to match.

Here's a close-up ...
The first card I watercoloured is below.  I heat embossed the images in lime green.  I LOVE how it turned out.  I used dark teal to watercolour the flowers and green for the leaves.  When I started this card, I wanted to cut out a shape and pop it up on a white background.  I had seen a lot of heart cards done in February that were filled with flowers and wanted to try that, but didn't want to use a heart.  Instead I used one of the Label dies from Spellbinders.  Once I had it cut out, I didn't like it on the white background, so popped it up over the background with the rest of the images.  Just a little different design for the card.


I'm entering Card #1 at Simon Says Wednesday Challenge - Girl Power.  I love the feminine images and colours with pink.  And entering at Time Out Challenges #104 - Bold.

I'm entering Card #2 at The Flower Challenge #18 - Anything Goes.


Thanks for stopping by for a visit!


Stamps:  Persian Motifs (Altenew); hello sentiment - The Big, the bold, the happy (Winnie & Walter); Happy Birthday sentiment - Happiest Birthday Wishes (SU!)
Paper:  Mixed Media (Strathmore 140 lb. 400 Series); vellum; black (SU!)
Ink:  Versamark; Zigs
Accessories & Tools:  water brush, Labels 2 shape die (Spellbinders), gold embossing powder (hero arts); lime green embossing powder (Ranger), white embossing powder, heat tool

Challenges:
Simon Says Wednesday Challenge - Girl Power
Time Out Challenge #104 - Bold
The Flower Challenge #18 - Anything Goes

Smile

Hi everyone.  Sharing another card made with Acetate.  This time I poured my Alcohol Inks on top and then tilted the panel so they ran.  I like the look of texture that was created.  I then stamped wildflowers on top, heat embossing them in liquid platinum.  The acetate sheets I use do take the heat gun, but I don't leave it too long or it will start to melt and curl.

I added a simple white frame around my image panel and heat embossed Smile at the bottom.  Fun, easy card.

Here's a close-up ...

I'm heading over to add this to the CAS Mix Up March Challenge - Acetate, that is being hosted by my friend Susan.  Acetate is a great product that you can do so much with!


Come join us!


Stamps:  Insightful Meadows (Unity Stamp); Smile (AliExpress)
Paper:  White card stock card base and frame (Neenah 110 lb.)
Ink:  Alcohol Inks:  Mermaid Lagoon, Botantical (Ranger)
Accessories & Tools:  Acetate sheet (Grafix .007 thickenss), Liquid platinum embossing powder (Ranger); Rectangle nestabilities (Spellbinders)

Challenges:
CAS Mix Up March Challenge - Acetate

Saturday, March 10, 2018

Twofer Card Challenge #3

Hi everyone.  Welcome to the start of another Twofer Challenge #3.


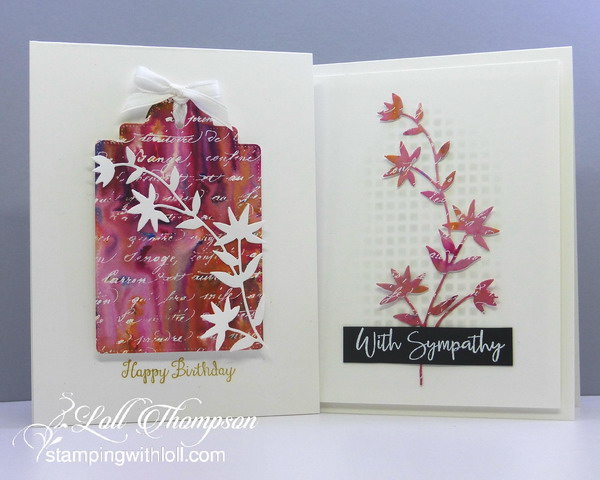
Today I'm sharing two cards that both use the same beautiful die from Penny Black.  It's just the right size to fit on something small by cutting off a few leaves, or leaving it full-size so it fills a page. :)

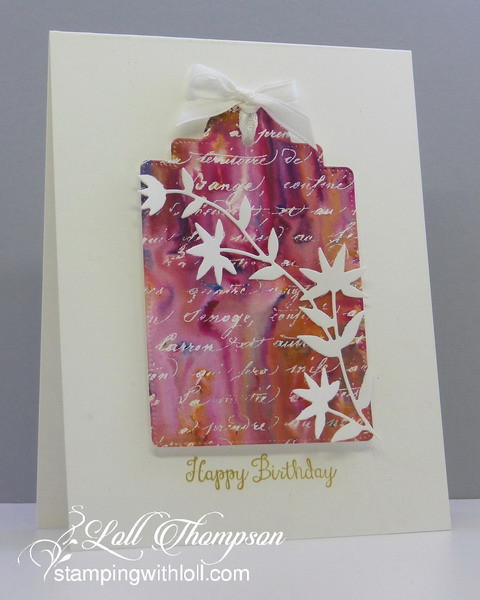
I started by heat embossing script in white across a piece of  mixed media paper.  I love the randomness as the script didn't stamp perfectly, which makes it even better to me.  Then I sprinkled on just a little of the Lindy's Magicals (autumn maple crimson, red hot poker orange, with just a smidge of cattail copper brown).  I spritzed lots of water and let the magicals do their own thing.  LOVE the result.  Die-cut a tag and a simple white die-cut of a sprig (blossoms) that had been cut to size for the tag.  The Happy Birthday sentiment is stamped in gold pigment ink. :)

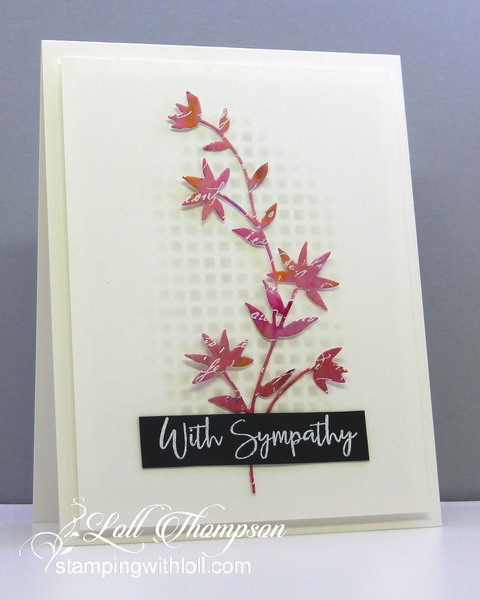
For my second card, I created a CAS (clean and simple) Sympathy card.  Here's the close-up ...


I added soft and subtle mesh stenciling to the background by sponging with light gray ink.  The same die was used as the card above, this time cut from a second piece of mixed media paper, with white heat embossed script and coloured with Magicals (as above, but blotted with a paper towel to have softer colours).  The card was finished by adding a black sentiment banner with white heat embossed sentiment.

Even though I used the same colours on both cards, you can see that I used only part of the sprig in white on the first card, and the second card has the full size flower sprig, cut from the same background as the tag in the first card.  The tag is solid and carries weight where the second card with just the flower sprig is light and airy over top of the stenciled background.

I hope you'll check out the challenge blog to see all the amazing Blossom Twofer cards by our wonderful Guest Designer, Verna, and the rest of the DT.  Then come play along!  The challenge is open for two weeks, closing on Mar. 24th.  Hope to see you in the gallery!


Card 1:
Stamps:  script (Penny Black); Sentiment - Bloom of Hope (SU!)
Paper:  Mixed Media paper (Strathmore 140 lb); White (Neenah 110 lb.)
Ink:  Versamark; Gold Delicata (Tsukineko); Lindy's Magicals (autumn maple crimson, hot poker orange, cattail copper brown)
Accessories & Tools:  white embossing powder, heat tool, water mister, Pinpoint Main Street Tag die (Poppy Stamps), Flower Frolic die (Penny Black), 1/8" white satin ribbon

Card 2:
Stamps:  Sentiment - Bouquet of Thanks (Simon Says Stamp)
Paper:  Mixed Media (Strathmore 140 lb.); Basic Gray card stock (SU!)
Ink:  White Pigment Ink (Hero Arts)
Accessories & Tools: Flower Frolic die (Penny Black), sponge


Challenges:
Twofer Challenge #3 - Blossoms

Thursday, March 08, 2018

Merry Christmas with Holly

Hi everyone.  Another Christmas card from me today ... and one that includes holly so I'm adding this to the CAS Christmas March Challenge - Holly.


This background was in my stash.  I used a NBUS stamp that I bought late in December last year.  I stamped in Versamark and heat embossed in white onto a piece of watercolour paper.  I then added distress ink to my craft mat and "splashed" away until I was happy with the depth of colour.  Check out my video on Splash Watercolour Background by clicking HERE.

But, as it happens to me often, the design I had in my head didn't work out, so I added this to my stash for later.  Today is the day to use it. :)

I popped up the panel on my card base, added a few holly leaves that are die-cut from green card stock, sponged on the edges, shaped with my stylus and then wink'd with stella.  The berries are done the same way with red card stock, then a small dot of white from a gel pen to finish.

Here's a close-up...
I hope you'll pull out your holly stamps, dies, or stencils and join us.  Remember to keep your design clean and simple.


Stamps:  Merry Christmas (Simon Says Stamp)
Paper:  Watercolour paper (Arches 140 lb. Hot Press); White card front (Neenah 110 lb. card stock); Garden green and Real Red card stocks (SU!)
Ink:  Versamark; Distress Inks:  Twisted Citron, Mowed Lawn (Tim Holtz); Garden Green, Cherry Cobbler inks (SU!)
Accessories & Tools:  White embossing powder, heat tool, water mister, Holly & Berry dies (C.C. Designs), stylus, sponge mat, sponges, white gel pen, clear wink of stella

Challenges:
CAS Christmas March Challenge - Holly


Tuesday, March 06, 2018

Dry Emboss Acetate

Hi everyone.  Today I'm playing with acetate again.  That is the CAS Mix Up March Challenge, hosted by Susan.


After seeing Julia's fun card at the launch of the challenge with the dry embossed acetate, I had to give it a try.  I used just a piece of acetate that came off the back of a stamp set, dry embossing it with a script embossing folder.  I keep any acetate pieces I get for acetate smooshing ... and now dry embossing. :)  This turned out so cool.  I love the clear texture.

I used a small piece of watercoloured tissue that was in my stash.  I ripped it and glued it to the back of my embossed acetate using Tombow Multi-Mono liquid glue, which dries clear.  There is a bit of gold on the tissue (hard to see in photo), so I wanted to add a gold die-cut leaf and sentiment to match.  I don't have this colour of gold card stock, so I used some matching acrylic paint and painted a piece of card stock.  Once dry, die-cut my leaf.  I have left over of this card stock to use on other projects.  Stamped the sentiment with Delicata Gold ink which doesn't need heat embossing. 

Popped the acetate panel on top of my card base, adhering clear pop dots under the tissue area only

Happy with my CAS design using acetate, embossing folder, watercolour tissue, die-cut and stamping. :)

Here's a close-up ...

Always great to up-cycle those acetate sheets that you probably all have from stamp sets you've bought.

Come check out the challenge blog where you'll see the wonderful inspiration cards from our Designers and special Guest Designer, Cathy.  And if you have time, check out the videos that Susan has provided.  Lots of different ways to use acetate! :) 


Also a reminder that we are celebrating our 2nd birthday at CAS Mix Up this month.  We hope you'll help us celebrate by playing along!!


Stamps:  Many Everyday Messages (Hero Arts)
Paper:  White card base (Neenah 110 lb.); white tissue paper
Ink:  Real Red, Tangergine Tango, Daffodil Delight (SU!); Delicata Gold (Tsukineko)
Accessories & Tools:  water mister for watercoloured tissue paper, acetate sheet, Script embossing folder (Sizzix), Little Leaves die-cut (Sizzix); Metallic Gold Acrylic Paint (Lumiere), paint brush, kook tak clear adhesive foam pads

Challenges:
CAS Mix Up March Challenge - Acetate