Monday, July 30, 2018

Shaker Card and More

Hi everyone.  This is my first successful shaker card.  I have made a few others, but they didn't go together as nicely as this one and I had glue all over the place. :)  This time, no glue ... just foam and adhesive strips.  Works much better for me. :)

I was looking for inspiration and saw the Jingle Belles challenge.  They are wanting cards inspired by their BEAUTIFUL header ...
I went with the silver, white and blue colours ... and silver snowflake! :)

I bought this die-cut snowflake block not long ago and this is my first time using it (NBUS - never before used schtuff ... as Darnell would say!).

I die-cut this twice ... once from white card (my card front) and a second time from silver foil.  I inlaid the silver foil snowflakes into my card front and secured it with a piece of acetate on the inside.  You probably can't see, but the acetate was dry embossed with falling snow.  Added a foam frame at the back around my block and then filled it with different colours of sequins.  Adhered a larger piece of white card stock on top of the sequins to hold everything in.  **  I did add a few little drops of glue near the top of the block on the back of the acetate and secured a few sequins so they didn't all drop to the bottom).

Placed my card front shaker over my card base and added a black with silver embossed sentiment banner to finish.  Happy with how it turned out. :)

Here's a close-up ...
I still had the white die-cut snowflake block from when I cut it from the card front of the card above, so used it with a watercoloured background done in brushos that was in my stash.

Here's the second card made with leftovers ...
This went so well that I ended up make two of each card so I have one for my Christmas card stash and one to donate.


Stamps:  Banner Sentiments (Penny Black)
Paper:  White card base and front (Neenah 110 lb. card stock); Silver Foil (SU!); Black (SU!)
Ink:  Versamark
Accessories & Tools: Snowflake Block die (Simon Says Stamp), Assorted colours of sequins, acetate, Falling Snow embossing folder, foam, silver embossing powder (Ranger), heat tool

Challenges:
Jingle Belles - Blog Banner Inspired

Sunday, July 29, 2018

Smiles for Patti

Hi everyone.  Today I'm sharing a card for my sweet blogging friend, Patti (Stationery Styles).  Patti and her hubby have been working hard to find a new place to live in New Mexico.  They finally found the perfect place, only to have the owner's circumstances change and it is no longer available. :(

Patti has asked her blogging friends to send her some much needed smiles.  My card is hopefully going to provide a smile for Patti today. :)  She set up a Linky party on her blog for friends to play along.

I used the Penny Black ... so loved set.  This dog is totally adorable, I was smiling the whole time I was colouring.  Not only smiles for Patti, but for me too! :)

Stamped in black and then watercoloured using zigs.  Simple, right!  Not quite, a little glitch when I was adding the wash for the sky ... touched the heart and red everywhere.  Not to fear, fussy-cut the dog (which I was happy with), stamped the image again and just coloured the background.  Paper pieced the fussy-cut dog on top, popping up his ears.  Added clear wink of stella and glossy accents to give the heart some umph!  And then framed all with a simple white frame.  I was even able to get the zig to work on my sentiment stamp.  First time trying that.

Here's a close-up ...
Dear Patti ... sending smiles, hugs and lots of love your way!


Stamps: ... so loved (Penny Black); happy snippets (Penny Black)
Paper:  Mixed Media (Strathmore 140 lb. 400 series); White (Neenah 110 lb. card stock)
Ink:  Black (Versafine); Zigs
Accessories & Tools:  water brush, clear wink of stella, glossy accents, Rectangle Nestabilities (Spellbinder)

Challenge:
Patti's Linky Party - bring smiles!

Friday, July 27, 2018

Alcohol Ink Twofer

Hi everyone.  Today I'm here with two colourful cards.  These smooshed alcohol ink backgrounds were made a while ago and have been in my stash.  They made quick cards by adding a beautiful flower background die-cut over top (I had to buy this gorgeous die-cut because of my friend Marcia ... she is really good at enabling me to buy more things!). :)

I glued down the white die-cut card fronts over top of the alcohol ink panels and then popped them up on foam over the card base.  I added a white heat embossed black sentiment banner for each card to finish.

Here's a close-up of the cards.  This first one was sent to my dear friend Mary for her birthday last month.

... and, my favourite colours ...


Stamps:  Everyday sentiments (AliExpress)
Paper:  Yupo; White (Neenah 110 lb. card stock); Black card stock (SU!)
Ink:  Alcohol inks:  Ranger and Pinata
Accessories & Tools:  Blending solution, Flower Burst Tria Background die (Gina Marie Designs), white embossing powder, heat tool

Tuesday, July 24, 2018

Penny Black - Simplicity at its best


Hi everyone.  I'm sharing a little sneak peek of my Penny Black card that is posted on the Simplicity at its best blog.  Click HERE to check out a full-size photo of my card, along with complete instructions on how it was made.

If you have time, would love if you left me a comment on the SAIB blog.  Thank you!


Sunday, July 22, 2018

Glittery Poinsettias

Hi everyone.  Making one final CAS card for the CAS Christmas July challenge - Poinsettia, before it closes in two days.

This is a QCAS (as Darnell would say ... Quick, Clean, and Simple).

I had die-cut this lovely poinsettia image (borrowed from my good friend Nancy) just over 1 year ago and finally got around to using it today. :)  I simply stamped the sentiment and heat embossed in copper, and then placed a piece of copper glitter paper behind the poinsettia aperture.  It doesn't get any easier than that ... and it's such a pretty and elegant card too. :)

Here's a close-up ...
I hope you'll join our challenge if you haven't already.  Always good to get some Christmas cards made ahead.


Stamps:  Big Scripty Greetings (Simon Says Stamp)
Paper:  White (Neenah 110 lb. card stock); Copper Glitter Paper
Ink:  Versamark
Accessories & Tools:  Poinsettia die-cut (Tim Holtz), copper embossing powder, heat tool

Challenges:
CAS Christmas July Challenge - Poinsettia

Thursday, July 19, 2018

Pink and Gold Birthday

Hi everyone.  I've been super busy going through my studio and getting rid of old stamp sets, dies, paper, etc. that I haven't used for a long time.  Whew!  Days of work, but a satisfied feeling that it is done.  Just need to label all my containers now that things have been moved around.  Right now I'm having a hard time finding anything! :)

I noticed the Just Us Girls latest challenge is Watercoloured Background, hosted by Bobby.  I LOVE Bobby's style of card making and have been following her for a long time now.  And my very talented friend, Julia is the Guest Designer at JUGS this month.  I just couldn't miss playing along.

The background is smooshed using liquid watercolour concentrate with water - magenta and orange which has created a coral and pink background - LOVE IT!  After it was dry, I wanted to "glam" it up a bit, so smooshed some gold over top.  I used Delicata Gold re-inker and water for my top layer.

Attached the watercoloured background to a white framed flower die-cut and then stamped the sentiment in matching gold ink.  Super fun card to make!

Here's a close-up ...
There's still a bit of time before the challenge closes.  Come play along!


Stamps:  Everyday Sentiments (AliExpress)
Paper:  Watercolour (Arches 140 lb. hot press); White (Neenah 110 lb. card stock)
Ink:  Delicata Gold (Tsukineko)
Accessories & Tools:  Liquid Watercolour Concentrate in Magenta and Orange (Dick Blick), waer mister, Floral Stem Collage die (Poppy Stamps), Delicata Gold re-inker (Tsukineko)

Challenges:
Just Us Girls #449 Watercoloured Backgrounds

Tuesday, July 17, 2018

White Poinsettia

Hi everyone.  Today is the reminder for the CAS Christmas July Challenge - Poinsettia.  There's still one week left to play along before the challenge closes!


I used a small square of Alcohol Ink blended on Yupo for my background.  I adhered it on top of the sweet scalloped-edged white square and popped it up on my card front.  I die-cut just two poinsettia (one medium, one small) from white, shaped them with my stylus and mat, then adhered them together, offsetting the petals.  I added three small silver glitter balls to the center and popped the flower up on the edge of my alcohol ink panel.  To finish, I stamped the sentiment in Delicata Silver ink.

Here's a close-up ...
I hope you'll check out the challenge blog to see the other reminder cards from our talented Designers, and special Guest Designer, Marina.

Then come play along.  Never too early to get Christmas cards made so you have a stash ready when the holiday time rolls around. :)

I'm also playing along with CAS on Friday - Christmas in July.


Stamps:  festive snippets (Penny Black)
Paper:  White (Neenah 110 lb. card stock); Yupo
Ink:  Alcohol Inks:  Botanical, Mermaid Lagoon (Ranger); Delicata Silver (Tsukineko)
Accessories & Tools:  Blending solution (Ranger), do not open ... die (Penny Black), layered poinsettia die (Penny Black), silver glitter balls, stylus and mat

Challenges:
CAS Christmas July Challenge - Poinsettia
CAS on Friday - Christmas in July

Monday, July 16, 2018

Maple Splash

Hi everyone.  Today is the reminder for the CAS Watercolour July Challenge - Splash Watercolouring, hosted by Nancy.


I used watercolour sprays for the die-cut maple leaf (red, brown, gold).  I love how the gold adds some lovely shimmer. I sprayed onto my mat and then splashed away.  Click HERE to see the video I've done on Splash Watercolouring Technique. 

Die-cut my maple leaf and popped it up over a stenciled mesh background that I sponged in gold ink.  I added a gold heat embossed black banner sentiment to finish.

Here's a close-up ...
I really wanted you to see the shimmer so I took a super close-up picture that I hope shows it better ...


There's still over a week left to play along with this month's challenge.  Check out the reminder post for some wonderful inspiration from our Designers and talented Guest Designer, Marcia.  Then come join us!


Stamps:  Sentiment - Watching Bloom (Memory Box)
Paper:  Mixed Media paper (Strathmore 140 lb.); White (Neenah 110 lb.); Black (SU!)
Ink:  Watercolour sprays:  red, brown, gold (Dick Blick); Delicata Gold (Tsukineko); Versamark
Accessories & Tools:  Textured Mesh stencil (Memory Box), sponge, ?maple die (?), gold embossing powder, heat tool

Challenges:
CAS Watercolour July Challenge - Splash Watercolouring

Sunday, July 15, 2018

You're so Tweet!

Hi everyone.  Today we are half way through July so it's time for a CAS Mix Up Reminder.  Check out the challenge blog to see new inspiration from the Designers and our wonderful Guest Designer, Sue.


Bonnie is hosting this month and she has us colouring our die-cuts.  It really makes them special when you add some colours and other details.  The sweet little birdhouses above are a new-to-me die-cut.  I cut them from woodgrain paper given to me by a sweet friend. :)  Then watercoloured them with distress inks.

I created a Splash Watercolour background with two layers of Tumbled Glass distress ink.  Once dry, I used some tiny grass stamps and leaf sprig stamps to create my grass at the bottom, and the leaves off to the left side.  I used first and second generation stamping with the leaves to add dimension.  I used the same colour for the sentiment as I did for the sweet little birds.

Here's a close-up ...
Since I used Splash Watercolouring for the background, I'm sending this card over to the CAS Watercolour as well.

I hope you'll be inspired to come play along.  Colour your die-cuts using any colour medium, keep your card CAS, and then join our gallery!


Stamps:  Sentiment - Love Bug (Fiskars); Master Garden #1 (Kittie Kits - Rubbernecker)
Paper:  White card base (Neenah 110 lb.); Woodgrain - gift from a friend; Black (SU!)
Ink:  Distress Inks:  Tumbled Glass, Twisted Citron, Mowed Lawn, Salty Ocean, Brushed Corduroy, Gathered Twigs, Walnut Stain (Tim Holtz)
Accessories & Tools:  water mister, water brush, white gel pen

Challenges:
CAS Mix Up July Challenge - Colour your Die-cuts
CAS Watercolour July Challenge - Splash Watercolouring

Thursday, July 12, 2018

Penny Black - Cherry Blossoms

Hi everyone.  Today I'm playing with a new Penny Black die-cut called Cherry Blossoms.  Living in Vancouver, I am blessed to see lots of beautiful cherry trees in blossom in the spring.  We have many streets lined with these gorgeous trees.

I die-cut the blossoms from mixed media paper and then used my Zigs to add colour to the blossoms.  I used two shades of pink and a red for the very center.  I cut two sets of the branches so that I could layer the blossoms as many of the trees here are double blooms.  I cut the flowers off from the second branch, coloured with my zigs, and then shaped with a stylus and mat.  I glued them on top of the existing blooms, just off-setting the petals slightly.  The card is finished with a soft gray stamped sentiment.

Here's a close-up ...
If you get a chance, pop over to the Simplicity at it's best blog to see what's new from  my Simplicity Sisters.


Penny Black Products:


Stamps:  Gratitude (Penny Black) - sentiment
Paper:  Mixed Media (Strathmore 140 lb.); White (Neenah 110 lb.)
Ink:  Zigs; soft gray ink
Accessories & Tools:  Cherry blossom die (Penny Black), water brush, stylus and mat

Tuesday, July 10, 2018

Twofer Challenge #7

Hi everyone.  It's time for a new challenge at Twofer Card Challenge.  That's where we want you to create TWO cards using either the same stamp or the same die, with TWO different designs for TWO different occasions.  Make sure to follow the word prompt as well.  The challenge is open for TWO weeks.


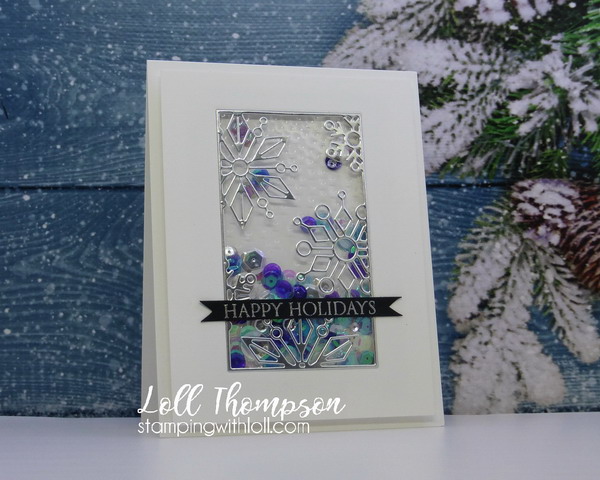
I am using the same stamp for my two cards above.  This is an old (retired) stamp set from Stampin' Up! that is all about tea.  I started by stamping the large flower patterned tea cup stamp in light ink so that I could do some no line watercolouring.  What I got with my first stamp was an outline of the tea cup.  Perfect, it sparked me to cut it out and use it for the card on the left.  I sprinkled two colours of Lindy's magicals over top and the spritzed a little water.  I got this deep blue -- so beautiful and shimmery.  I die-cut a partial flower wreath from hot press watercolour paper, cut all the pieces apart and watercoloured them with distress inks.  Then I used them to create a little bouquet in the tea cup.  So happy how this turned out.  Added a simple sentiment.

Here's a close-up ...

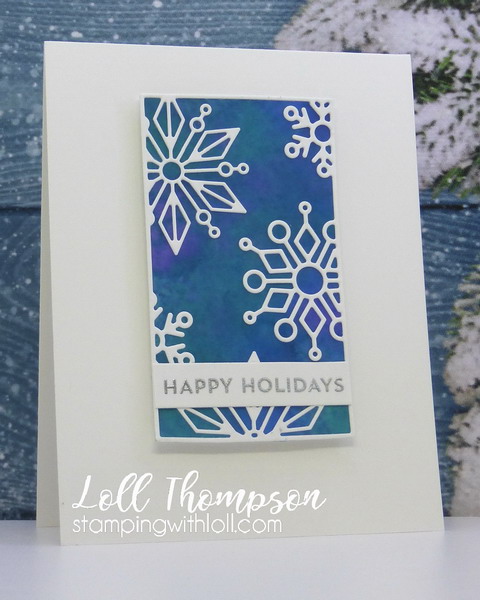
The second card (right above) is the tea cup stamped a few times with light ink so that I could use no line watercolouring to create this vintage look tea cup with flowers.  So pretty.  It was hard to figure out what to put with it.  In the end I want no distractions from the tea cup, so added a bit of steam at the top with gray and used the same colour to add a grounding.  I used a very small tag to stamp the sentiment and added it to the cup with a piece of green twine.

Here's a close-up ...

We have two very talented Guest Designers joining us this month.  Please check out the challenge blog to see the beautiful cards from Bonnie (Stamping with Klass ) and Marianne (Marianne's cards 'n stuff ), along with our team designers.  I know you'll be inspired to play along.  See you in the gallery!


Card #1:  A Cup of Thank
Stamps:  Tea Shoppe (SU!)
Paper:  Mixed Media paper (Srathmore 140 lb. 400 Series); White (Neenah 110 lb.)
Ink:  Sahara Sand (SU!); Zigs
Accessories & Tools:  water brush, floral arrangement die (penny black), Lindy's magicals (hydangea blue, tiffanylou's blue), water mister

Card #2:  Hello
Stamps:  Tea Shoppe (SU!); Word Salad (Paper Smooches)
Paper:  White card base (Neenah 110 lb.); Mixed Media paper (Strathmore 140 lb.)
Ink:  Sahara Sand, Smoky Slate (SU!); Distress Inks:  Brushed Corduroy, Shabby Shutters, Peeled Paint, Abandoned Coral, Barn Door (Tim Holtz)
Accessories & Tools:  water brush, Pinpoint Main Street Tag (Poppy Seed), twine

Challenges:
Twofer Challenge #7

Friday, July 06, 2018

Lustrous Rose

Hi everyone.  A little while ago I had an day of play with my friends Susan and Christine.  Susan brought this image that she had just bought.  Isn't it pretty??!!

I stamped the image in soft tan colour ink so that I could no-line watercolour.  But it was hard to figure out how the petals were formed.  I used the photo of the watercoloured rose on it's packaging and just did a really quick bit of outlining with a fine black marker.  It made it so much easier for me to watercolour.  I used distress inks and a waterbrush.  Once it was done, I splattered with a bit of green ink and stamped the sentiment in black to tie it to the black outlining.

Here's a close-up ...


Stamps: Lustrous (Penny Black), Gratitude (Penny Black)
Paper:  Mixed media (Strathmore 140 lb)
Ink:  Distress Inks:  Ripe Persimmon, Picked Raspberry, Shabby Shutters, Peeled Paint (Tim Holtz)
Accessories & Tools:  Water brush, fine line black permanent marker, brush for splattering, white gel pen

Tuesday, July 03, 2018

CAS Christmas July Challenge

Hi everyone.  Today is the start of the CAS Christmas July Challenge.  This month the challenge is hosted by me and I have chosen ...


I love to watercolour, and I have a beautiful and easy stamp set and matching dies to create my poinsettia cards.  Last time I used this set, I mentioned in my post I was going to stamp a bunch more images and play with watercolouring.  And I did.  I have four cards to share today.  I made multiples of a few, so managed to make six cards in total.  I also used a piece of designer paper AGAIN and wanted to use up the entire 6"x6" piece.  I hope this is becoming a habit because I have LOTS of Christmas papers. :)

I varied the designs slightly and also varied the colours of the poinsettias ... some red, some pink, and some in-between.

Here's the close-ups ...


Check out the challenge post to see some inspiring Poinsettia cards from our talented Designers, and special Guest Designer, Marina (My Perfect Life).  Then come play along.  There's still a week left before the challenge closes on July 24th at midnight (PDST).


Stamps:  Holiday Bouquet (Avery Elle), Be merry sentiment - Snowglobe Sentiments (My Favorite Things); Joy sentiment - Many Christmas Messages (Hero Arts); Thinking of you sentiment - ? (Stampin' Up!)
Paper:  Mixed Media (Strathmore 140 lb. 400 Series);
Ink:  Reinkers:  Real Red, Cherry Cobbler, Pear Pizzazz (Stampin' Up!); Archival Black (Ranger); Black (Memento)
Accessories & Tools:  Holiday Bouquet matching dies (Avery Elle), water brush, white gel pen, glossy accents

Challenges:
CAS Christmas July Challenge - Poinsettia