Wednesday, August 31, 2011

In the Studio with Heather and Leslie


This morning I had time to practice a brayered card that I made a few months ago (April 16).  I have Lili and Natasha coming on Friday and they want to learn how to make "Night Sky at the Lake".  I wanted to try making the card again since it had been a while.  I didn't want to be teaching something that I couldn't remember :)  Anyways, it turned out great, so I'm ready to go for Friday.  I also wanted to try watercoloring some Tiger Lilies and I'm happy with they turned out as well.  Will make them into a card at a later date ... this morning I was just experimenting.

In the afternoon, Heather and Leslie joined me in the art studio.  We had fun spending time creating together.  Leslie made three awesome cards using lots of techniques.  Heather made some main images to be made into cards later (two, I think), plus she managed to stock up on die-cuts and stamped images before she left.  Thanks Leslie for the delicious chocolate chip cookies!!

For some reason I was stuck on an image that I had brayered ... just couldn't figure out how to finish the card and what colors to use.  After Heather and Leslie left, I took a short break and then headed back to the studio.  This time I had a plan and I managed to finish my card.  I'm pretty happy with it.  Hope you like.

"Snowy Trees for Christmas"


Stamps:  Lovely as a Tree, Christmas Greetings, Patterned Pines, Short & Sweet (SU!)
Paper:  Always Artichoke, Glossy White, Whisper White (SU!)
Ink:  Bashful Blue, Sahara Sand, Soft Suede, Whisper White; Soft Suede Stampin' Write marker
Accessories & Tools:  Speedball Rubber Brayer, post-it notes for masking, Stamp-a-ma-jig, sponges, Baja Breeze ribbon seam binding, white gel pen, toothbrush, water mister, sticky strips and dimensionals

* * * * *

I created a mask with a post-it note to mask the snow area on the Glossy Paper.  I brayered Bashful Blue ink for the sky and then brayered Sahara Sand ink on top of the blue to create a wintery blue hue.  I sponged Sahara Sand ink along the top of the mask to highlight the horizon line.  I used the Stamp-a-ma-jig to find the best position to stamp the trees, removed it, covered the "hills" part of the stamp with masking tape because I didn't want them to show, inked the stamp with Soft Suede ink, removed the tape and then stamped the image.  I removed the post-it-note mask and then used the Soft Suede Stampin' Write marker to draw in the missing trunks at the bottom of the trees.  I repositioned the mask lower on the snow and sponged along the top to create some hills in the snow.

I used the white gel pen to add snow to the tree branches.  I then misted the toothbrush with lots of water, swiped it across my Whisper White stamp pad, added more water and then used my thumb to flick the bristles, letting them release drops of white paint that make it look like it was snowing.  Beautiful!

I made a frame from Always Artichoke.  It's so easy to make a frame without having to have die-cuts like Spellbinders - I plan to write a short tutorial in the next little while.  I stamped the snowflake (in Whisper White ink) from the Patterned Pines set and the snowflake from the Short & Sweet set, randomly over the Always Artichoke frame.  I mounted the brayered image to the back of the frame and tied the Baja Breeze ribbon seam binding around the frame, knotting it at one side
.
I stamped the sentiment in Always Artichoke ink onto Whisper White cardstock and cut around the words.  I mounted the sentiment on top of the ribbon using sticky strips.  I mounted the framed image onto the card base of Always Artichoke, popping it up with dimensionals to add depth.


Tuesday, August 30, 2011

Japanese Elegance


Today I CASE'd a card from SCS website.  Click here to see the beautiful, original card made by Lynda Lee.  I love her soft colors and was planning on using mostly soft colors as well, but I used part of a Japanese seal that my friend Deb gave me as the decorative strip on the bowl and that influenced the turquoise flowers.  Hope you like.

"Japanese Elegance"


Stamps:  Just Believe (SU!)
Paper:  Certainly Celery, Barely Banana, Basic Black, Whisper White (SU!)
Ink:  Stampin' Write markers:  Tempting Turquoise, Certainly Celery (SU!)
Accessories & Tools:  ornament punch, Japanese seal (stamp), Big Shot, Cuttlebug Corners die-cut, Sizzix Square Lattice embossing folder

* * * * *

I punched the ornament from Basic Black cardstock and then cut off the top, leaving a small piece which is the stand for the bowl.  I cut off the majority of the bottom part of the ornament, leaving a very shallow dish.  I cut a thin piece from the Japanese seal and used it as the decorative strip on the bowl.

I inked the stamp with Tempting Turquoise and Certainly Celery and stamped onto a piece of Whisper White cardstock.  I adhered the stamped image on a larger (1/16") frame of Certainly Celery cardstock and then placed that on another larger (3/8") frame of Barely Banana cardstock.

I used my Big Shot to cut out three of the Cuttlebug corner die-cuts from Basic Black cardstock.   I ran a piece of Barely Banana cardstock through the Big Shot with the Square Lattice embossing folder.  I mounted the black die-cut corners in a row, about 1/4" from the bottom of the embossed cardstock.

I mounted all the pieces as shown in the picture above, popping up the main image with dimensionals to add depth.


Monday, August 29, 2011

Birthday Balloons


Quick and easy CAS card for today's challenge from SCS - "A Bright Kraft Colored Card"  - CAS133 (using Kraft paper plus bright or primary colors).  A great way to use up a few scraps too! :)
Here's a picture and the details of the card  - finished size is the standard 5 1/2" x 4 1/4".  Hope you like.

"Birthday Balloons"


Stamps:  sentiment - Daisy Thanks (Stampendous)
Paper:  Riding Hood Red, Crumb Cake, Early Espresso, Whisper White (SU!); scraps of DP
Ink:  Early Espresso
Accessories & Tools:  1 1/4" circle punch, 2-step owl punch, corner rounder, adhesives and dimensionals

* * * * *

I punched three circles out of scraps of DP.  I used one of the same DP scraps for the owl's vest.  Rest of the owl was punched in Early Espresso and Whisper White.

Stamped the sentiment in Early Espresso and used the Stampin' Write marker to draw in the balloon strings and the owl's hand.

Popped up the blue and yellow balloons with dimensionals to add depth.  Rounded the bottom corners of the Crumb Cake cardstock and Riding Hood Red card base.


Sunday, August 28, 2011

Christmas Poinsettia


I was planning on taking a little break from the art studio this weekend.  I've been spending so much time there that my husband and son didn't recognize me when I poked my head out the other day :)  Seriously, I'm so obsessed right now it's scary.  I think making my first Christmas card a couple of days ago was the catalyst!  All I can think of is Christmas.  Less than four months away!!  Anyways, I couldn't stay away --- surprise, surprise!! :)

I mentioned the other day that I received my first order from Cheery Lynn.  I love their die-cut leaves I got and I also bought some red foil (silver on the back side - bonus!!).  Anyways, I thought that the leaf die-cut and red foil combined would make for a beautiful poinsettia - it worked!!  I used two sizes of the same leaf design and I'm really happy with how it turned out.  I found the foil to be quite lightweight (which means I was concerned it wouldn't hold it's shape), so I cut out coordinating pieces of cardstock and glued the foil pieces on top - they are nice and study now.  I'm still thinking that this card shouldn't go through our mail system ... after all my hard work, I don't want some machine crushing my flower - so this is definitely a "hand-delivered" type of card.  I combined several challenges from SCS, so I'm pretty proud of myself for that too (WT333 - Altered Ribbon; WT332 - Heavy Metal; F4A79 - Stacked!; WT329 Something old, something new).

Here's a picture and the details of the card  - finished size is the standard 5 1/2" x 4 1/4".  Hope you like.

"Christmas Poinsettia"


Stamps:  Gifts of Christmas (sentiment) - (SU!)
Paper:  Old Olive, Christmas DP (retired), Real Red (SU!)
Ink:  VersaMark, Old Olive (SU!)
Accessories & Tools:  Cheery Lynn small leaves #2 and large leaves #2 die-cuts, Big Shot, red foil, 1 3/8" circle punch, white half-pearls, white embossing powder, 5/8" Old Olive satin ribbon, sticky strips and dimensionals

* * * * *

Using the Big Shot, I cut out six large leaves and five small leaves from red foil and Real Red cardstock.  I cut out three large leaves from Old Olive cardstock.  I glued the red foil leaves on top of the red cardstock leaves using Tombow glue and let them dry.

I also punched out a 1 3/8" circle from both red foil and red cardstock and glued them together (let dry).  This is used as the base for my flower.

I used more glue to place the large six leaves on to the base (overlapping each other slightly).  I curled the smaller leaves slightly with my fingers and then glued them on top of the large leaves, overlapping slightly and off-setting them from the large leaves.  I placed three white half-pearls in the center of the flower.  I lightly sponged Old Olive ink onto the three Old Olive leaves and glued them in behind the flower.  Before adding the flower to my card, I curled up the tips of the large leaves to add depth and give the flower more character (it's hard to see in the picture above).

I cut a thin (3/8") strip of red foil and stamped with the sentiment in VersaMark and then embossed it in white.  I centered the red strip on the piece of 5/8" Old Olive satin ribbon and used a sticky strip to adhere them together.  I added another sticky strip to the back of the satin ribbon and then glued it to the striped background paper, centering the sentiment, placing the ribbon 3/4" from the bottom of the paper and wrapping the edges around to the back.  I used more sticky strips to adhere the background paper to the card base of Old Olive.

Finally I added three mini half-pearls to each side of the sentiment and added the poinsettia above, popping it up with dimensionals to add depth.


Friday, August 26, 2011

Double Stacked Christmas Wreath


My first Christmas card of the year and it's only August!! :)

Today's "Free For All" challenge is "Stacked!!" - stacking punches, shapes, etc. to make an image.  Immediately I thought of my Martha Stewart vine border punch and making a Christmas wreath.  I hung it in a window, looking out at snow-covered trees.  The window is also punched shapes that I stacked (with dimensionals) to create a look of a window - so my card is double-stacked!   Hope you like.

"Double Stacked Christmas Wreath"

Stamps:  Lovely as a Tree; Christmas Greetings (SU!)
Paper:  Always Artichoke, Glossy White, Old Olive, Always Artichoke, Cherry Cobbler (SU!); Bazzill white
Ink:  Bashful Blue, Sahara Sand, Soft Suede, VersaMark; Stampin' Write markers:  Old Olive, Always Artichoke, Soft Suede
Accessories & Tools:  Martha Stewart vine border punch, 1" circle punch, 1 3/8" circle punch, 1 1/4" square punch, Speedball rubber brayer, post-it notes for masking, sponge dauber, 1/8" circle punch, white embossing powder, white gel pen, red embroidery floss, sticky strips, adhesives, Tombow glue and dimensionals

* * * * *

I started the wreath by punching a 1" circle from Always Artichoke cardstock.  I took the 1 3/8" circle punch and centered it over the 1" whole and punched out a thin ring of cardstock - this was my base for my wreath.  I punch vine border from both Old Olive and Always Artichoke cardstock and then cut the vine into stems.  I used the Stampin' Write markers to add veins to the leaves.  I punch out 1/8" circles from Cherry Cobbler to use for the berries.  I used Tombow glue to layer the stems onto the wreath base.  I added the berries and then used the white gel pen to add a dot on each berry to give it interest.  I tied the embroidery floss around the top of the wreath, knotted it to hold it in place, left a "tail" and added a knot at the end of the tail which is glued to the top of the window.

For the background, I ripped a post-it note and masked the bottom of the Glossy White cardstock.  I brayered first Bashful Blue ink and then Sahara Sand ink over top (I wanted the blue to be a "wintery" hue).  I stamped the Lovely as a Tree stamp with Soft Suede ink.  I used a sponge dauber to lightly sponge Sahara Sand ink along the top of the post-it note (horizon line).  I moved the post-it note down and angled it and added some more sponging of Sahara Sand ink to mimic hills in the snow.  I removed the post-it note mask and used the Soft Suede Stampin' Write marker to extend the tree trunks into the snow hills.  I cut the image to size and used sticky strips to adhere to the card base of Always Artichoke.

For the window:  I used Bazzill white paper and a pencil and ruler to mark 1/2" from top and 1/8" on both sides of center on the back of the cardstock.  I lined up my 1 1/4" square punch and punched out the four "panes of glass".  I added dimensionals and adhered the window on top of the background image.

I used VersaMark ink to stamp the Merry Christmas sentiment onto Always Artichoke cardstock and then embossed in white.  I cut out the sentiment, following along the basic shape of the script.  I adhered it about 1/2" below the bottom of the window. 

Lastly, I glued the wreath hanging from the top of the window.


Thursday, August 25, 2011

Cheery Lynn Die-cuts

I started the day by making a batch of sweet cucumber relish.  I make it every year and it's one of the preserves I give to family and friends at Christmas time (along with raspberry jelly and red pepper jelly).  This is a delicious relish which is awesome to have on hand for summer barbeques (great on hamburgers and hot dogs!) ... but it's also really great with roast beef (hot sliced, or cold in a sandwich).  Our family loves it!  I'll include the recipe in the Baking section of this website (see top left-hand column).

____________________ 

Today I received my first order from Cheery Lynn Designs (Phoenix, Arizona).  They offer several items for sale, but their specialty is die-cuts.  I ordered two sets of leaves (one small and one large).  I love the detail of the embossed centers of the leaves!  I also purchased some thick red foil which I'm thinking might work really well for Christmas cards.  Speaking of that ... I have seen a lot of Christmas cards lately on SCS ... I guess I should start thinking about making some.  The past few years I've worked on coming up with one design and then making 35 of the same card to send to family and friends.  Maybe this year I should challenge myself to make 35 different designs - sounds like fun!!!
For today, my card celebrates fall. ... I love the fall season (my favorite!) with all the beautiful colors of the changing leaves.  Hope you like.

"Changing Leaves" 

Stamps:  none!
Paper:  Crumb Cake, Soft Suede, Whisper White (SU!)
Ink:  Early Espresso, Soft Suede, Old Olive, Daffodil Delight, Pumpkin Pie, Cajun Craze (SU!)
Accessories and Tools:  Cheery Lynn Large Leaves #2 die-cut, Big Shot, Cuttlebug "Forest Branches" embossing folder, sponges, hemp twine, sticky strips, adhesives and dimensionals

* * * * *

I ran a large piece of Soft Suede cardstock through the Big Shot with the Cuttlebug "Forest Branches" embossing folder.  I sponged Early Espresso ink overtop to highlight the embossing and also around the edges of the cardstock to add depth.

I ran four pieces of Whisper White cardstock through the Big Shot with the Cheery Lynn Large Leaves #2 die-cut.  I sponged one with Old Olive ink and added a little Daffodil Delight ink for highlights.  I sponged a second leaf with Daffodil Delight ink and added Pumpkin pie ink around the outside edges.  The third leaf was sponged with Pumpkin Pie ink and Cajun Craze ink was added around the outside edges.  The last leaf was sponged with Cajun Craze ink with Early Espresso ink added around the outside edges.

I cut four 1 1/2" squares of Crumb Cake cardstock and sponged Soft Suede ink around the outside edges to add depth.

I wrapped hemp twine around the embossed background five or six times and knotted at the front (off center).  I used sticky strips to adhere the embossed background to the Crumb Cake card base (edges of the card base were sponged with Soft Suede ink).

I used dimensionals to adhere the four squares to the front of the card, popping them up to add depth.  Dimensionals were also added to the four leaves (so they are double-popped), which were adhered on top of the four squares - making sure each leaf was facing in a different direction to add interest.


Wednesday, August 24, 2011

Coneflowers and River Rock


Another beautiful day.  The weatherman had predicted showers for today (this was a couple of days ago ... and of course, weather forecasts change hourly) ... so I had prepared to make a batch of relish today.  Now that's it's nice out, I'm not very motivated :)  I think I'll cut up the veggies tonight and then cook it tomorrow.  That just means more time available to play in my art studio - funny how that always seems to work out!! :)

Today's sketch challenge had me stumped for a while.  I saw it late last night and mucked around with ideas for about an hour before heading to bed ... a little defeated.  But this morning, I looked through my digital stamps and came up with a plan!  Hope you like.

"Coneflowers & River Rock"

Stamps:  Coneflowers (Wax Fruit Company); Precious Butterflies (SU!)
Paper:  Soft Suede, River Rock DP (SU!); Watercolor paper
Ink:  Soft Suede; Re-inkers:  Soft Suede, Regal Rose; Stampin' Write marker: Old Olive
Accessories & Tools:  Aqua Painter, sponges, Sizzix Embosslits "Beautiful Wings", sticky strips, adhesives and Tombow glue

* * * * *

I printed off two copies of the digital stamp "Coneflowers" onto watercolor paper.  I used re-inkers (Soft Suede for the flower centers; Regal Rose for the petals) to watercolor the image.  I inked the stems with an Old Olive Stampin' Write marker.  I then cut out all the pieces.  I sponged Soft Suede ink over top of the petals to give them a more earthy color.

I mounted the River Rock DP onto thin frames of Soft Suede and sponged Soft Suede ink around the edges to give some definition.  I also sponged Soft Suede ink around the outside edges of the card base.  I stamped the sentiment (from Precious Butterflies set) in Soft Suede ink.

I ran a small piece of Soft Suede cardstock through my Big Shot with the Embosslits Beautiful Wings and then sponged the small butterfly with Soft Suede ink to define the embossing around the edges.
I mounted all the pieces as per the picture above, bending the wings of the butterfly upward and gluing only at the center to give it depth.


Tuesday, August 23, 2011

Fresh Apples


It's been a busy and productive day so far!!  After having coffee out on the deck this morning, I made a nice breakfast for Gord and I.  Then I called my SIL Moe and we headed to Kitchen Therapy in South Surrey.  They have some beautiful things!  We stopped at the Celtic Times Pub for lunch and then on to a Cakes & Pastry shop before heading home.  Before leaving for shopping this morning, I started my card for today's color challenge (C337) - Real Red, Night of Navy and Daffodil Delight.  All very strong colors!  I decided to tone them down by watercoloring my image.  I finished assembling my card when I got home.  Now on to making dinner --- Evan will be stopping by on his way home to pick some up for him and Nikki.  Tonight's menu is Sweet & Sour Chicken, Basmati Rice, Coleslaw with home-made dressing, and of course, the Pumpkin Ice Cream Pie that I made yesterday.  Back to the details of the card ...

"Fresh Apples"


Stamps:  Countryside (SU!)
Paper:  Real Red, Night of Navy (SU!); watercolor paper
Ink:  Basic Black, Night of Navy; Re-inkers:  Real Red, Night of Navy, Daffodil Delight, Sahara Sand, Early Espresso (SU!)
Accessories & Tools:  Aqua Painter, Cuttlebug "Diamond Plate" embossing folder, Nestabilities Classic Rectangles, MM distressing tool, sponges, Cherry Cobbler Baker's Twine, Night of Navy mini brad, sticky strips, adhesives and dimensionals

* * * * *

I stamped the image in Basic Black ink onto watercolor paper.  I used the re-inkers and an Aqua Painter to add the ink to the image.  I combine the Daffodil Delight and Night of Navy re-inkers to make the green for the grass - so I only used the challenge colors plus neutrals.

I ran a piece of Real Red cardstock through my Big Shot with the Nestabilities Classic Rectangle and then trimmed to create a thin, 1/4" frame for the main image.  I used sticky strips to adhere it to the watercolor paper.

I ran a large piece of Night of Navy cardstock through my Big Shot with the Cuttlebug "Diamond Plate" embossing folder.  I used Making Memories distressing tool to distress the edges.

I sponged Night of Navy ink around the edges of the Real Red frame and the Real Red card base.  I wrapped Cherry Cobbler Baker's Twine around the main framed image several times and tied a knot.  I secured the twine to the image using a mini brad.

I mounted all the pieces as shown, popping up both the embossed Night of Navy background AND the main image.


Monday, August 22, 2011

Hot, hot, hot!

I was busy in the kitchen today and am including both of today's recipes in the Baking section (see top left hand column).  Red Pepper Jelly and Pumpkin Ice Cream Pie.


____________________ 

I managed to find time this afternoon to do another card for today's "Hot, hot, hot" challenge.
                                     
"Hot Sand"


Stamps:  Sunny Fun (SU!); feet (unknown)
Paper:  Sahara Sand, Marina Mist, Whisper White, Soft Suede (SU!); red polka-dot
Ink:  Sahara Sand, Marina Mist, Bashful Blue, Daffodil Delight, Pumpkin Pie, Early Espresso; Stampin' Write markers:  Real Red, Daffodil Delight (SU!)
Accessories & Tools:  white gel pen, sponges, post-it not masks, 1 3/8" circle punch, computer-generated umbrella template, glue dots and adhesives

* * * * *

I masked the water and sky and sponged Sahara Sand ink for the sand.  I removed the mask for the water and place a mask over the sand and sponged Marina Mist for the water.  I removed all masks, replaced the mask for the water and added a mask for the sun.  I lightly sponged Bashful Blue for the sky.  I removed the sun mask and added a mask around the sun; I sponged Daffodil Delight and Pumpkin Pie for the sun.

I added footprints in the sand using Sahara Sand ink.  I added ripples in the water using the white gel pen.
I cut out the umbrella template and then used it to cut two pieces for the umbrella top.  I cut a thin sliver of Soft Suede to use as the pole.  I layered the two pieces of umbrella top with the pole in-between, using glue dots to adhere.

I stamped the flip-flops in Early Espresso ink and colored in with Real Red and Daffodil Delight inks and cut them out.

I mounted all the pieces as shown above.
____________________ 

Had a great weekend!  Visited with my mom on Saturday - always a good time!!  And on Sunday, went to Fran's house and helped her show her friends how to stamp.  They did so well!!  I left before the end, but I heard they took home four beautiful and fun cards to use.  I really enjoyed meeting Barb, Lonnie and Louise.  And, of course, we managed to find time to have a delicious lunch!!  Thanks Fran for having me over - lots of fun!
Today I'm keeping busy.  I've made one batch of Red Pepper Jelly so far and hope to make another later this afternoon.  Also planning on making dessert for tomorrow's dinner - Pumpkin Ice Cream Pie - yu-ummm!  I'll post the recipe once the pie is made.  Such a delicious treat for a hot day.

And I made a card for today's SCS Clean & Simple Challenge (CAS132) "Hot, hot, hot!".  Hope you like.

"Hot & Steamy Thank you"


Stamps:  Baroque Motifs (SU!)
Ink:  Cherry Cobbler (SU!); sentiment was computer-generated
Paper:  Cherry Cobbler, Whisper White (SU!)
Accessories & Tools:  Ornament punch, black hemp twine, Sizzix "Scribbles Swirls" Sizzlit, red button, silver stickles, adhesives, glue, glue dots and dimensionals

* * * * *

I stamped a piece of Whisper White cardstock with the large Baroque Motifs Stamp in Cherry Cobbler ink.  I punched out the stamped image with the ornament punch and then cut of the end.  I used the Cherry Cobbler Stampin' Write marker to outline the cup.  I used the Scribble Swirls die-cut to cut out Cherry Cobbler cardstock and then glued one of the pieces onto the cup as the handle.

I printed off the sentiment from the computer onto Whisper White cardstock.  Silver stickles were added for the "steam" coming from the cup.  I used dimensionals to adhere the cup just under the steam and then framed the whole panel in Cherry Cobbler cardstock.  I tied black hemp twine around the bottom and tied a knot which is tacked down to the card with a glue dot.  I added the red button on top of the knot, again using a glue dot to hold it in place.

I mounted the main image panel onto the white card base, popping it up with dimensionals to add depth.


Friday, August 19, 2011

Embossed Rose


Friday's "Free For All" Challenge is "Embossing Central" - use an embossing folder to create your main focal point.  Right away I thought of the Manhattan Flower embossing folder from Sizzix.  It's a beautiful image and I decided to use re-inkers to watercolour this card.  These challenges make me think of using supplies in a whole different way.  It's also a great way to flex your artistic muscle :)

I'm definitely obsessed with card making ... and now I'm finding it hard to wait until each day comes with a new challenge.  The challenges are usually posted late the night before and now I'm checking every half hour in the evening to see if they are there. :)  Last night at 10 pm I saw today's challenge and actually did the watercolouring on the pieces right then.  I left them to dry overnight before making my card this morning.  Trouble is ... it's only about 10am and I'm finished card-making for the day??!!  I have the feeling I'll do some experimenting this afternoon or maybe make another card - it's all good.  Hope you like.

"Embossed Rose"


Paper:  Always Artichoke, Whisper White; watercolor paper
Ink:  Certainly Celery; Re-inkers:  Tangerine Tango, Regal Rose, Always Artichoke; Stampin' Write marker:  Regal Rose
Accessories & Tools:  Sizzix "Manhattan Flower" embossing folder, Aqua Painter, mister, sponges, Sizzix "Leaves" die-cut, sticky strips, adhesives and dimensionals

* * * * *

I used watercolor paper to emboss the Manhattan Flower and then cut it out.  I also used watercolor paper for the two stems of leaves cut from the Sizzix die-cut.  I placed the watercolor pieces (one at a time) on paper towel and misted generously with water.  I used my Aqua Painter to pick up re-inker and drop it onto the saturated watercolor paper.  I kept misting more water, blotting, and adding more re-inker until I was happy with the image.  After all pieces were done, I left them to dry overnight ... it was getting late and I needed sleep!!
Once all the pieces
were dry, I liked the look, but thought it could use just a touch more color, so I lightly sponged Always Artichoke ink on the leaves and both Tangerine Tango and Regal Rose inks on the rose.
I lightly sponged Certainly Celery onto the Whisper White background paper.

I mounted all the pieces as shown in the picture above, popping up the rose with dimensionals to add depth.


Thursday, August 18, 2011

Versamark Florets


Today's "Ways To Use It" challenge from SCS is "Versamark".  Easy for me because I use Versamark a lot in my cards.  I used Cherry Cobbler ink for the sentiment only, everything else on the card is done in Versamark.  Again I used the Fabulous Florets stamps set - and it's just that ... FABULOUS!!  I noticed when posting this card that it's the fourth time this month that I've used this stamp set ... I need to let go :)
Hope you like.

"Versamark Florets"


Stamps:  Fabulous Florets, vine wheel (retired - can't remember the name) - SU!
Paper:  Bazzill White; Always Artichoke, Cherry Cobbler (SU!)
Ink:  Versamark, Cherry Cobbler
Accessories & Tools:  Clear embossing powder, white embossing powder, heat tool, white gel pen, adhesives, glue dots and dimensionals

* * * * *

I inked the vine wheel stamp with Versamark and rolled it over the Always Artichoke cardstock (two passes).  I mounted this background paper onto a piece of Cherry Cobbler cardstock that is 1/4" wider.  The whole panel was then mounted onto the card front of Bazzill white (I used Cherry Cobbler cardstock as the card base but you can't see it ... I find SU!'s cardstock very sturdy and they make the best card bases).

I inked the leaf sprig from the Fabulous Florets stamp set in Versamark and stamped onto Always Artichoke cardstock.  I embossed the image in clear and heat set it to make it darker.  I outlined the image with a white gel pen and then cut it out.

I inked the blossom from the Fabulous Florets stamp set with Versamark and stamped it twice onto Cherry Cobbler cardstock.  I embossed both images with white, heat set them and cut them out.

I stamped the sentiment in Cherry Cobbler ink onto Bazzill white cardstock and mounted it onto a frame of Cherry Cobbler cardstock.

I mounted all the pieces as shown in the picture above, popping up the leaf sprig and sentiment with dimensionals.  The blossoms were attached using glue dots.


Wednesday, August 17, 2011

Crackled Ginger Jar


Another quiet day at home.  Lots of time to experiment in my art studio - yah!!  I made another crackle die-cut piece today (well, actually I started it yesterday and finished it today).  I'm going to keep experimenting ... I'm hoping that I can use my heat tool or maybe a hair dryer to speed up the drying process because waiting is the hardest part with this technique!! :)

Today's card is for the sketch challenge at SCS.  I did an Asian-themed card and I just love how the ginger jar turned out.  I found the image on Google, downloaded it, resized it and printed it off.  I cut it out and used it as a template for my cardstock.  It worked really well.  Hope you like.

"Ginger Jar"


Stamps:  Of the Earth & Just Believe (SU!); For You (Rubber-Art Stamps)
Paper:  Basic Black, Soft Suede, Cherry Cobbler (SU!)
Ink:  Basic Black, Soft Suede, River Rock, Cherry Cobbler, Always Artichoke
Accessories & Tools:  Dreamweaver Matte Black embossing paste & Crackle embossing paste (2-step), palette knife, sponges, Cuttlebug "Floral Screen" embossing folder, medium oval punch, temporary adhesive, sticky strips and dimensionals

* * * * *

I printed off the image that I found on the internet and cut it out to use as a template.  I traced it onto Basic Black cardstock and cut it out.  I used lots of temporary adhesive on the back to stick my ginger jar pieces onto a scrap piece of paper and then used the palette knife to slather on a coat of Matte Black embossing paste.  Once it had set up a little (not completely dry), I removed it from the scrap paper and let it dry completely (approx. one hour).  I again used temporary adhesive to stick the coated ginger jar pieces onto an new scrap piece of paper and used the palette knife to slather on a thin coat of Crackle embossing paste.  This time I removed the pieces right away from the scrap paper and let them dry (approx. one hour).  Once the pieces were dry, they had curled a little, so I straightened them out with my fingers and then placed them under a heavy book and left them overnight. 

I then sponged the jar first with River Rock ink and then around the outside edges with Soft Suede ink.  I inked the flower stem with Stampin' Write markers Cherry Cobbler and Always Artichoke and stamped on top of the jar.  The crackle prevents the stamp from being really clear, so I went over the image with my markers to fill in any gaps.  I inked the leaf sprig from Just Believe with Always Artichoke ink and stamped it three times along the left side of the jar (again, filling any gaps with the marker).  I used sticky strips to adhere the jar pieces to the background Basic Black cardstock.

I ran the Soft Suede cardstock through my Big Shot with the Cuttlebug Floral Screen embossing folder and then sponged lightly with Soft Suede ink to highlight the embossing.  I also sponged more Soft Suede ink around the outside edges of the piece and also around the outside of the medium oval which has been stamped with the sentiment in Basic Black ink.  I sponged the Cherry Cobbler cardstock strip with Cherry Cobbler ink (dark around the outside edges and randomly on the piece).

I mounted all the pieces as shown in the picture above, popping up the main panel with dimensionals to add depth.


Tuesday, August 16, 2011

Colorful Trendy Trees


Today I'm staying home, catching up on all the laundry that has piled up (my life is SO exciting!!).  Evan is stopping by on his way home to pick up dinner for him and Nikki, so I'm working on making something special for them (and us!).  Tonight's menu, Spaghetti with Meat & Roasted Veggie sauce, garlic bread ... and for dessert (my favorite part!!), Chocolate Mocha Pie (picture below and recipe added to the "Baking with Loll" link in top left-hand column).


____________________

I recently bought the "Trendy Trees" stamp set from SU! and got to use it today.  I CASED my own layout from last month, but changed it up a little bit, using some beautiful (but unfortunately, retired DP from SU! ... Haiku).  Just a quick and easy card that was fun to make.

"Colorful Trees"


Stamps:  Trendy Trees, Happy Moments (SU!)
Paper:  Old Olive, Whisper White, Haiku DP (SU!)
Ink:  Chocolate Chip, Old Olive, Tangerine Tango, More Mustard (SU!)
Accessories & Tools:  Stamp-a-ma-jig, pencil, ruler, eraser, adhesives and dimensionals

* * * * *
 
I used a pencil and ruler to lightly draw across the Whisper White cardstock, 1/2" up from the bottom.  I then made "tick" marks with the pencil at the middle and 3/4" in from both sides.  These pencil marks are used to line up my trees.

I used the Stamp-a-ma-jig to stamp the three tree trunks in Chocolate Chip ink.  I used the Stamp-a-ma-jig again to line up the leaves of the tree, stamping in Old Olive, Tangerine Tango and More Mustard inks.  Once everything was dry, I carefully erased all the pencil marks.

I inked the sentiment stamp from the Happy Moments stamp set in Old Olive and stamped below the trees, off to one side.

I mounted all the pieces shown in the picture above, popping up the main panel with dimensionals to add depth.  Easy, fun and fast card to make that uses all SU! products.


Monday, August 15, 2011

Crackled Maple Leaf


Today I hung out for a few hours with my mom ... always a great way to spend some time.  We went to the grocery store, the paint store, and then stopped at a veggie market before heading back to her place for lunch.  Had a nice relaxing lunch and then I headed home.  I've been revamping my website this weekend --- lots and lots of hours on the computer :( ... but I was almost finished, so came home and finished up before making a card.  Gord and Jer are out dirt-biking today, so I have the house to myself this afternoon.  It's so quiet :)

I bought supplies the other day to try out a new technique (new to me!) --- Paste Embossed images.  You apply a paste over a brass stencil, remove and let the paste dry and then sponge with ink once dry.  You end up with a raised image on your card - so pretty!  I've tried a few times now, but even though I'm just learning, I'm getting a little frustrated.  But, I will try again until I figure it out ...

I also bought a crackle finish that goes over top of the paste - it's such a fantastic finish.  So since I was having trouble with the stencils, I decided to use my new Nestabilities Maple Leaf to die-cut an image.  I spread it with the embossing paste, let it dry, added the crackle finish on top, let it dry and then sponged some color.  The leaf turned out really cool!  Definitely looks like a late fall leaf that has been off the tree for a while.  Today's CAS challenge was to use a partial image ... so I inked my Fabulous Florets leaf stamp and added it on top of the maple leaf.  I'm not sure what I think of it yet ... it's growing on me.  And I had some trouble figuring out how to use the image on a card.  All I know is that after having to wait and wait and wait for this thing to dry ... it WAS being used.

So, let's say this is an "artistic adventure" and leave it at that.

"Crackled Maple Leaf"


Stamps:  Fabulous Florets (SU!)
Paper:  Soft Suede, Early Espresso, Basic Black (SU!)
Ink:  More Mustard, Pumpkin Pie, Cajun Craze, Early Espresso, Soft Suede (SU!)
Accessories & Tools:  Nestabilities Maple Leaf, Matte Black embossing paste, Crackle embossing paste, palette knife, sponges, hemp twine, temporary adhesive and dimensionals
 
* * * * *

I used Basic Black cardstock to cut out the maple leaf die-cut with my Big Shot.  I used temporary adhesive to stick it down on some scrap paper and then, using the palette knife, covered the image with Matte Black embossing paste (Dreamweaver).  I let it dry for several hours.  I then used the palette knife again to apply a thin coat of Crackle embossing paste.  I let it dry overnight.  The image curled up on me, but I flattened it out and placed it under a heavy book for a couple of hours and it was good to go!

I sponged the entire leaf with More Mustard ink.  I then sponged Pumpkin Pie ink over top, making sure to leave the center of the leaf just the More Mustard color.  I sponged Cajun Craze ink over top, just around the outside edges.  Finally I sponged Early Espresso on the edges only.  I inked the Fabulous Florets leaf sprig with Early Espresso ink and stamped it twice on the left hand side of the maple leaf
I ripped a piece of Early Espresso cardstock and then randomly sponged the same color ink over the cardstock.  I added more sponging along the edges.  I took three pieces of hemp twine and wrapped it around the panel and tied it at the bottom in a knot. 

I sponged the card base of Soft Suede with the same color ink to give it a distressed look as well.

I mounted all the pieces as shown in the picture above, popping up the main panel and the maple leaf (so double-popped) with dimensionals to add depth.


Saturday, August 13, 2011

Framed Poppies

Another beautiful day ... but the weatherman is predicting a 40% chance of showers tomorrow so I did my duty and painted my front stairs today - done!!  Hopefully this is the last time.  Hubby and I decided it was time to replace them and we've been looking into different materials.  Looks like we'll replace them next spring with treads that are a man-made material that looks like wood but doesn't require painting - SOLD!!!  The less painting to do, the better!!

Looks like I'm off the hook (no pun intended!) for cooking dinner tonight too as my SIL just dropped off a fresh sockeye salmon.  Gord will be heating up the grill and Cedar Plank Teriyaki Salmon is on the menu - yum, yum!!  Now I get a delicious dinner made for me AND more time to spend in the studio this afternoon --- win, win!

I mentioned a few days ago how I had found a great website that offers free digital images.  The artist, Beccy Muir, has generously offered her images and I downloaded her beautiful poppies a few days ago.  Today I've had time to use them ... and I ended up putting them in a frame (well, actually on top of the frame), so I'm going to post this at SCS for yesterday's challenge "Frame It Up".  I really love the distressed look, so here's another card that has a vintage feel to it.  I added scoring on both the background paper and the card base although it might be hard to see in the photo below.  Hope you like.
                  
"Framed Poppies"


Stamps:  Poppies (digital - Beccy Muir from Beccy's Place); En Francais (SU!)
Paper:  Soft Suede, Crumb Cake, Whisper White (SU!)
Ink:  Soft Suede, Old Olive, Tangerine Tango, Cajun Craze; Stampin' Write Markers: Old Olive, Cajun Craze
Accessories & Tools:  Scor-Pal, sponges, Nestabilities Classic Ovals, sticky strips and dimensionals
 
* * * * *

I printed off the poppies image onto Whisper White Cardstock.  I used sponges to sponge the poppies first with Tangerine Tango ink and then again in the center and outer edges with Cajun Craze ink.  I used the Cajun Craze Stampin' Write marker to add more color to the poppy center.

I sponged Old Olive ink on to the leaves and pod, adding it darker near the edges.  I used the Old Olive Stampin' Write marker to ink the stems.  I cut the image out.

I stamped Crumb Cake cardstock in Soft Suede ink with the En Francais stamp and then put it through my Big Shot with the largest oval from the Nestabilities set.  I ran a piece of Soft Suede cardstock through the Big Shot with the largest and third largest ovals to create the frame.  I inked the edges of the frame with Soft Suede ink to give it a aged look.  I lightly sponged Soft Suede ink randomly over the Crumb Cake oval to also age the piece.

I took the background piece of Crumb Cake and used the Scor-Pal to add vertical lines every 1/4".  I sponged the lines with Soft Suede ink to give them more definition and also sponged around the outside edges of the piece to give it an aged look.

I used the Scor-Pal to add horizontal line to the top of the front card base and also vertical lines to the bottom of the front card base.  I sponged Soft Suede ink overtop to highlight the scoring and around the outside edge to give it a distressed look.

I mounted all the pieces as shown in the picture above, popping up the oval frame with dimensionals and also adding dimensionals to the poppies so that they are "double" popped.

Friday, August 12, 2011

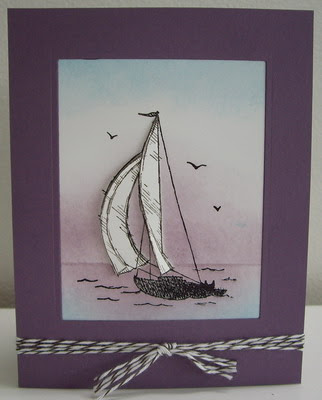
Sail Away


Another beautiful day here on the Westcoast ... sunny, warm and breezy.  My friend Patt was on a sewing course in my neighborhood, so she stopped by afterwards and we had lunch and a nice visit.  We worked together for many years and had our coffee and lunch breaks together.  I miss seeing her everyday!!
The plan was to paint my front stairs after she left, but I decided to participate in today's "Free For All" Challenge as SCS instead ... is wasn't a very hard decision! :)

Today it's "Frame it Up" and so I used my Spellbinders Nestabilities to make a frame for my sail boat.  I just got this stamp yesterday from SU! and couldn't wait to use it!!  I decided to give the sail boat some depth by layering the sails (paper tole).   Hope you like.

"Sail Away"


Stamps:  Sail Away (SU!)
Paper:  Perfect Plum, Whisper White (SU!)
Ink:  Marina Mist, Perfect Plum, Craft Black
Accessories & Tools:  Big Shot, Nestabilities Classic Rectangles (Spellbinders), clear embossing powder, sponges, post-it note for masking, Early Espresso baker's twine, glue dots and sticky strips

* * * * *

I stamped the image onto Whisper White cardstock and then heat embossed in clear.  I did two extra stampings and embossed them (to be cut out later for the sails).

I sponged Marina Mist ink at the bottom and top of the main image.  I added a post-it note to mask above the horizon line and sponged Perfect Plum ink just below the mask.  I removed the mask and replaced it, this time covering below the horizon line and then sponged Perfect Plum ink above the mask.
I cut out the two extra sets of sails and layered on top of the main image (so three layers in all).  I rolled up glue dots with my fingers to create a very small dimensional and used them to attached the sails.  This is called paper tole.

I ran a large piece of Perfect Plum cardstock through my Big Shot with the Nestabilities Classic Rectangles Large to create my frame.  I mounted the frame on top of the main image using sticky strips to adhere.
I mounted the framed image onto a card base of Perfect Plum, tied four strands of Early Espresso baker's twine around the bottom and tied a knot in the middle.


Thursday, August 11, 2011

Fun in the Sun


Had a great day today!!  Morning coffee on the deck (as usual) ... then off shopping in Coquitlam.  First stop - Cherish the Thought Scrapbooking store - my first time there.  The owner was great and managed to score the Spellbinder's Maple Leaf Nestabilities that I'd been wanting.  I also was interested in the owner's Embossing Paste technique that she has perfected.  She had sent me an email a few months ago with the instructions, but I hadn't had a chance to get to her store to pick up the supplies.  Today was the day!!

I'm really excited about trying this new technique, but it has to wait until tomorrow as I had other commitments for today :(

Second stop - Lee Valley - picked up a bunch of things for the garden (hoses, reel, connectors, etc.).  Then hubby and I stopped at the Dublin Castle Pub for lunch - it was a nice treat.  Then home to make some more Sun-dried Tomato Pesto - I now have enough to last me until next year and even some to give away!
I did manage to find time to participate in today's "Ways to Use it" challenge on SCS ... "What's Hot??!!"  I just got my latest SU! order and in it was the Sunny Fun stamp set.  So I decided to use it today for the challenge.  Unfortunately, I had this beautiful sun over top of the kids in the water, but the proportions of the card were all wrong so it got cut off.  You'll just have to imagine that it's sunny and hot!! Hope you like.

"Fun in the Sun"


Stamps:  Sunny Fun (SU!)
Paper:  Daffodil Delight, Tempting Turquoise, Whisper White (SU!)
Ink:  Tempting Turquoise, Early Espresso; Stampin' Write markers: Sahara Sand, Garden Green, Regal Rose, Pacific Point, Pumpkin Pie, So Saffron, River Rock, Soft Suede, Crumb Cake (SU!)
Accessories & Tools:  Cuttlebug "Tiny Bubbles" embossing folder, sponges, post-it note for masking

* * * * *

I stamped the main image onto Whisper White cardstock and then stamped it again onto a post-it note (to use for the mask).  I cut out the post-it note along the water line and then masked the kids above.  I used a sponge to add Temping Turquoise ink for the water.

I colored in the kids with the Stampin' Write markers and stamped the sentiment in Early Espresso ink.
I ran the large background piece of Tempting Turquoise through my Big Shot with the Tiny Bubbles embossing folder - love it!!

I mounted all the pieces as shown in the picture, popping up the main panel with dimensionals to add depth.

Wednesday, August 10, 2011

Razzleberry Floret


Today I'm taking a "rest" day and just playing in the studio.  I'm been on my feet a lot the past couple of days and was planning on making some more Pesto today to freeze, but have decided I need a day off :)

Here's my card for today's sketch challenge at Splitcoaststampers.  The great thing about the sketch challenges is usually it involves several layers and I usually am more of a "clean and simple" card-maker, so it helps me to use up some of my beautiful DP (designer papers) that I'm had hanging around for a while.  The DP used in my card today is Cottage Wall and it's retired.  It is one of my favorite SU! papers and I bought several packages of it when it was available a couple of years ago.  Everything used in my card today is from SU!  Hope you like.

"Razzleberry Floret"


Stamps:  Fabulous Florets (SU!)
Papers:  Rich Razzleberry, Rich Razzleberry DP, Cottage Wall, Whisper White (SU!)
Ink:  Rich Razzleberry, Old Olive, Versamark (SU!)
Accessories & Tools:  Ice embossing powder, heat tool, 5/8" Rich Razzleberry satin ribbon, sticky strips and dimensionals

* * * * *

I stamped the leaves in Old Olive ink onto Whisper White cardstock.  I stamped the blossom onto Whisper White cardstock in Rich Razzleberry ink.  After it dried, I coated it with Versamark and ice embossing powder and heat set it.  I find embossing powder sticks better to Versamark so I get better coverage than embossing the image directly.  I cut out the flower and adhered it on top of the leaves, popping it up with dimensionals.

I added a thin frame of Rich Razzleberry to the stamped image and also the satin ribbon and bow.
I mounted all the pieces as shown in the picture above, popping up the main panel with dimensionals to add depth.

Tuesday, August 09, 2011

Basket of Apples digital stamp


I'm heading out to Westham Island Herb Farm in a few minutes to pick up some blueberries and more basil.  I'm making glazed blueberry pies again today ... have to take advantage of the local blueberry season!!  And I'm going to make more Sun-dried Tomato Pesto tomorrow so will need more basil.
But before heading out, I wanted to participate in today's SCS Color Challenge - kraft, any yellow, any red ... and the dessert is leaves.  Today I'm using a digital image that I got from Beccy's Place (http://beccysplace.blogspot.com/).  Beccy is an amazing artist who generously shares her artwork for free.  Check out her blogspot - it's amazing!!  And thanks Beccy for this adorable digital image that I used in my card below!  Hope you like.

"Basket of Apples"

 
Stamps:  Apple Basket (Beccy's Place); happy day sentiment (Stampendous) Paper:  Crumb Cake, Cherry Cobbler, Whisper White (SU!); yellow gingham
Ink:  Stampin' Write markers:  Cherry Cobbler, So Saffron, Crumb Cake, Soft Suede, Early Espresso, Old Olive, Marina Mist, More Mustard Accessories & Tools:  sponges, adhesives and dimensionals

* * * * *

I printed the digital image onto Whisper White cardstock and then colored it in with the Stampin' Write markers.  I used small make-up sponges to add some dark shadows to the basket and bow.  I carefully cut out the image ... it took a bit of time :)

I mounted all the pieces as shown in the picture above, popping up the basket with dimensionals to add depth.