Wednesday, January 29, 2014

Copper Birthday


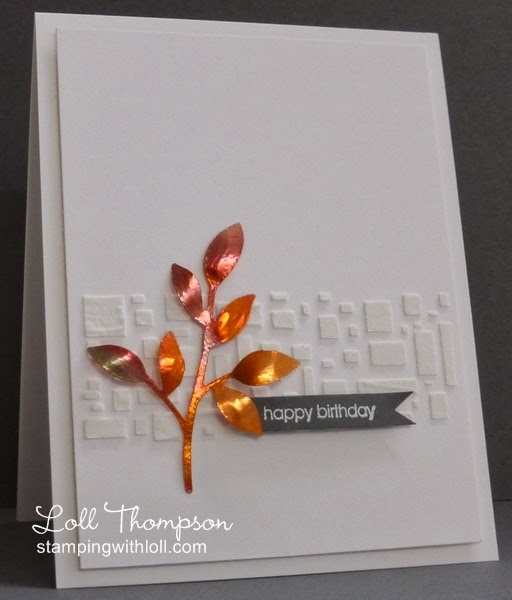
Hi everyone.  Back with another stenciled card using embossing paste - can't get enough of this technique! :)  Today I paired it with heated and die-cut copper for a masculine birthday card.

I discovered something by accident when making this.  I have very worn cutting plates for my Big Shot, and when I cut the copper, the back side took on the "design" of the cuts from my plate ... I loved the look - almost like a "hammered" metal.  I wanted that texture on the right side of my die-cut leaves, so I placed it back in my big shot, with the right side facing down on my worn cutting plate, placed the top cutting plate and ran it through.  This transferred the pattern ... and it totally flattened my sprig.  Awesome ... not only did I get the texture I wanted ... but all the sharp edges that I always worry about on my cards disappeared - a happy accident!  Then I just used my stylus and mat to add the dimension back into the leaves.

More about the card.  I masked off a strip on my stencil and filled with embossing paste.  Once dry, I mounted my copper sprig on top and added a small gray banner with an embossed sentiment.  Easy and fun card to make!

I'm entering this into the Less Is More Challenge (#156 - sketch).  Love this sketch!


Stamps:  Bitty Birthday (SU!)
Paper:  White (Neenah); Basic Gray (SU!)
Ink:  Versamark
Accessories & Tools:  Big Shot, Little Leaves die (Sizzix), Mini Cubist stencil (Crafter's Workshop), copper metal sheet .005 thickness (K&S Precision Metals), mini torch, white embossing powder, heat tool


Tuesday, January 28, 2014

Star of Wonder


Hi everyone.  Back with more homework from my stenciling class.  The class is now finished, but I have lots of technique that I haven't gotten to yet.  Today's card uses the stencil for adding embossing paste, and then covering the paste with embossing powder while it's still wet.  Once everything is dry, the embossing powder is heated until it melts.  Love the look of these raised stars for the backdrop.

I used the sketch from CAS(E) this sketch #61 for my card today (it is one of my favorites layouts and I use it A LOT!) :)


I added a large gold foil star for the focal with a star center of DP and a red rhinestone for a little color.  Some gold cording and Merry die-cut from gold foil finishes the card.  I LOVE gold!  I started using it a lot on my Christmas cards last year.

I'll be back tomorrow with more "homework".  For now, I'm in my studio playing and trying to stay warm as there are big, gaping holes in my house right now.  Our windows are being replaced.  It all started yesterday (and went very smoothly) ... so hopefully it will all be done by the end of tomorrow.  For now sweaters and more sweaters :)

Edited to add:  Just found out that this qualifiess for the Moxie Fab Challenge (Consellations:  Trendy Star Power Challenge) - thanks Bridget!


Paper:  White (Neenah); Gold Foil (SU!), Silver and Gold Collection (Bo Bunny)
Accessories & Tools:  Silhouette Cameo (for cutting my star template). embossing paste, palette knife, gold embossing powder, heat tool, Stacking star die (MFT), Merry die (Simon Says), gold cording, red rhinestone


Monday, January 27, 2014

Embossing Paste


Hi everyone.  Today I'm sharing two cards that I made yesterday with the lessons I learned at my stenciling class.  I had a lot of fun playing with the embossing paste and learned several ways to enhance the paste which I will use later.

The embossing paste is easy to use and easy to apply with my palette knife.  And while I had all the supplies handy, I thought I'd make up several different versions.  I ended up with five card fronts - two of which I have made into cards and will share with this post.

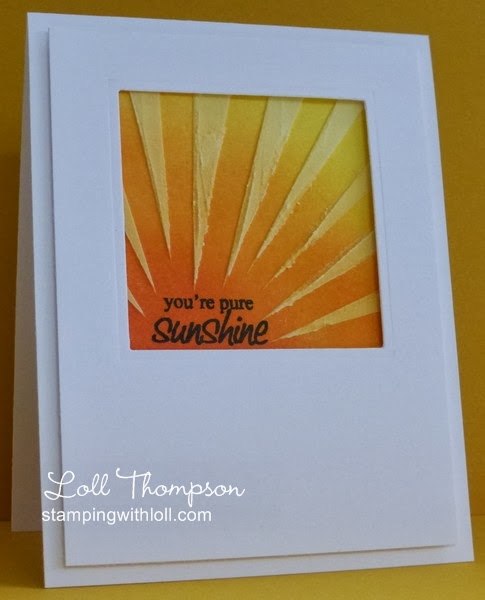
The first card (above) turned out really interesting.  As with all experimenting, you just never know what's going to happen.  I cut a sun stencil using my Silhouette Cameo - this one is perfect for embossing paste, as it is the negative.  Only every other ray is exposed on the stencil.  So I started the card by sponging a Whisper White card front using my favorite SU! "sun" colors (I love sponging!).  I taped the stencil over the sponged card front and added the embossing paste.  I thought it would look great with the white embossing paste rays.  Little did I know that the paste would absorb the color from my sponging - I LOVE how it turned out.  The paste rays ended up being a pale yellow shade - perfect!  More learning ... :)  I see that I didn't spread the embossing paste evenly ... or maybe I jarred it when removing the stencil, so the paste rays were a little ragged - but I like the look. :)

____________________


The second card is a CASE of Debby Hughes' card from the class.  I just loved the look of her card.  I changed up a few things to make it my own ... but it is the same layout.  I love the white embossed strip of dots on the white card front - subtle but adds lots of texture and depth.  I did make a mistake on this card ... I was supposed to spray mist BEFORE adding the stencil and embossed paste dots, but I was so excited to start adding paste to card fronts that I forgot that step. :)   I misted afterwards and I didn't like the mist on some of the dots, so I "fixed" it by filing off the tops of the dried dots with an emery board to reveal the white underneath.  Worked pretty well.

For the spray, I mixed tempting turquoise re-inker and a few drops of Shimmer paint, plus rubbing alcohol this time instead of water in my mister - thanks for the tip Rita!! :)  Worked great!  Misted a little on my card and then used a lot on the butterfly die-cut.  I added two flourish die-cuts (the die was a gift from my friend Peggy - thanks Peggy) and mounted the butterfly on top.  I added a pearl to the center of the butterfly and three more pearls randomly on my card front.

I still have three more card fronts to work with ... later.  More lessons from today and ideas are spinning around in my head.  Off to do some playing in my studio! :)

I'm going to enter these cards in the ATS&M Challenge (#79 - CAS).


You're Pure Sunshine Card:

Stamps:  Sunny Sentiments (Amy R)
Paper:  White (Neenah); Whisper White (SU!)
Ink:  Tangerine Tango, Pumpkin Pie, Daffodil Delight, So Saffron, Black (SU!)
Accessories & Tools:  Silhouette Cameo (for cutting stencil), Big Shot, Square Nesties (Spellbinders), embossing paste, palette knife, sponges)


Hello Butterfly Card:

Stamp:  Where your Heart is (Simon Says)
Paper:  White (Neenah)
Ink:  Tempting Turquoise, Smoky Slate
Accessories & Tools:  Big Shot, Flourish # 6 (Crafty Ann), Kaleidoscope butterfly die (Memory Box), embossing paste, palette knife, Dot stencil (Crafter's Workshop), rubbing alcohol, shimmer paint, mister, pearls



Sunday, January 26, 2014

Oh Happy Day


Hi everyone.  Back with another card from my stenciling class.  I made this late yesterday, but just had time to post now.  I've been working my way through Day 3 of the course and will hopefully have some more cards to share with you either later today or tomorrow.

This is stamping within a stencil.  And this is a CASE of the beautiful card by Kristina Werner (one of the instructors).  I happened to have a splatter stencil similar to Kristina and so here's my card.  I made a couple of versions.  The first had the sentiment embossed in white and then the sponging was overtop - it looks great until I decided to add a gray shadow (same as Kristina) and it went downhill from there.  I think maybe part of my sentiment was too small lettering to add the shadow.  So I made a second version and just stamped the sentiment at the end in black - worked well.  :)  One of the other problems I encountered, was getting a clean stamping of the pattern within the splatters ... for some reason the thin ridge from the stencil caused a bit of a problem.  I took my clear stamps off the acrylic block, inked them and then pressed them down with my fingers - worked much better.  If I had one of those stamp presses ... that probably would have worked really well.

There are a couple more techniques from Day 2's lessons, but I have already moved on to Day 3 because it was the techniques I was most interested in.  Today's lessons are all about embossing paste.  I'm having so much fun experimenting!! :)  Since it is a bit messy, I decided to get a bunch of different card fronts started and I have five sitting drying right now.  Not sure how they will translate into cards yet, but excited to play some more this afternoon.

Edited to Add:  I'm entering this into the ATS&M Challenge (#79 - CAS).


Stamps:  Sunny Sentiments (Amy R); BBD3 (border stamps from Annabelle Stamps)
Paper:  White (Neenah); Whisper White (SU!)
Ink:  Daffodil Delight, Tangerine Tango, Melon Mambo, Rich Razzleberry (SU!)
Accessories & Tools:  Splatter Stencil (Crafter's Workshop), sponges


Saturday, January 25, 2014

Bee Happy


Hi everyone.  Day 2 of the stenciling course and lots of new techniques today.  I'm still working on yesterday's lessons.  This technique is to use misting with stencils.  I don't have any mists, but I do remember a long time ago, watching an SU! video about mixing up your own, so that's what I did.  In my water mister bottle, I mixed water, re-inkers and a couple of drops of shimmer paint.  I made two colors, Daffodil Delight and Real Red.

I again made my own stencil using Whisper White card stock and my Silhouette Cameo.  It all worked pretty well to get the background paper for my main panel above, but I had several failures.  I taped down my stencil onto my card stock in a couple of places and started spraying.  Unfortunately it bled on me ... so here are the two things I learned.  Add temp adhesive to the back of stencils to help keep the seal tight ... and it might be worth investing in misting sprays because maybe my home-made one was too watery (although just sticking down the stencil may have solved the problem).  Anyways, the above piece turned out and it is so shimmery in real life (hard to tell in the photo).

I stamped a bee, colored with Copics and added some dazzling diamonds to the wings and then fussy-cut.  It is popped up at the tail end of the Simon Says die-cut "happy".  And I stamped the "bee" onto a separate piece of white card stock and popped it up as well.  I backed the panel in black to tie to the black in the words and then popped the main panel up on my card front.  In the end, I'm pretty happy with this card.


Stamps:  Garden Oasis (Fiskars); Word Salad (Paper Smooches)
Paper:  Whisper White; black, white
Ink:  Black, Daffodil Delight, Real Red (SU!); Copics:  Y21
Accessories & Tools:  Silhouette Cameo (to cut stencil), Happy die (Simon Says), dazzling diamonds, black twine


Friday, January 24, 2014

Experimenting with Stencils


Hi everyone.  Day 1 of my stenciling course and I've made a couple of cards to share.  Just to let you know, this is all new to me, so I am experimenting and the results are definitely from a beginner! :)  Four different ways to use stencils were covered off in the lessons and this is the first one.  I've made two samples, again experimenting with how things look.  I rarely use stencils and I rarely use vellum, so this first card was a little challenging for me, but fun at the same time.  I used my Cameo to cut out a stencil of snowflakes.  I don't have any plastic to use for my stencils yet, so I cut it from Whisper White card stock ... didn't work too well as there are lots of edges that pulled away as I was sponging ... I think the design is not really meant to be a stencil since there are so many edges - but I do love the look of the sponging.  I used very soft blues to sponge the snowflakes ... sky blue first and then a darker turquoise for the upper right corner.

I cut my vellum tag and stamped and heat embossed in white - so difficult to photograph.  I have a close up below and hopefully you can see more detail.  The vellum on top allows the sponging to show through, so nothing is being covered up.  Fabulous design.  Forgot to mention, I complete copied Debby Hughes design for this card, but changed up the pattern, colors and the occasion of the card.  I also didn't have any white twine that I could use for the tag and do didn't have the long, wispy ends that are so pretty and feminine on Debby's original.  Guess I need to go buy some more supplies :)


FYI, here's the logo and link for the stenciling course if you're interested.  It's four days and if you don't have time to participate now, no problem as the materials, supplies list, videos and instructions are archived and ready for when you are!


As I mentioned above, I made two cards ... the second is exactly the same stencil, design and sentiment.  I changed up the colors of ink (darker blues) and embossed the sentiment in dark blue.  Totally different look ... but I definitely like the look of the white embossing better.  Always fun to experiment, though ... I've learned lots today. :)


Off to do a little painting in the house ... window guy called this morning and the install has been moved up to this coming Monday so I need to get to work! :)

Hoping to have some time later today to work on one of the other lessons from today's class.  As I mentioned above, there were four lessons in Day 1, so this course is going to keep me busy for a while! :)


Stamps:  Merry Little Christmas (SU!)
Paper:  White, Whisper White, Vellum
Ink:  Sky blue, Tempting Turquoise, Pacific Point (SU!)
Accessories & Tools:  Stencil made with my Silhouette Cameo, sponges, white embossing powder, heat tool, 1/8" white ribbon, three silver sequins


Thursday, January 23, 2014

Tribute to Charlene


Hi everyone.  Today's card is to honor a stamping friend, Charlene Merrick (LilLuvsstampin' on SCS), who lost her battle with cancer at the beginning of this year.  Charlene was a talented crafter and an inspiration to all that knew her.  I was lucky to have met her during our time together on the SCS CAS design team, back in 2011.  Yesterday would have been Charlene's birthday, so her fellow DT members at CCEE arranged a tribute to Charlene on their blog.  I first read about it on Benzi's blog, and wanted to join in.  I have had the card below in my favorites folder for a couple of years, so thought it would be good to CASE it for the tribute.

Here's Charlene's card that I CASED (copy and share everything):


My plan is to make Christmas cards all year long ... hopefully at least one a week, so I'm keeping that going with this card.  I haven't been making many cards lately as my mojo has gone on vacation and hasn't returned yet.  I'm hoping to see it soon! :)  I'm hoping that CASE'ing this wonderful card of Charlene's will kickstart my creative juices again.

Tomorrow I'm starting my very first On-line Class ... this one is on stenciling.  When I saw the notice, I was intrigued because apparently there are 16 different ways in which to use a stencil that will be covered in the four days of classes - who knew??!!  :0

I have several stencils in my studio that have been collecting dust for a while now.  Looking forward to learning something new ... and a new way to use something that I've had for ages.

I don't know if I mentioned earlier, but hubby gave me a Silhouette Cameo for Christmas.  For those who haven't heard of it before, it is a cutting machine for digital files.  I've been playing a little with it, but there is a big learning curve ... for me that is :)  I have managed to cut some stencils (on card stock), but hope to get out to pick up some heavy plastic sheets (transparencies), as I think they will work well at stencils.  So this on-line class is perfect timing.  I'll keep you posted.


Stamps:  Traditional Christmas Sentiments (Pink Petticoat)
Paper:  White, Cherry Cobbler; Seasons of Style DP, Holiday Treasures DP-retired (SU!)
Accessories & Tools:  Big Shot, Holly & Berry Die (C.C. Designs), white gel pen


Monday, January 20, 2014

Welcome Little One ...


Hi everyone.  I made this as an invitation to a baby shower I am having for my DDIL and DGS in a few weeks.  I love this sweet image from Pink Petticoat and it comes with the sentiment as well.

I paper pieced the elephant, ears, and hair bow.  I colored the flower with Copics and added a small rhinestone for some shine.

I'm entering this into the Less Is More Challenge (#155 - new baby).

Still working away on reorganizing my studio ... didn't realize how out of hand it had gotten  :)

I'm also doing a little painting today ... window sills - not very glamorous.  We are getting new windows in a few weeks and I wanted to give the frames and sills a fresh coat before the install and then do any touch-ups as needed afterwards.  Less chance of me slopping paint on the new windows doing it this way :)

Hope you're all having a great start to your week!


Stamps:  Baby Elephant (Pink Petticoat)
Paper:  White, Tempting Turquoise polka-dot; yellow gingham (making memories)
Ink:  Black, Copics:  Y21, G43
Accessories & Tools:  small blue rhinestone


Saturday, January 18, 2014

You're Purrr-fect! :)


Hi everyone.  Today is the latest challenge for Addicted to CAS.  This challenge is being run by the very talented Shana (Stress Free Stamping with Shana) ... and she picked this fun word:


Prize:  3 digi sets
(please follow the rules to be eligible to win)

____________________


Love this code word ... there are so many ways to interpret.  I decided that I would create my card with new goodies that I received for Christmas - so fun!

I stamped the cat onto gray card stock, colored in his stripes with a darker gray and then fussy-cut.  I sponged more gray around the outside edges to give him some depth.

Keeping up with my plan to add more patterned paper to my cards this year, I added a strip of DP at bottom and popped my cat on top.  I die-cut a word bubble, stamped the sentiment and then ran a marker along the edge to give it more oomph.  I added a double strand and knot of twine and a heart die-cut from the same patterned paper as the strip on the bottom.  Fun and easy card to make! :)

I hope you'll play along with us this challenge ... it's open for two weeks so you have lots of time to join in.

Please check out the ATCAS - New challenge and see the amazing cards from the rest of the DT.


Stamps:  Chubby Chums (Paper Smooches)
Paper:  White, Smoky Slate (SU!); Raspberry Pop DP (Walmart)
Ink:  Black, Smoky Slate, Basic Gray (SU!)
Accessories & Tools:  Big Shot, Small Heart dies (Simon Says), Word Bubbles die (Paper Smooches), Pink Sorbet twine (The twinery)


Wednesday, January 15, 2014

Smiling Snowman


Hi everyone.  I bought this sweet digital image from Sweet 'n Sassy and paired it with a digital sentiment from Pink Petticoat .  Just bought a huge stack of Christmas papers ... five packs from Etsy and four more packs from Simon Says.  I'm gearing up to make lots of Christmas cards and tags this year and I really want to start using more patterned papers.  Today's card uses two ... one for the background (falling snow) and a second for the paper pieced scarf that the snowman is wearing.  I had a lot of fun making this card.

I sponged blue ink around the edges of the snowman to add interest and also coated all edges with dazzling diamonds (along with the top of the snow bank) ... unfortunately, the glitter doesn't really show up in the photograph - but it looks good in real life :)

I've been busy for several days and have missed making cards.  My studio is partially emptied as I continue to try to sort through and downsize.  Have lots of bits and pieces that I've been hanging on to for years and it's time to let them go!

Hubby and I went to Ikea yesterday and bought three bookcases that are going to be my main storage in the closet of my studio.  Should really help to get me more organized - can't wait to get them assembled and in place. :)

Off to visit DDIL and DGS tomorrow.  Looking forward to cuddling with Cooper. :)


____________________


Note to Joyce across the Pond:  Hi Joyce, got your lovely email yesterday - thank you so much!!  Tried to email you back, but the email address didn't work.  Wanted to let you know the embossing folder I used for Framed Flowers card is Designer Frames from Stampin' Up!  If you have any other questions, please email me  - click on the "Email Me" button at the top of the right-hand column.  Thanks!!

____________________


I'm entering this card into the following challenges:

Sparkle Creations Weekly Christmas Card challenge - #7 - polka-dots
Crafty Hazelnut's Christmas challenge #159 - winter weather


Stamps:  Smiley Snowman (Sweet 'n Sassy Stamps); Snow Sentiments (Pink Petticoat)
Paper:  White, OTC - Winter boy, 'Tis the Season (My Mind's Eye)
Ink:  Bashful Blue, Pumpkin Pie (SU!)
Accessories & Tools:  Dazzling Diamonds, sponge


Friday, January 10, 2014

Bokeh Heart


Hi everyone.  I don't know how many of you read the title and wondered why I would make a broken heart card :)  Nope, it's bokeh (pronounced BOH-KAY) ... and it's something new for me.  This is a technique that is used by photographers.  I saw a tutorial by Lydia on Splitcoaststampers and wanted to give it a try.

Here's an example of bokeh in photography ... a filter is used to blur lights ...


Lots of fun and easy to do ... you just ink up round sponges (I used the small sponge daubers for this card) and randomly stamp them to create a background.  I thought this was perfect for the current challenge at CAS-ology.


This is also a CASE of a card by Irene (DandI93 at Splitcoaststampers).  I LOVE Irene's design and it inspired me to make the card today.  Thanks Irene! :)

I die-cut the heart and placed my sponged paper in-behind.  I stamped the "LOVE" and then colored in the lettering with Melon Mambo ink.  The SU! inks are much darker when used to color on white paper that is not Whisper White, so I was disappointed about how dark the sentiment ended up.  I decided to coat it with dazzling diamonds and it did lighten it a bit and made it sparkly - all good! :)

Another cloudy day here with lots of rain forecasted for this afternoon and evening (and the next day, and the next day .... you get the idea).  Hubby and I did all our errands this morning (six places) and it only took an hour - so proud of us ... now we have the rest of the day to relax, play, etc.  Friday is sandwich night at our house so pretty easy dinner which gives me even more time to play this afternoon.  Gotta love that! :)

Hope you're all having a great day!


Stamps:  Word Salad (Paper Smooches); You (Simon Says)
Paper:  White
Ink:  Tuxedo Black (Memento); Crushed Curry, Tangerine Tango, Melon Mambo (SU!)
Accessories & Tools:  Big Shot, Large Hearts die set (Simon Says), sponge daubers, dazzling diamonds


Challenges:
CAS-ology (#77 - Bubbly)

Thursday, January 09, 2014

Golden Christmas


Hi everyone.  I've been on a roll lately making cards ... maybe because playing distracts from my job of cleaning out my studio :)  I did manage to empty out the closet of the room, piling everything on the bed in the guest room.  Yikes! ... the bed is covered with STUFF ... of which half is probably stuff I don't use.  Next I need to got through it and actually get rid of things ...

On to the card.  This is for the latest challenge at Merry Monday (#90 - use ribbon or twine).  Such a great group of talented ladies and I had fun being on the Design Team last year.  LOVE the inspiration photo!  And it's great to get a head start on my Christmas cards for next year ... why don't you come play along?! :)


I used some patterned papers from Bo Bunny and my blooming poinsettia die to create an elegant Christmas card.  I stamped "Peace" in black, but because it was on the patterned paper, it looks more charcoal gray.  Some gold sheer ribbon with bow finishes the card.

One other quick note ... I mentioned a while back that I was hoping to get a light box made to help improve my card photos.  My friend Susan had purchased a kit through a local photo supply company and mentioned it to me ... such a good deal and not worth the expense or time to make one ourselves, I jumped in and bought it.  It's was a great little unit, but the photos weren't much different, so I'd rather take the space that the light box would have used, and use it for something else.  It was a good experiment, though, and glad I tried it.

ETA:  I just saw that this qualifies for the Jingle Belles challenges - Something old and something new.  I used my poinsettia die that I've had for a couple of years, along with some pretty patterned paper that I just bought.


Stamps:  Peace (Anita's)
Paper:  White, Gold foil, Silver & Gold Collection (Bo Bunny)
Ink:  Black
Accessories & Tools:  Big Shot, Blooming poinsettia die (Poppy Stamps), Gold sheer ribbon (creative packaging), gold stickles, glue, adhesives and dimensionals


Wednesday, January 08, 2014

Sweet Summer


Hi everyone.  I made this as a CASE of the Muse card by Laurie Willison - LOVE her card!  It was fun to pull out my summery dies and papers and make a cheerful card on a very dreary and rainy day here on the West Coast.  Don't get me wrong ... I am thankful that we've had a mild winter and I hope that the deep freeze and stormy conditions on the east coast of Canada and the U.S. ease soon.  I have missed having snow, though ... we only had one day a while back, where there was just a light dusting.  So for now, rain, rain and more rain - I always have my umbrella handy. :)

I mentioned before that I got a few crafty toys for Christmas, plus I just received an order from Simon Says in the mail today.  Lots of fun goodies to play with but no where to put them.  My studio looks like a bomb went off.  Jer stopped by today and asked how the organizing was going since he thought I had pulled everything out to get started.  Nope ... haven't started - it's just a mess. :)

Off to check out blogs and see what's new with my friends.  Hope you enjoy the card and check out the Muse #49 challenge and play along - so fun!!


Stamps:  Sweet Summer Sentiments (Amy R)
Paper:  White, yellow gingham
Ink:  Tuxedo Black (Memento)
Accessories & Tools:  Big Shot, Sunshine Large die (Lil' Inkers), Puffy Clouds (Memory Box), washi tape, glue, adhesives, and dimensionals


Sunday, January 05, 2014

Warm Mittens


Hi everyone.  Today I made a card for the Less Is More Challenge (#153 - Winter Blues).  I made the background for my main panel a while back using the Smoosh technique that I saw on my friend Bonnie's blog.  Love this technique - so fun and the results are so pretty!!  I can't remember the shades of blue ink that I used (sorry about that!), but I think it was a combination of turquoise, bermuda bay and maybe baja breeze??  I followed Bonnie's instruction (click the link above to her blog) and ended up with a couple of A2 sheets of this gorgeous background paper.  I've been "collecting" backgrounds and embellishments for quite a while now ... you know the ones ... you cut them out or "create" them as with this background and they don't quite work on the project that you're doing at the time.  So they end up in a big box and usually end up collecting dust.  I'm determined to use some of these up! :)

I die-cut my mittens from felt and also from white cardstock and then glued them together.  It might be just as easy to glued the two together first and then die-cut - both ways work.  I LOVE the color of this felt ... it's very close to Island Indigo from Stampin' Up!  I added snowflakes cut from silver glimmer paper for the embellishments and a strand of twine to define the cuffs.  Quick and easy card, especially since the background paper was already made.

Taking it pretty easy today.  Having the family over for our regular Sunday dinner - always a treat for me when we are all together.  Haven't seen Cooper since last Sunday ... I'm sure he's changed a lot in the week.  Looking forward to my Cooper-cuddling time :)

Hope you're all having a great start to your week!


Stamps:  Frosty Sentiments (Amy R)
Paper:  White, Whisper White, silver glimmer
Ink:  Tempting Turquoise, Bermuda Bay, Baja Breeze, Smoky Slate; Frost White (SU!)
Accessories & Tools:  Mittens die (Sizzix), Small Snowflake die (Impression Obsession), blue felt, Stone twine (The Twinery), plastic bag, Stamp-a-ma-jig, glue, adhesives and dimensionals


Challenges - Less Is More (#153 - winter blues)

Saturday, January 04, 2014

Home Sweet Home


Hi everyone.  Today is the first challenge of 2014 at Addicted to CAS.  I'm hosting the challenge and I have picked the code word below ... I hope you'll play along.


Prize:  3 digi sets
(please follow the rules to be eligible to win)

____________________


This Christmas I got this sweet stamp with matching die-cut set from Simon Says.  I thought this house would look so cute done in yellow gingham ... I just love it!


Stamps:  Where the heart is (Simon Says)
Paper:  White, yellow gingham
Ink:  Black; Copics: R29
Accessories & Tools:  Big Shot, Where the heart is dies (Simon Says), Puffy Clouds dies (Memory Box), Maraschino twine (The Twinery), adhesives, glue, and dimensionals


I hope you join us for our first challenge of the new year - ATCAS: code word:  Die-cuts.  Please click on the link to check out the challenge rules and to see the fabulous cards from the rest of the Design Team.  The challenge runs for two weeks ... so there's lots of time to play.  Hope to see you in the gallery! :)


Thursday, January 02, 2014

A Special Card


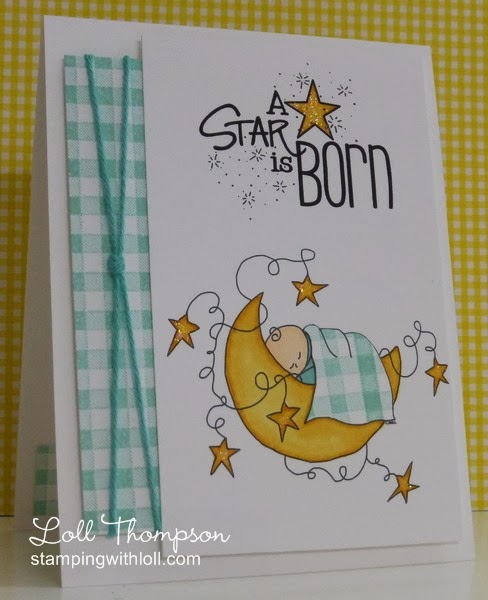
Hi everyone.  I'm sharing a special card that I gave to my DS and DDIL to celebrate the birth of their first child.  I had so much fun making this card!! :)

I'm getting back into the swing of things and have made a few cards the past few days.  It's so nice to be back in the studio creating.  I'm hoping to have time to play more later today, but have the task of taking down the Christmas tree and decorations today ... always do it on Jan. 2.  Time to move into the new year.

I'm also hoping to clean and organize my studio over the next while.  I have bought/received many new toys lately and need to made room for them.  I was hoping hubby would agree to taking down a wall and me expanding my space ... but apparently, he doesn't think that's a good idea :)  So I need to make do with the room I have and that means getting rid of some items that I've been holding on to for along time, but never use.  Time to downsize!

More about today's card ... the digi image is from Tiddly Inks and the large sentiment I found on a site called Gottapixel.net.  I just googled "a star is born digital stamp" and this came up - perfect!

I printed the image onto my card front and colored it with Copics.  I stamped the gingham pattern in Pool Party ink and paper pieced the blanket and added a strip on the side - love these colors together.

I added some dazzling diamonds to all the stars to give them some sparkle and shine.

____________________


Before I go, here's another picture of my beautiful grandson Cooper ... just six days old in this photo.  Isn't he precious??


Stamps:  Sleep Tight Baby (Tiddly Inks); A Star is Born (Gottapixel.net); Gingham wheel (SU!)
Paper:  White
Inks:  Pool Party; Copics:  Y21, Y32, YR24, E00, E01
Accessories & Tools:  dazzling diamonds, Caribbean twine (The Twinery), adhesives, and dimensionals


I'm entering this card into these challenges:
Simon Say's Something New challenge
Inkspirational #46 - Anything Goes
Snippets Playground #105
Little Red Wagon #218 - New Beginnings


Wednesday, January 01, 2014

My Favorites from 2013

First of all, Happy New Year to all!! :)  We had a wonderful Christmas and New Year's ... lots of time with family and friends.  And, of course, lots of time with our sweet grandson who has brightened our lives beyond words :)

I hope all of you had a wonderful holiday and are resting up today and getting ready for a fresh start.  Where has the time gone ... 2014 - wow!  Hubby and I realized last night that we started dating in August of 1974 - almost 40 years ago! Time flies when you're having fun :)

This year I'm hoping to change things up a bit on my blog.  I want to get back to when I first started this adventure, sharing little bits about myself and my family.  The past year has been mostly just cards, which is my passion, but it's also nice to get to know each other through our posts.  Also have some ideas about what I want to do this year as far as cards ... the one thing I know for sure ... start my Christmas cards early!!  I started in June last year and I actually ran out before my list was completed ...  I couldn't believe it!  So I'm hoping to join in some of the Christmas card challenges that run all year so that I have a good stash when it's time to send them out.  And my focus is also going to be on Christmas tags ... had so much fun making tags, but need to make more and I will share them with you as well (didn't share this year).  So I guess this sounds more like a new year's resolution ... and hopefully I follow through.

First up ... I'm joining in at Debby's blog to pick my favorite five cards I made this year.  Debby runs this each year and it's fun to look back.  I made 218 cards this year that I posted on my blog and here are pictures (with links) to my favorite five ... 


___________________


____________________


I hope you have enjoyed looking back at some of my past cards.  And I hope you'll join in the fun at Debby's blog and post your favorite five that you've made in 2013!

I'll be back tomorrow with a very special card to share with you.