Tuesday, November 28, 2023

Happy Birthday Susan!

Hi everyone.  Happy Birthday to Susan (Cardmaker's Garret).  Hope you have a wonderful day, my sweet friend!!

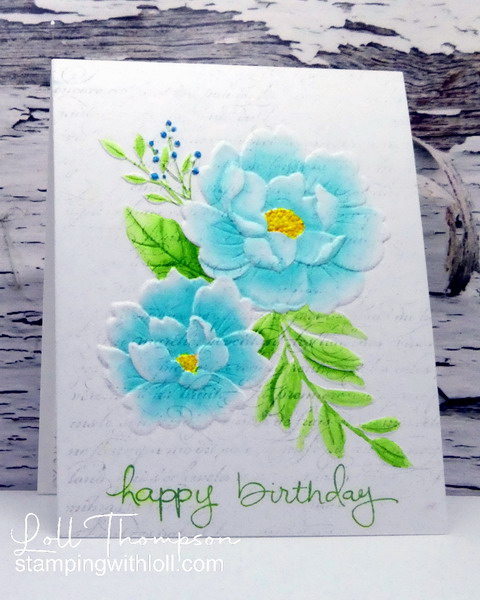
Blue is Susan's favourite colour, so I took artistic license today and painted my peonies blue. :)  I started by randomly inking a script background (En Francais from SU!) with Shadow Grey Archival ink.  I didn't want it solid because I knew I was going to watercolour over top, so I just added light inking here and there before stamping onto mixed media paper.  The great thing about Archival ink is that it's permanent, so I can watercolour overtop without loosing the background image.

I then embossed my panel using Peony Bundle Embossing Folder (Simon Says).  I misted the back of my panel lightly before embossing, preventing cracks that you sometimes get when using a 3D embossing folder.  Worked like a charm. :)

I watercoloured the embossed image with Distress Inks:  Salvage Patina, Mowed Lawn, Mermaid Lagoon, Mustard Seed, and Wild Honey.  I added a few layers of each colour to create depth and to add to the dimension of the image.  To finish, I stamped the sentiment (Endless Birthday Wishes - SU retired) in Distress Oxide ink.

Close-up ...
If you know Susan, I hope you'll take a few minutes to wish her a happy birthday!

I'm sending this card to the Can You Handle the Pressure challenge - Anything with Embossing Folders Goes.  I didn't use the optional twist this month of Christmas.

Thanks for stopping by!


If you would like to subscribe by email,
please fill out the subscription form in the upper right sidebar.
Make sure to add "subscribe" to the message.
It is also important to add SWL1subscribers@gmail.com to your contact list
so Google recognizes the address and delivers the updates.

To unsubscribe, please use the same form making sure to add
"unsubscribe" to the message.
Thank you.


Stamps:  En Francais & Endless Birthday Wishes (SU! - both retired)
Paper:   White card stock (Neenah 110 lb.); Mixed Media (Strathmore 140 lb.)
Ink:   Shadow Grey Archival Ink (Ranger); Distress Ink:  Salvage Patina, Mowed Lawn, Mermaid Lagoon, Mustard Seed, Wild Honey (Tim Holtz); Mowed Lawn Doxide Inks (Tim Holtz)
Accessories:   Peony Bundle Embossing Folder (Simon Says Stamp); watercolour brushes

Smooshing with Cling Wrap - Group of Seven

Hi everyone.  This month Group of Seven Cardmakers is Smooshing with Cling Wrap.  This is an older technique that most of us have tried.  But fast forward several years and there are so many new products on the market that would work with this easy technique that gives amazing results.  I hope you'll give it a try using a variety of substraits and mediums from your stash.  :)

Please check out the details for the technique and link to video on the blog ...
Here's what I learned when I experimented with this technique with different substraits and mediums ...
  • The card used made the most difference.  Mixed media paper, coated card stock or Bristol worked the best for me, giving me the most "cells" that really make this technique special.  Watercolour paper came in next with mixed results.  Regular card stock gave the least amount of "cells" and is better suited for just smooshing, in my opinion.
  • When smooshing with powdered inks, the easiest way to get the card wet with colour is to let the misted powdered inks sit on your work mat for a couple of minutes so the crystals start to dissolve before smooshing with card and then adding cling wrap.  Brushos and Bister powdered inks gave me the most beautiful backgrounds.  Powdered inks with mica powders (shine) like Magicals and Perfect Pearls, usually let the shine ingredient show in the creases, which in most cases, resulted in a subtler look which is so pretty!  Everyone will have different results depending on their method of adding water and how much water ... so experiment to find what works best for you! :)  
For the card above, I used Bister powders (powdered inks with walnut stain).  Because of the walnut stain added to the colours, they all have a warmth about them.  I used Bister Blue, Bister Green, and Bister Dark Brown for my card above.  I sprinkled them onto my work mat, misted with water and let the crystals activate before smooshing with mixed media paper.  I flipped the card over and placed a piece of cling wrap over the wet ink, scrunching up the cling wrap to create lots of creases.  I left it to dry for a couple of hours before removing the cling wrap and then left the card to completely dry before finishing.

I stamped with a silhouette stamp I received from Maureen through the Rudolph Days Challenge --- isn't it fabulous??!!  I stamped in Black Memento ink and added a torn snowhill at the bottom before splattering with white acrylic paint for snow.  LOVE IT!

Close-up ...
I'm sending the above card to the Rudolph Days November challenge.  Thanks again Maureen!


... and here's more cards I made using this awesome technique.  Again I used mixed media card with Bisters (Red, Yellow, Natural).  I LOVE the natural colours of these powders.  I got two cards from the one panel. :)


I hope you'll check out the Group of Seven Cardmaker's blog to see the other beautiful cards from our group.  Come join us!

Thanks for stopping by!


If you would like to subscribe by email,
please fill out the subscription form in the upper right sidebar.
Make sure to add "subscribe" to the message.
It is also important to add SWL1subscribers@gmail.com to your contact list
so Google recognizes the address and delivers the updates.

To unsubscribe, please use the same form making sure to add
"unsubscribe" to the message.
Thank you.


Card #1:
Stamps:  Stamp #391 (Studio Light Essentials)
Paper:   White card stock (Neenah 110 lb.); Mixed Media paper (Strathmore 140 lb.)
Ink:   Bister Powders:  Bister Blue, Bister Green, Bister Dark Brown; Versamark; Black (Memento) 
Accessories:   Water mister, cling wrap, clear embossing powder (Ranger), heat tool, diluted white and black acrylic paint, splatter brush

Card #2 & #3:
Stamps:  Birthday Blowout (Poppy Stamps - retired); A Little Sentimental (Clearly Besotted - retired)
Paper:   White card stock (Neenah 110 lb.); Mixed Media paper (Strathmore 140 lb.); Black card stock (SU!)
Ink:  Bister Powders:  Bister Red, Bister Yellow, Bister Natural; Versamark; Black (Memento) 
Accessories:   Water mister, Cling Wrap, Freida Curve Die (Poppy Stamps), Black acrylic paint (diluted), Flower Frolic die (Penny Black), diluted black acrylic paint, splatter brush
 
Challenges:

Thursday, November 23, 2023

Guesting at Seize the Birthday!

Hi everyone.  I'm back with my second card this month as Surprise Party Guest at Seize the Birthday Challenge #274 - Fall Items (Food, Flowers, Leaves).
 

Fall is my favourite time of year.  I just LOVE the colours of the fall flowers and the changing leaves.  Today I've used Beautiful Bouquet Dahlia from WPlus9 (retired).  My great uncle used to have a field of dahlias on his property.  They were so beautiful and I have loved that flower since I was a little girl. :)

I stamped the image in black and heat embossed in clear over a stencil monoprint background using the Mini Tiny Circles stencil from The Crafter's Workshop.  The background is done with Peeled Paint distress ink and I've used more distress inks to watercolour the bouquet (Seedless Preserves, Forest Moss, Mustard Seed, Ripe Persimmon).

The card front is cut with a circle aperture for the bouquet to peek through.  This creates a CAS mixed media design, which is finished with a simple sentiment (Endless Birthday Wishes by Stampin' Up! - retired).  

I'm sending the above card to Stencil Fun November Challenge (3rd entry!).

Close-up ...
Come join the challenge at Seize the Birthday with your fall season birthday cards.  Hope to see you in the gallery!

Thanks for stopping by!


If you would like to subscribe by email,
please fill out the subscription form in the upper right sidebar.
Make sure to add "subscribe" to the message.
It is also important to add SWL1subscribers@gmail.com to your contact list
so Google recognizes the address and delivers the updates.

To unsubscribe, please use the same form making sure to add
"unsubscribe" to the message.
Thank you.


Stamps:  Beautiful Bouquet Dahlia (WPlus9 - retired); Endless Birthday Wishes (SU! - retired)
Paper:   White card stock (Neenah 110 lb.); Mixed Media (Strathmore 140 lb.)
Ink:   Black (Memento); Distress Inks:  Peeled Paint, Forest Moss, Seedless Preserves, Mustard Seed, Ripe Persimmon (Tim Holtz)
Accessories:   Mini Tiny Circles Stencil (The Crafter's Workshop), Clear embossing powder (Ranger), heat tool, watercolour brushes, Circle Nestability (retired - Spellbinders)

Saturday, November 18, 2023

Christmas Ornaments 2023

Hi everyone.    I'm making Christmas ornaments again this year.  This time I'm using flat round 3" glass ornaments (round ornaments of glass that are hollow, approx. 1" thick, with the front and back flattened slightly - see below photo) that I purchased from Michaels at the end of last year.  Drips of alcohol inks are added to the outside of the glass ornaments to create the designs.  It's also a great way for me to use some of my stash of many bottles of alcohol inks. :)

I had a play day with my dear friend, Fran.  We each made a few ornaments - so fun!  We followed this video:  Christmas Ornament Tutorial using Alcohol Inks by Michelle Fountain.  As always, when working with alcohol inks, make sure your area is well-ventilated and wear protection so you don't have a big mess to clean up at the end.  We wore gloves and had lots of paper towels on hand.

We used the same process as the video, adding drops of inks over the ornaments and used a fine tip applicator to add streams of rubbing alcohol to break up the metallic inks.  I love the random look you get when using the rubbing alcohol.  It's important to leave areas of glass without any inks on them to allow the tree lights to filter through.

Above is my favourite ornament of the day using only two colours, red and gold.  I can't wait to see what it looks like on my tree with some lights behind it. :)  I will list the colours of inks I used on the three ornaments near the bottom of this post.

Sending the above ornament to Color Hues #76 - Red and Metallic Gold.  Perfect! :)

... and since this is the first time I've used the glass ornaments, I'm also entering the above ornament into NBUS Challenge #56. 

I finished all three ornaments in the same way, adding some drips of Rainbow Alcohol Ink (Marabu), which is clear with mica glitter.  It adds a colourful, glittery finish which is so pretty.  The caps for the ornaments were all silver, so I left it original for the purple ornament.  For the ornaments with gold drips, I added 2-3 layers of Princess Gold Embossing powder, heat setting after each layer.  I added a decorative hanger and voila --- gorgeous one-of-a-kind ornaments. :)

Here's two more I made that day ...
Sending the above ornament to Merry Little Christmas Challenge #53.


#1 Alcohol Inks:  Aqua, Clover, Stream, Sailboat (all from Ranger); Gold (Pinata); Rainbow (Marabu)
#2 Alcohol Inks:  Pearl Villianous (Purple), Eggplant, Silver (all from Ranger); Rainbow (Marabu)
#3 Alcohol Inks:  Pearl Sublime (Lime), Turquoise, Meadow Green (all from Ranger); Gold (Pinata); Rainbow (Marabu)

Thanks for stopping by!


If you would like to subscribe by email,
please fill out the subscription form in the upper right sidebar.
Make sure to add "subscribe" to the message.
It is also important to add SWL1subscribers@gmail.com to your contact list
so Google recognizes the address and delivers the updates.

To unsubscribe, please use the same form making sure to add
"unsubscribe" to the message.
Thank you.


Supplies:  Flat Round 3" Glass Oraments (Michaels), Alcohol Inks (Colours: Ranger, Pinata; Metallics: Ranger, Pinata; Rainbow: (Marabu), Rubbing Alcohol, Needle-nose Applicator bottle, Versamark ink, Princess Gold embossing powder (Ranger), Sponge paint brush, Durable Gloss Finish (Martha Stewart - discontinued), decorative hangers (Amazon)


Tuesday, November 14, 2023

More Stenciling over Heat Embossing & Photos of Jessie


I started the above card with the background, Stained Glass Background (Simon Says Stamp) - first time using this stamp even though I've had it for AGES! :)  I inked up my stamp with Versamark and then stamped onto a piece of Neehan card stock (making sure to used anti-static powder first).  I sprinkled with white embossing powder and then heat set.  I love the close design that this stamp has ... perfect to use for Stenciling over Heat Embossing.

Next I attached the Fading Florals Stencil (Simon Says Stamp) over top, masking different sections at a time; then sponged Distress Inks:  Shabby Shutters, Saltwater Taffy, and Mustard Seed inks.  I LOVE the look.

Mounted my panel onto my card base and added a simple sentiment (Essential Sentiments - Maker's Movement - business closed) banner to finish.

Sending the above card to NBUS Challenge #56.  First time using the Stained Glass Background stamp. :)

...and I'm entering into Stencil Fun November Challenge (2nd entry). :)


Next I wanted to try this using metallic embossing powder for the background.
The Lovely Leaves stencil (Wendy Vecchi) was placed over top of a kraft card stock panel which was stamped (Ornate Background - Simon Says Stamp) with Princess Gold embossing powder.  I sponged with distress inks: Mowed Lawn and Ripe Persimmon.  Using the metallic embossing powder gives this technique a completely different look.  So cool!!

... and while I had this background stamp out ...
... I used it for my latest Christmas card.  This time I heat embossed in silver which gives a subtler look.  The stencil is Christmas Trees from STAMPlorations, sponged with Evergreen Bough and Pine Needles distress inks.  It didn't stand out much on the busy background, so I outlined the stenciling using a fine tip black marker, which made a big difference.  The sentiment is silver heat embossed on black card stock to finish the card.

Sending the above card to Peace on Earth Challenge #51.

I've had a lot of fun with this technique. :)

* * * * *

Oh my gosh ... my SIL, Alex took the yearly fall portraits of both Jessie and Violeta.
These were taken in their yard under a maple tree which had dropped all it's gorgeous red leaves.
He even added in a well-used wheelbarrow and rake. :)

If you want to see all the photos taken, click on the Jessie tab at the top of blog. :)

... my absolute fav of Jessie

... my fav of Violeta ...

Thanks for stopping by!


If you would like to subscribe by email,
please fill out the subscription form in the upper right sidebar.
Make sure to add "subscribe" to the message.
It is also important to add SWL1subscribers@gmail.com to your contact list
so Google recognizes the address and delivers the updates.

To unsubscribe, please use the same form making sure to add
"unsubscribe" to the message.
Thank you.


Card #1:
Stamps:  Stained Glass Background (Simon Says Stamp); Essential Sentiments (Maker's Movement)
Paper:   White card stock (Neenah 110 lb.)
Ink:   Versamark; Distress Inks:  Shabby Shutters, Peeled Paint, Saltwater Taffy, Abandoned Coral, Mustard Seed (Tim Holtz)
Accessories:   White embossing powder (Ranger), heat tool; Fading Florals Stencil (Simon Says Stamp), sponging brushes and detail brushes

Card #2:
Stamps:  Ornate Background (Simon Says Stamp)
Paper:   White card stock (Neenah 110 lb.); Kraft card stock
Ink:   Versamark; Distress inks:  Mowed Lawn, Ripe Persimmon (Tim Holtz)
Accessories:   Princess Gold embossing powder, heat tool, sponge brushes, Lovely Leaves stencil (Wendy Vecchi)

Card #3:
Stamps:  Ornate Background (Simon Says Stamp); Snowglobe Sentiments (MFT - retired)
Paper:   White card stock (Neenah 110 lb.); Black card stock (Stampin' Up!)
Ink:   Silver Delicata (Tsukineko); Distress inks:  Evergreen Bough, Pine Needles (Tim Holtz
Accessories:   Silver embossing powder, heat tool, sponge brushes, Christmas Trees (STAMPlorations)

Thursday, November 09, 2023

Guest Designing at Seize the Birthday!

Hi everyone.  I'm excited to be the Surprise Party Guest at Seize the Birthday for November and January (the challenge takes a break for December). :)   Thanks Nancy!

Today's challenge (#273) is all about Neutrals ...


I had fun creating a CAS (clean and simple) card using two shades of brown ink with black accents.  I LOVE how this combo looks.

I started by using sponge brushes over a retired leaf stencil from Carabelle Studio, onto mixed media paper.  I started with Gathered Twigs for the complete background and then sponged in the middle with Vintage Photo.

I die-cut the leafy branch (Fresh Foliage from Memory Box) in black card stock and used a piece of foam with my stylus, to add shape to the leaves.  I also cut a small sentiment banner from black card stock; then stamped (Simply Sentiments - Lawn Fawn) in white pigment ink before heat embossing with white embossing powder.  I attached the leafy branch with glue on the stems and placed the sentiment banner over top at the bottom of the card.

Close-up ...
I'm sending this card to the Stencil Fun November Challenge.

The Seize the Birthday challenge is open for 12 days.  I hope you'll come join us with your Neutral Birthday cards.

Thanks for stopping by!


If you would like to subscribe by email,
please fill out the subscription form in the upper right sidebar.
Make sure to add "subscribe" to the message.
It is also important to add SWL1subscribers@gmail.com to your contact list
so Google recognizes the address and delivers the updates.

To unsubscribe, please use the same form making sure to add
"unsubscribe" to the message.
Thank you.


Stamps:  Simply Sentiments (Lawn Fawn)
Paper:   White card stock (Neenah 110 lb.); Mixed Media (Strathmore 140 lb.); Black card stock (SU!)
Ink:   Distress Inks:  Gathered Twigs, Vintage Photo (Tim Holtz); Unicorn - white pigment ink (Hero Arts)
Accessories:   Leaf stencil - retired (Carabelle Studio), sponge brushes, Fresh Foliage die (Memory Box), White Embossing Powder (Ranger)

Saturday, November 04, 2023

Building my Christmas card stash

Hi everyone.   It's already the beginning of November and usually I am writing my cards by this time so I can get them into the mail.  But I still need to make over a dozen Christmas cards, so I spent yesterday making several using the same colours and sentiments on all of them.  I also used three different background stamps heat embossing two of each design before sponging over top with different stencils.  I am loving the current technique at Group of Seven, and I managed to get seven cards made in an afternoon.  You gotta love that!! :)

The first one above is a nod to my dear friend Bonnie.  She used the same stencil (Layering Poinsettia - Tim Holtz) and maybe even the same background stamp (En Francais - SU! retired), embossing her card with gold (I used silver).  Thank you for the inspiration, sweet friend!!  

I recently bought some small detail sponge brushes and was able to make my cards without masking.  Saved a lot of time! :)  

Here's a close-up ...
I'm sending this first card over to Just Us Girls #704 - Colour Challenge.

* * * * *
And here are more cards using this great combination of Stenciling over Heat Embossing ...
The background is again En Francais, this time heat embossing in white.  The stencil is from Magenta, it's branches and berries - sorry don't know the name.


* * * * *

The card above uses Snowflake Background (Hero Arts - retired), heat embossed in white before stenciling just the tree and star from the Farmhouse Tree Stencil (Honey Bee Stamps).

* * * * *

This time I've used the Crackle Background Stamp (Simon Says Stamp) stamp, heat embossed in white and then partially sponged over top with Christmas Wreath stencil (Simon Says Stamp).  I made two of these.

The above card is heading to the Simply Clean & Simple November Challenge - Anything Goes.

Thanks for stopping by!


If you would like to subscribe by email,
please fill out the subscription form in the upper right sidebar.
Make sure to add "subscribe" to the message.
It is also important to add SWL1subscribers@gmail.com to your contact list
so Google recognizes the address and delivers the updates.

To unsubscribe, please use the same form making sure to add
"unsubscribe" to the message.
Thank you.


Card#1:
Stamps:  En Francais (Stampin' Up! - retired); Merry Messages (Lawn Fawn)
Paper:   White card stock (Neenah 110 lb.); Silver Metallic card stock (SU!)
Ink:   Unicorn white pigment ink (Hero Arts); Distress Inks:  Fired Brick, Mowed Lawn, Wild Honey (Tim Holtz); Distress Oxide Ink:  Fired Brick
Accessories:   Silver embossing powder (Ranger), heat tool, sponge brushes

Card#2:
Stamps:  En Francais (Stampin' Up! - retired); Merry Messages (Lawn Fawn)
Paper:   White card stock (Neenah 110 lb.)
Ink:   Unicorn white pigment ink (Hero Arts); Distress Inks:  Fired Brick, Mowed Lawn (Tim Holtz); Distress Oxide Ink:  Fired Brick (Tim Holtz)
Accessories:   White embossing powder (Ranger), heat tool, sponge brushes

Card#3:
Stamps:  Crackle Background (Simon Says Stamp); Merry Messages (Lawn Fawn)
Paper:   White card stock (Neenah 110 lb.)
Ink:   Unicorn white pigment ink (Hero Arts); Distress Inks:  Mowed Lawn, Wild Honey (Tim Holtz); Distress Oxide Ink:  Fired Brick (Tim Holtz)
Accessories:   White embossing powder (Ranger), heat tool, sponge brushes

Card#4:
Stamps:  Snowflake Background (Hero Arts); Merry Messages (Lawn Fawn)
Paper:   White card stock (Neenah 110 lb.)
Ink:   Unicorn white pigment ink (Hero Arts); Distress Inks:  Fired Brick, Mowed Lawn, Rustic Wilderness, Wild Honey (Tim Holtz); Distress Oxide Ink:  Fired Brick (Tim Holtz)
Accessories:   White embossing powder (Ranger), heat tool, sponge brushes