Tuesday, February 28, 2023

Debossed Inky Resist - Group of Seven

Hi everyone.  Back this month with another technique done by our Group of Seven Cardmakers.  This time we have tried Debossed Inky Resist, following a video by Anna-Karin Evaldsson and led by Julia.

Please check out the details for the technique and link to video on the blog ...

This is a heat embossing technique done with an embossing folder.  Another technique with endless possibilities by using different embossing folders, different colours of embossing powder, and different colours / types of inks. :)

Our group all agreed that success depends on the embossing folder.  It's something you need to experiment with to find the folders that work for you.  Most of us found it worked best with regular folders (not 3-D), but a few in the group used 3-D folders with success.  I think it depends more on the individual folder design.

For the card above, I used a SU! embossing folder called Lucky Stars.  I first stamped my image (Studio Light) on mixed media paper in black ink, then clear heat embossed.  This was one of two generous gifts I received from entering Rudolph Days Challenge, run by the lovely Maureen.  Thanks Maureen!!

I added Versamark to the inside of my embossing folder and placed my panel so that it would only deboss above the image.  Ran it though my Gemini Jr. and then sprinkled with more clear embossing powder and heat set ... this created a resist for the stars.  I smooshed two colours of Distress Inks (Chipped Sapphire / Wilted Violet) over top.  I'm happy how this turned out! :)
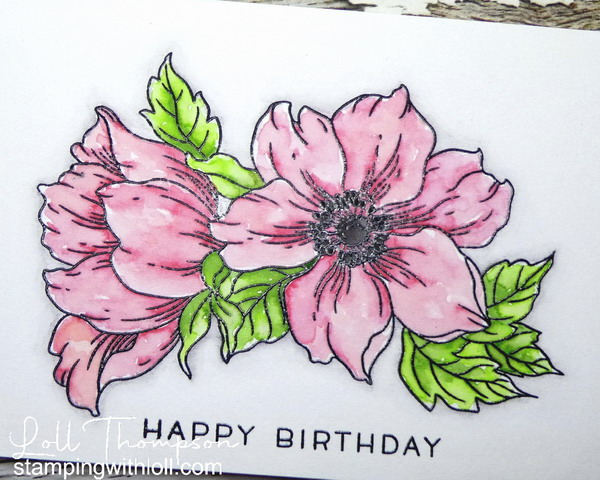
Close-up ...

Since this was the first time using both the beautiful Christmas Reindeer image and the star embossing folder, so I'm sending this card over to NBUS Challenge #47.

And I made a second card using a different embossing folder, Leafy Branch (Cuttlebug).  This time I heat embossed with white on the debossed side and then smooshed in two colours of Distress Inks (Mowed Lawn / Peacock Feathers).  Dried the panel and then smooshed again with the same Distress Ink colours to add more depth of colour.  To finish I splattered with diluted blue ink and added a sentiment banner.

I hope you'll try this out.  It stretches the use of your folders by using the debossed side for a different look to embossing. :)

We're adding a linky on the Group of Seven blog for those that try the technique and want to share.  Just so you know, this is not a challenge and the linky will not be moderated.

* * * * *

I will be taking a break from blogging as I'm headed to the hospital later today and will be having open heart surgery tomorrow.  I've been waiting for this surgery for quite a while, so I'll be relieved once it's done.

I'm hopeful everything will go smoothly and I will be back making cards and sharing them on my blog in the not-too-distant future.

Thanks for stopping by!


If you would like to subscribe by email,
please fill out the subscription form in the upper right sidebar.
Make sure to add "subscribe" to the message.
It is also important to add SWL1subscribers@gmail.com to your contact list
so Google recognizes the address and delivers the updates.

To unsubscribe, please use the same form making sure to add
"unsubscribe" to the message.
Thank you.


Card #1:
Stamps:  Stamp#391 (Studio Light Essentials)
Paper:   White card base (Neenah 110 lb.); Mixed Media paper (Strathmore 140 lb.)
Ink:  Black Ink:  Memento; Versamark; Distress Inks:  Chipped Sapphire, Wilted Violet (Tim Holtz) 
Accessories:   Lucky Stars embossing folder (SU!), embossing buddy, Clear embossing powder (Ranger), White embossing powder (Ranger), heat tool, water mister


Card #2:
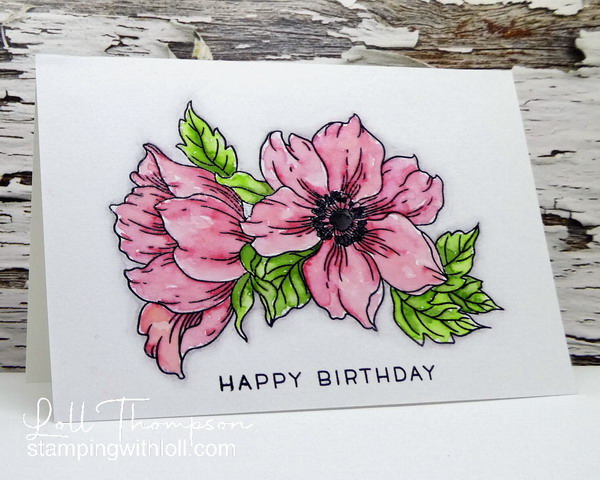
Stamps:  Birthday Blowout (Poppy Stamps - retired)
Paper:   White card base (Neenah 110 lb.); Mixed Media paper (Strathmore 140 lb.); Black card stock (SU!)
Ink:  Versamark; Distress Inks:  Mowed Lawn, Peacock Feathers (Tim Holtz) 
Accessories:   Leafy Branch embossing folder (Cuttlebug), embossing buddy, White embossing powder (Ranger), heat tool, water mister

Challenges:

Saturday, February 18, 2023

Watercolour Foliage

Hi everyone.   I made this card a while ago, but just getting around to posting.  This is done with the stencil monoprint technique and watercolouring.

I started with the Leaves stencil (Simon Says Stamp), sprinkling orange and terracotta Brushos over top of the stencil, spritzing with a fine mist of water before turning it over and pressing it down over top of a piece of hot press watercolour paper.  I kept pressing with a paper towel to mop up any moisture that popped out from under the stencil.  I ended up with a lovely background with the leaf design fairly clear of colour (stencil monoprint).

Once dry, I used Mowed Lawn distress ink to watercolour my leaves and stems.  I went over them a few times on the w/c paper and it didn't pill - yay!  Once the leaves were dry, I used my white Posca pen to outline the image and add some veins to the leaves.  I cropped the image, added a thin white frame and popped it up over my card front with a sentiment (Happy Snippets - Penny Black) stamped underneath.  I used Carved Pumpkin distress ink and stamped the sentiment over and over (3 times) and then added a final stamping with Ripe Persimmon distress ink.  I thnk the colour ended up looking like it was done with the same colours as the background. :)

Close-up ...

Edited to add:  I've included a link to a wonderful video by Lee-Anne Cross on how to do stencil monoprints.  Thanks for the prompt from Diane to include a link! :)


I'm sending this card over to February Stencil Fun Challenge - didn't use the optional theme this month.


Thanks for stopping by!


If you would like to subscribe by email,
please fill out the subscription form in the upper right sidebar.
Make sure to add "subscribe" to the message.
It is also important to add sw1subscribers@gmail.com to your contact list
so Google recognizes the address and delivers the updates.

To unsubscribe, please use the same form making sure to add
"unsubscribe" to the message.
Thank you.


Stamps:  Happy Snippets (Penny Black)
Paper:   White card stock (Neenah 110 lb.); Hot Press Watercolour Paper (Strathmore 140 lb.)
Ink:   Brushos:  Orange, Terracotta; Distress Inks:  Mowed Lawn, Carved Pumpkin, Ripe Persimmon (Tim Holtz)
Accessories:   Leaves Stencil (Simon Says Stamp); water mister, paint brushes, white Posca pen

Challenges:


Wednesday, February 08, 2023

Happy Birthday Mom!

Hi everyone.  Today is my Mom's 94th birthday! :)  I made this especially for her.  She loves flowers and used to spend hours every day in her garden.

I stamped the Statement Flowers (Altenew) in black ink before heat embossing in clear onto Fabriano Mixed Media paper (first time trying this paper).  I watercoloured the image with distress inks before outlining the image with gray watercolour pencil and then adding water to the outline.  It's subtle, but does make the flowers stand out a little more on the white background.  I stamped Simply Sentiments (Lawn Fawn) for the sentiment in black ink, also heat embossed in clear.

This is my second larger-sized card.  It was easier to photograph because of the landscape orientation.  Still not as comfortable as I am with A2 sized cards ... I'll keep trying.  :)

Close-up ...
Later today hubby and I will be having dinner with Mom, along with Jer & Alex and my nephew and his girlfriend.  It will be a nice evening.


Thanks for stopping by!


If you would like to subscribe by email,
please fill out the subscription form in the upper right sidebar.
Make sure to add "subscribe" to the message.
It is also important to add SWL1subscribers@gmail.com to your contact list
so Google recognizes the address and delivers the updates.

To unsubscribe, please use the same form making sure to add
"unsubscribe" to the message.
Thank you.


Stamps:  Statement Flowers (Altenew)
Paper:   White card stock (Neenah 110 lb.); Mixed Media paper (Fabriano 108 lb.)
Ink:   Black (Memento); Distress Inks:  Mowed Lawn, Rustic Wilderness, Saltwater Taffy, Candied Apple (Tim Holtz); Gray watercolour pencil (Derwent)
Accessories:   Clear embossing powder, heat tool, watercolour paint brushes

Challenges:

Friday, February 03, 2023

Peaceful Night

Hi everyone.  

First, I want to say that I'm not happy with this card, but decided to post anyways.  I love this image, and I love the mica powders used to watercolour.  But the black mixed media paper I used warped and I couldn't get it flattened, no matter how hard I tried.  From now on I will be taping down the black mixed media paper when using. :)  You might save yourself some grief if you do that as well. :)

I also decided to try making larger cards this year.  Why not??!! :)  Well, because I found it really hard to photograph the larger size.  Not in my comfort zone.  You will see this one today, and another next Wednesday ... not sure if that will be the last of my larger-sized cards or if I can figure out something soon. :)  Sorry for the long write-up ...

Edited to add:  A few of you have suggested I spritz the card with water and weight it down with something heavy for several days.  I have done that ... it didn't work.  I think it's the nature of the mixed media paper that's the problem.

I bought this stamp after seeing a gorgeous card made by Pat (Colourful Card Creations).  I had seen this stamp done by a few other friends and thought I should buy it then, but life got in the way until Pat's card appeared on her blog in late last year.  I bought it and then promptly filed it away until I had time to ink it up.  Today's the day. :)

I stamped the image onto black mixed media paper, heat embossing the outline in gold embossing powder.  I used my mica powders mixed with gum arabic (binder) and some water to create metallic watercolours and had fun painting the image.

Close-up ...
Since this is the first time using this stamp, I'm sending this card over to NBUS Challenge #47.  I'm so thankful for Darnell's challenge that inspires me to use my "never-before-used-schtuff"! :)


Thanks for stopping by!


If you would like to subscribe by email,
please fill out the subscription form in the upper right sidebar.
Make sure to add "subscribe" to the message.
It is also important to add SWL1subscribers@gmail.com to your contact list
so Google recognizes the address and delivers the updates.

To unsubscribe, please use the same form making sure to add
"unsubscribe" to the message.
Thank you.


Stamps:  Peaceful Night (Woodware)
Paper:   Black card base (SU!); Black Mixed Media paper (Strathmore 140 lb.)
Ink:  Versamark 
Accessories:   Princess Gold embossing powder (Ranger), heat tool; Arteza mica powders (gift from a sweet friend), Gum Arabic, paint brushes

Challenges: