Showing posts with label colouring with pencils. Show all posts

Tuesday, December 20, 2022

Merry Christmas!

Hi everyone.  I have this wonderful stamp that was gifted to me by my very good friend, Susan.  She loves dogs and has a beautiful English Spaniel, Tessa who she brings with her when we get together to stamp. :)  She gave me this stamp not long after we adopted Jessie.  I made two special Christmas cards using this sweet image ... one for Susan, and one for my dog walker, Emily. :)

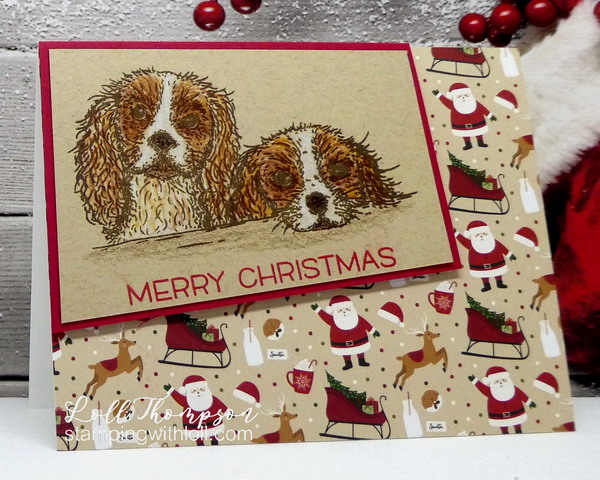
I stamped the image onto tan mixed media paper using archival brown ink.  I used my Prismacolor pencils to colour the dogs before restamping overtop to add more depth of colour.  It took me a while to figure out the design for this card.  It all came together when I found some lovely Christmas paper in my stash using the same tan and red from the main image. :)

Second card with a slightly different layout ...
Thanks for stopping by!

If you would like to subscribe by email,
please fill out the subscription form in the upper right sidebar.
Make sure to add "subscribe" to the message.
It is also important to add SWL1subscribers@gmail.com to your contact list
so Google recognizes the address and delivers the updates.

To unsubscribe, please use the same form making sure to add
"unsubscribe" to the message.
Thank you.


Stamps:  King Charles Spaniel (Hunkydory); Merry Messages (Lawn Fawn
Paper:   White card stock (Neenah 110 lb.); Tan Mixed Media paper (Strathmore 140 lb.); "A Gingerbread Christmas" patterned paper (Echo Park)
Ink:   Potting Soil Archival ink (Ranger); DOX Candied Apple ink (Tim Holtz)
Accessories:   Prismacolor pencils (Arteza), 


Wednesday, June 17, 2020

Pencil Colouring on Kraft

Hi everyone.  Three friends of mine are playing along with the Monday videos from Gina K, learning new techniques.  I have been loving the cards I'm seeing from them, so I joined them Monday night and watched as Gina showed how to use coloured pencils on kraft without having to use any blending liquid.  Here is a link to her video Coloring on Kraft Card Stock with Colored Pencils.  Fast forward through the first part where the audio is not good until you get to the actual colouring.  Gina fixes the audio part way through the video.

I only have crumb cake and baked brown sugar card stock from SU!  I don't like the lightness of the crumb cake, so I used the darker colour.  This is darker than kraft, but I'm happy how it turned out.

I stamped my image in black ink.  Used three colours for the petals (magenta, pink, white), three for the leaves (olive, lime, white) and dark green for the stems.

It took me MUCH longer to actually decide on the design than it did to colour the image. :)  In the end I placed a plain piece of brown sugar card stock through the aperture of the white card front with stitched square cut-out.  The card front has been dry embossed with leafy branches, but couldn't capture them in the photo.  The peonies are popped up through the window so they hang outside the edge of the frame.  Sentiment is stamped in black.

Close-up ...
I don't have a good pencil sharpener (more shopping!).  So I ended up colouring over the lines in the center of the petals and leaves.  I had left my image in the Misti, so once I was finished colouring, I restamped the black and heat embossed in clear.  It really made a big difference.

I rarely have time to play along with Just Us Girls, so happy I can this week for their "Frame It!" challenge!

* * * * *
We were lucky to have my mom stay with us last weekend.
She had a good time and got in lots of cuddle time with Jessie.

Jessie loves my mom ... here she is licking (kissing) mom's ear.  It tickled!

Thanks for shopping by!


Stamps:  Perfect Peonies (Clearly Besotted); Essential Sentiments (Maker's Movement)
Paper:  White card Stock (Neenah 110 lb.); Baked Brown Sugar (SU!)
Ink:  Black (Memento); Prisma coloured pencils
Accessories & Tools:  sharpener, Clear embossing powder, heat tool; In & Out Stitched Squares die (My Favorite Things); Leafy Branch embossing folder (Cuttlebug)

Challenges:
Just Us Girls - #540 - Frame It!


Wednesday, November 27, 2019

Autumn Leaves x 2

Hi everyone.  I'm going to take a break until January, so I will be posting cards that I made throughout the year that I couldn't fit into my post schedule.

Sharing two cards I made a while ago using the same stamp set.  The one above is coloured with Prismacolor pencils.

Stamped the leaf image a few times in soft brown on kraft paper for my main panel.  Stamped another leaf on a scrap of kraft and used my pencils to colours the leaves.  Fussy-cut leaf (it was a bit challenging) and adhered on top.  Stamped the sentiment in same ink as background leaves to pull it all together.

The second card ...
Started by adding white embossing paste through a tiny dot stencil for the background.  Stamped two leaves in kraft ink and heat embossed in clear.  Fussy-cut both leaves and smooshed in distress inks.  Cut a small strip of cork and stamped the sentiment on top.  Popped up the cork over the embossed background and tucked the stems of the leaves in behind.

Thanks for stopping by!


Stamps:  Leaves (AliExpress); Sentiment (unknown)
Paper:  White (Neenah 110 lb); Kraft (SU!)
Ink: Baked Brown Sugar (SU!)
Accessories & Tools: Prismacolour pencils, paper stump for blending


Wednesday, May 30, 2018

Another Retreat Card

Hi everyone.  Sharing more pieces from my recent craft retreat.  This is colouring with pencil crayons (not watercolour pencils).  Susan led a session layering colours on our images with pencil crayons and then blending using a paper stump dipped in gamsol.  Oh my goodness ... I LOVE this technique.  It's so fun!  Thank you so much for teaching us this technique Susan!!

I used one of my favourite stamps from Simon Says Stamp, colouring the flowers in oranges and reds on watercolour paper.  I added a few details with a white gel pen and stamped a sentiment to finish.  Also rounded both top corners for something different. :)

Here's a close-up ...

I am also sharing photographs from our retreat if you are interested in taking a look.  I have added a tab at the top of my blog "2018 Retreat" or you can click HERE. 

My son-in-law Alex came over for a couple of hours one day during the retreat and took photos of us working on stenciling projects.  Thanks Alex ... your pictures are wonderful!  xx


Stamps:  Bouquet of Thanks (Simon Says Stamp)
Paper:  Watercolour paper (Arches 140 lb. hot press)
Ink:  Black (Memento)
Accessories & Tools:  pencil crayons, gamsol, paper stump, white gel pen, corner rounder