Showing posts with label glass bead gel. Show all posts

Friday, January 17, 2025

More Ombré for Gof7

Hi everyone.  More cards for December's Group of Seven - Ombré - Design Element.  Today I'm sharing two Winter / Christmas cards that use stenciling with the Ombré technique. 

Group of Seven Cardmakers

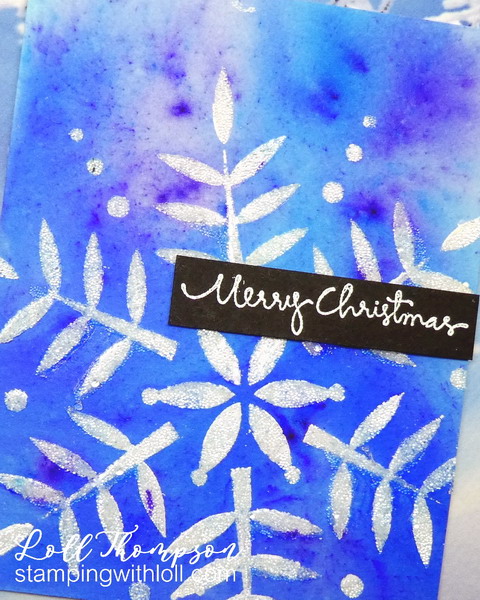
I used DOX inks for sponging the Ombré background ... they go on so smoothly and create more of an opaque look.  I used three shades of purple inks (Shaded Lilac, Wilted Violet, Villaneous Potion) over top of the stencil I made from a Tree Frame die (Gina Marie Designs), cut from Yupo paper.  Yupo makes great stencils ... it doesn't tear and you can use it many times; plus any water soluable ink will wipe off with a damp paper towel. :)

I cut my panel down a bit and then added a stamped sentiment in Wilted Violet ink to match the sponging.  Very quick and easy card to make!

Sending the above card to CAS on Friday Challenge #300 - Winter ...
* * * * *
For the next card, I used a lovely tree stencil from STAMPlorations called Christmas Trees.  I created a sponged Ombré background for the branches using only one colour of distress ink - Mowed Lawn.  The star is also Ombré using Wild Honey distress ink.  Once the sponging was dry, I placed the clean stencil back over top and used a palette knife to add a layer of Glass Bead Gel (Golden).  It's so beautiful when it dries, showing off the colour below and creating a sparkly finish on top with lots of texture.   A simple sentiment vellum banner, heat embossing with gold glitter powder, finishes this CAS design.


Thanks for stopping by!

Card #1:
Stamps:  Christmas Sampler (Paper Smooches - closed)
Paper:   White card stock (Neenah 110 lb.)
Ink:   Distress Oxide Inks: Shaded Lilac, Wilted Violet, Villaneous Potion (Tim Holtz)
Accessories:   Sponges, Tree frame die (Gina Marie Designs) for creating stencil, Yupo Paper

Card #2:
Stamps:  Christmas Sampler (Paper Smooches - closed)
Paper:   White card stock (Neenah 110 lb.)
Ink:   Distress Inks: Mowed Lawn, Wild Honey (Tim Holtz)
Accessories:   Sponges, Christmas Tree stencil (STAMPlorations), Glass Bead Gel (Golden); palette knife

Thursday, January 11, 2024

Guest Designing for Seize the Birthday!

Hi everyone.  I'm so happy to be back as the Surprise Party Guest for Seize the Birthday again this month.  


Today starts the first challenge of 2024 with a choice of options (Embossing Wet or Dry) - Challenge #275.  I made two cards (the one above with dry embossing, and a second card with wet embossing).

The card above uses the Perfect Peonies from Clearly Besotted.  I stamped the image in black ink and heat embossed with clear before watercolouring using Distress Inks (Kitsch Flamingo, Picked Raspberry, Shabby Shutters, Peeled Paint, Mustard Seed).  I placed the peonies on a layer of pink card stock, covered with a dry embossed vellum piece I received in the Christmas card from my friend Leslie.  It was so pretty, I had to use it right away! :)  Thank you Leslie!  I finished the card by adding a simple Happy Birthday sentiment stamped in black.

I'm sending the above card to the Triple B (Birds, Butterflies, & Blooms January Challenge.  They have provided a mood board for inspiration.  My flowers are pink and the layer of embossed vellum (sort of) looks like snow. :)

... and then ....

This card is done using "Wet Embossing" and my very favourite embossing gel, Glass Bead (Golden).  I used the Leaves stencil from Simon Says Stamp, sponged with Distress Inks (Peacock Feathers, Mowed Lawn, Rustic Wilderness).  I removed the stencil and cleaned off the ink before placing it back over top to add a layer of glass bead gel.  I love the sparkle from this amazing product.  I kept the card design CAS (clean and simple) so that the beautiful leaves were the star, simply adding a sentiment to finish.

I hope you'll join us with your Happy Birthday card(s).  As always, Anything Birthday goes with optional theme.  Hope to see you in the gallery!

I'm sending the above card to Stencil Fun January Challenge - where it's always Anything Stenciling Goes with optional theme.  I went with the Anything stenciling this time. :)

... and I'm also sending this card to Simply Clean & Simple January Challenge - Anything CAS Goes.

Thanks for stopping by!

Card #1:
Stamps:  Perfect Peonies (Clearly Besotted); Greetings (Cavallini & Co)
Paper:   White card stock (Neenah 110 lb.); Mixed Media (Strathmore 140 lb.); Pink Pirouette card stock (SU!)
Ink:   Obsidian Black Pigment Ink (Altenew); Distress Inks:  Kitsch Flamingo, Picked Raspberry, Shabby Shutters, Peeled Paint, Mustard Seed (Tim Holtz)
Accessories:   Dry embossed vellum (gift from a friend), clear embossing powder (Ranger), heat tool

Card #2:
Stamps:  Brushed Wishes (Stampendous)
Paper:   White card stock (Neenah 110 lb.)
Ink:   Distress Inks:  Peacock Feathers, Mowed Lawn, Rustic Wilderness (Tim Holtz)
Accessories:   Leaves Stencil (Simon Says Stamp), sponge brushes, Glass Bead Gel (Golden), palette knife


Monday, May 30, 2022

Glass Bead Snowflake

Hi everyone.  Today I'm sharing a Christmas card with some added sparkle.  The background is from a piece in my stash of a stentil monoprint.  I used brushos in blue and purple (2 colours) sprinkled over a piece of watercolour paper and spritzed with lots of water.

Once dry, I placed a homemade snowflake stencil, cut with my Silhouette Cameo.  I pounced over the stencil with versamark and then sprinkled with white embossing powder, heating to set.  I wanted the snowflake to stand out more, so I washed off the stencil and lined it up over my embossed snowflakes, adding a layer of glass bead gel.  The bead gel dries clear and gives a lovely sparkle to the snowflake.

I added a simple heat embossed sentiment banner to finish the card.

Close-up ...

I'm sending this card over to two challenges.

First, Christmas Craft Creations challenge where they are looking for 2 colours on a Christmas card.

And, also sending this to Rudolph Days Challenge where anything Christmas Goes.


Thanks for coming by for a visit!


If you would like to subscribe by email,
please fill out the subscription form in the upper right sidebar.
Make sure to add "subscribe" to the message.
It is also important to add SWL1subscribers@gmail.com to your contact list
so Google recognizes the address and delivers the updates.

To unsubscribe, please use the same form making sure to add
"unsubscribe" to the message.
Thank you.


Paper:   White card stock (Neenah 110 lb.); Watercolour paper (Arches 140 lb. Cold Press)
Ink:  Brushos, Versamark 
Accessories:   water mister, snowflake stencil cut from acetate on silhouette cameo, white embossing powder, Glass Bead gel (Golden), palette knife, 

Challenges:


Saturday, May 15, 2021

CAS Challenges May Reminder

Hi everyone.  It's already the middle of May and time for reminder cards for both CAS Mix Up and CAS Christmas.  

First up, CAS Mix Up's challenge is host by Susan and I've had a lot of fun ink blending with rainbow colors this month.  The gallery is so pretty!!  Thanks for a great challenge Susan!

Susan is our host.
I used a Fishscale stencil that I made with my Silhouette Cameo.  The image is from Silhouette America.  I placed the stencil over my regular white card stock and secured with tape.  I used my blending brushes (LOVE THEM! - thanks Trina!), to sponge in the colours of the rainbow using Distress Inks (Candied Appled, Carved Pumpkin, Mustard Seed, Mowed Lawn, Salty Ocean, Wilted Violet).  I removed the stencil, washed and dried it and placed it back over the design.  I coated the stenciling with Glass Bead gel using a palette knife.  Removed the stencil again and immediately had it in water.  The glass bead gel takes a little while to dry, but it is so worth the time.  It's so sparkly!

To finish, I added a silhouette die-cut made from a die I received from a dear friend and stamped the sentiment (Bloom Sketches - STAMPlorations - retired) on a black sentiment banner.

The close-up shows the sparkle from the glass bead gel ...

------------------------------------------------

Here's my reminder card for CAS Christmas.  Christine is our host this month.


I love foliage and berry cards for Christmas.  I make a lot of them.  Today I used just a few die-cuts to make a very CAS design.  Adding foil gives the card an elegant look.

I've used double-sided sheets (Sookwang) to cover an A2 card front.  I left the cover on and will keep it handy to die-cut images when I make future cards.  For the one today, I die-cut Holly Branch (Penny Black), removed the cover and then used scraps to first cover the whole holly branch with bright green Deco Foil.  I used red foil card stock to punch out the berries and NOEL and then adhered everything to my card front.

Simple, easy design!

Product Links

------------------------------------------------

I hope you'll check out the challenge blogs to see the amazing cards from our Designers, Guest Designers, and participants.  If you haven't had time to play along, there's over a week left before both challenges close on the 24th at midnight PST.  Come join us!


CAS Mix Up Reminder - Oh Happy Day!
Stamps:  Bloom Sketches - retired (STAMPlorations)
Paper:  White card stock (Neenah 110 lb.); Black card stock (Stampin' Up!)
Ink:  Distress Inks:  Candied Apple, Carved Pumpkin, Mustard Seed, Mowed Lawn, Salty Ocean, Wilted Violet (Tim Holtz); Versamark
Accessories & Tools:  Fishscale Stencil (Silhoutte America), Silhouette Cameo, blending brushes, Glass Bead gel (Golden), palette knife, Silhouette Flower die (gift from friend), White embossing powder (Ranger), heat tool


CAS Christmas Reminder - Foiled Christmas
Stamps:  ---
Paper:   White card stock (Neenah 110 lb.)
Ink:  ---
Accessories:  Green Foil (DecoFoil); Sookwang sheet; Holly Branches die (Penny Black), Red foil card stock (Tonic), 1/8" hole punch, Christmas Phrases dies (Little B)


Challenges:
CAS Mix Up May Challenge - Rainbow Ink Blending
CAS Christmas May Challenge - Foliage and Berries

Wednesday, October 21, 2020

Another Zoom Session with another Zoom Group

Hi everyone.  I'm playing along with another group of crafting friends, meeting up once a month.  We had our first session on Sept. 30th and it was all about using embossing folders.  I have lots, but rarely remember to pull them out.

It was a lot of fun and we all got some samples done and have made some into cards.  We are all sharing our finished cards today, so check below for links to the other girl's blogs.  I hope you'll take a look.  I know you'll be inspired! 

For the card above, the technique was double embossing.  I had never done this before.  It's so easy and the results are awesome!  First I dry embossed white card stock with the Pinewood Planks embossing folder.  I then took the dry embossed card stock and placed it into a second embossing folder, Layered Leaves (both are 3D folders from Stampin' Up!).  I love the design I got with the woodgrain planks in the background and the leaves in the foreground.  So cool!  The card front was sponged with Antique Linen distress ink to highlight the embossed design.

I cut a flower die that was a gift from a sweet friend.  I watercoloured the leaves in shades of brown; the flower petals in red with brown in the center and sponged brown on the outer edges.  I used the same brown marker to add details to the center of the two flowers and finished with a brown half pearl.  The sentiment is stamped in the same brown and then restamped in red.  The colour works perfectly with the flower!

Close-up ...
The next card is a bit of a surprise.  At least I was surprised making it.  The dry embossed panel is made from toilet paper!  Four layers held together with a light spritz of water and then embossed with a leaves folder (Spring Leaves - retired - Elizabeth Craft Designs).  I love how it looks like handmade paper.  
I tore the edges to create a square, adding a die-cut leaf sprig (Little Leaves die - retired - Sizzix for SU!) on top that is watercoloured with bright green ink and coated with glass bead gel.  It's backed with black card stock to add some contrast with a white heat embossed sentiment.

For my last card, I dry embossed a piece of silver foil card stock and then added drips of three colours of alcohol inks.  I used blending solution to thin out the inks so they would flow down the card.  I always use a piece of aluminum foil to protect my work surface and catch any extra ink.  I also wear vinyl gloves, and used my fingers to pick up some extra ink off the foil and press it onto my card stock.  Worked great ... and then I'll use the aluminum foil to make a card as well! :)
I used my favourite combination of alcohol inks for this (all Ranger); Wild Plum, Sunset Orange, Sunshine Yellow.  I added a black die-cut of Flower Flourish (from Penny Black) and stamped my sentiment (Noveau Flowers - retired- Clearly Besotted at the bottom.  The panel is popped up on foam to add a bit of dimension.

Hope you enjoyed my embossing folder cards.  It was fun to learn new ways to use my EFs.

Check out the wonderful cards from the other members of the group:

Thanks for stopping by!


Card #1 - Double Embossing
Stamps:  Scripty Sentiments (AliExpress)
Paper:   Mixed Media (Strathmore 140 lb.); White card stock (Neenah 110 lb.)
Ink:   Distress Inks:  Antique Linen, Fired Brick, Gathered Twigs (Tim Holtz)
Accessories:   Pinewood Planks embossing folder (SU!); Layered Leaves embossing folder (SU!), sponge, water brush, brown marker, brown pearls

Card #2 - Handmade Paper
Stamps:  Essential Messages (Maker's Movement)
Paper:   Toilet paper, White card stock (Neenah 110 lb.); Black card stock (SU!)
Ink:   Bright Green; Versamark
Accessories:   Little Leaves die (Sizzix), Glass Bead Gel (Golden), white embossing powder, heat tool

Card #3 - Foil and Alcohol Inks
Stamps:  Noveau Flowers - sentiment only (Clearly Besotted)
Paper:   Silver Foil card stock (SU!); White card stock (Neenah 110 lb.); Black card stock (SU!)
Ink:   Alcohol Inks:  Wild Plum, Sunset Orange, Sunshine Yellow (Ranger); Black (Memento)
Accessories:   Courrier embossing folder (Carabelle Studios), blending solution, Flower Flourish die (Penny Black)


Thursday, May 30, 2019

Eat, Sleep, Craft, Repeat 2019

(l to r:)  Christine, Trina, Susan, Darnell, Colleen, Loll (me),
Bonnie, Nancy, Linda

Hi everyone.  Recently returned home after spending a week with my stamping buddies.  This is the third year for the ESCR (Eat, Sleep, Craft, Repeat) retreats, with each year being better than the last!  We were lucky to find a very large house in the Crescent Beach, B.C. area to accommodate our expanding group and allow us the opportunity to have wonderful guests join us throughout the week.

What fun we had!  From last year's group of me, Susan, Christine, Nancy, Darnell, and our guest Trina (who came for the whole retreat this year) ... we were joined by our wonderful, sweet friend, Bonnie.  We were all so excited to finally meet Bonnie in person after being on-line friends for years!

We also had three guests join us for a few days; Linda and Colleen, and Nancy's daughter Jeani.  We all just clicked and had a great time together!

We had Alex taking photographs of our crafting again this year.  Check out the tab at the top of this blog Retreat Photos to see us in action!

The location for the retreat was awesome.  Huge house so that we could spread out; Crescent Beach and White Rock Beach within a short drive (gorgeous!!); a local craft store for some retail therapy; and a delicious, yummy bakery a couple of blocks away! :)

Today I'm sharing a card made from the retreat.  This is one of my cards from an Embossing Paste / Gel session that I led.  We played with glass bead gel, white paste, glitter gels, crackle paste and more.  Everyone had fun getting messy! :)

This is one of my favourites from the session.  I started by smooshing my card front with distress inks in yellow, orange and reddish purple.  Love this combination.  I borrowed this amazing stencil from my friend Nancy and sponged with the same colours over the flower, but with more intensity.  I cleaned off the stencil, placed it back over top, lining up the image.  I then used a palette knife to add a thick layer of glass bead gel.  I LOVE the sparkle and shine from this gel.  It's really spectacular.

Here's a close-up ...
Everyone from the retreat is posting one of their cards made at the retreat.  I hope you'll find time to pop by and visit to see what we were up to!


I'll be sharing more retreat cards over the next few weeks.  See you soon!


Entering this card into the ARTplorations May Mixed Media Challenge ...


Stamps: smile today! (Penny Black)
Paper:  Mixed Media paper (Strathmore 140 lb.); White card base (Neenah 110 lb.)
Ink:  Distress Inks:  Mustard Seed, Ripe Persimmon, Seedless Preserves (Tim Holtz)
Accessories & Tools:  water mister, Peeking Dahlias stencil (STAMPlorations), Glass bead gel (Golden), palette knife

Challenges:
ARTplorations May Mixed Media Challenge - use a stencil


Saturday, May 26, 2018

Embedded Brushos Technique

Hi everyone.

Before I tell you about today's card, wanted to mention that for the past couple of weeks I haven't been receiving all the comments that are made on my blog posts.  I don't know if it's a problem with blogger for with gmail.  In the meantime, I'm checking my posts regularly and thanks to all that leave me comments.  I appreciate the time you take ... you are all so encouraging!  Thank you!


Made the background for the above card at the retreat using a technique that I led (we all took turns leading techniques).  Before we talk about the one above, I need to start at the beginning since the card is made with the third (and final) pull of the colours, which is always the lightest version.

Click HERE to see the video that inspired this card (first 6:50 min)  Brenda in IN --- you should definitely give this a try! :)

I will explain how it was done.  First, picked out an embossing folder ... the one I used is script.  Opened the folder up and placed a small panel of hot press watercolour paper inside.  Sprinkled with Brushos (I believe I used leaf green, lime, turquolise, ultra marine blue --- just a little of the ultra marine).  Next, I closed the top of the embossing folder and ran it through my Big Shot.  At this point everything is still dry.

The embossing folder dry embossed the hot press watercolour paper, embedding the Brushos into the paper.  I removed the w/c paper and spritzed with water.  By embedding the Brushos, they don't move as much once water is added.

I found there was still ink left inside my embossing folder, so I placed a second clean piece of hot press watercolour paper, spritzed the inside top of the folder, closed the lid and ran it through the Big Shot.  It picked up the left-over colour and dry embossed the panel at the same time.  Still had left over wet ink inside my folder so placed a third panel of clean hot press watercolour inside and pressed down on the lid, just using my hands as pressure (embossing folder stamping technique).  That have me the print I used on the card's background above.  Some of the girls only got one impression, some two ... but I was lucky enough to get three. :)

Once the other two panels were dry, I used a brayer to ink lightly over both panels to highlight the dry embossed areas.  Here's a photo of the two other pieces that I will make into cards in the future.
                             First pull                                            Second pull
Sorry for the long winded message.  Hope you'll give this fun and easy technique a try.

To finish off the card at the top of the post, I placed a small tulip stencil over top of my muted background and sponged with peacock feathers distress ink.  I then added a layer of glass bead gel over top.  The tulips are very sparkly! :)


Stamps:  Everyday Sentiments (AliExpress - Current link:  https://www.aliexpress.com/item/English-words-Transparent-Clear-Silicone-Stamps-for-DIY-Scrapbooking-Card-Making-Kids-Christmas-Fun-Decoration-Supplies/32851757043.html?spm=2114.13010708.0.0.3efd4c4d1JJmOc)
Paper:   Watercolour paper (Arches Hot Press 140 lb.); White card base (Neenah 110 lb.)
Ink:  Brushos:  Leaf Green, Lime, Turquoise, a litttle Ultra Marine); Peacock Distress Ink (Tim Holtz); Delicata Gold (Tsukineko)
Accessories & Tools:  Script embossing folder (Sizzix for Stampin' Up!); water mister, brayer,  acetate sheet, cut file for tulips from Silhouette America, Silhouette Cameo cutting machine, sponge, Glass Bead Gel (Goldent), palette knife

Tuesday, March 20, 2018

Glass Bead Roses

Hi everyone.  I had to make one more acetate card before the CAS Mix Up March Challenge - Acetate closes.  The challenge is winding down.  There's still four days left to enter.


Susan has us playing with acetate this month and I have shared three cards each using Acetate in a different way - one card with Alcohol Inks, one card with dry embossed Acetate, and one where I have used Acetate to cut a stencil using a die.  There are many other ways to use acetate on cards ... check out the challenge blog to see some video tutorials.  It's a very versatile product to have in your craft room.

The card above uses a Rose stencil.  I used a piece of acetate from the same background as this card.  I do love this combination of colours, and it looks so pretty with the glass bead gel through the rose stencil.  A bit difficult to get a good picture because of the transparency, but the texture and shine is very unique to this amazing product.   If you ever get a chance to buy some, it's worth it.  I use Golden Brand glass bead gel, but there are other brands.

I backed my panel with a piece of copy paper to show off the colours of the alcohol inks.  I added a white embossed black banner at the bottom.

Here's a close-up

I hope you'll come play along at CAS Mix Up if you haven't had a chance yet.


Stamps:  Fond Expressions 2 (STAMPlorations)
Paper:  White card stock card base (Neenah 110 lb.); Black (SU!)
Ink:  Alcohol Inks:  Wild Plum, Red Pepper (Ranger); Tangerine (Pinata); Versamark
Accessories & Tools:  acetate sheet, Rose stencil (CUTplorations), glass bead gel (Golden), white embossing powder, heat ool

Challenges:
CAS Mix Up March Challenge - Acetate

Friday, January 19, 2018

Fun with Magicals

Hi everyone.  Another card for the CAS Mix Up January Challenge - Cling Wrap.  There's five more days left before the challenge closes.


I started out by playing with my new Lindy Magicals that I got for Christmas.  Hubby got me quite a few things on my wish list.  This was on it because of Mac Mable (The Sweetest of Peas).  She has done some AMAZING colouring with these little pots of powder.  Thanks for enabling me Mac!!

Since I've used something new to me, I'm sharing this card at AAA Challenge #106 - Quote  - my second entry.

I used two colours for the background - tibetan poppy teal and ponderosa pines olive.  I sprinkled just a little powder, spritzed with water and then covered it with a piece of cling wrap.  I used my hands to move the colour around and scrunch up the cling wrap.  Once dry, I removed the plastic and a very subtle but pretty design was left where the colours pooled around the creases.

I used a harlequin stencil to add a bit of glass bead gel on the right hand side of the background.  I die-cut the white daisy and sponged the tips and center with Peacock Feathers distress ink.  I was inspired by Izzy's beautiful card.  I added a colourful rain stone to the center for a pop of colour.  The sentiment is stamped in silver Delicata  ink.


I've already sent this off to a friend who had major surgery at the beginning of January.  My hope is that it brought her some joy. :)

My CAS design has magical powders used with cling wrap technique, stenciling with glass bead gel, die-cut, sponging and stamping.

Still lots of time to play along at CAS Mix Up January Challenge - Cling Wrap!


Stamps:  A Little Sentimental (Clearly Besotted)
Paper:  Coated card stock (gifted from a friend), White (Neenah 110 lb. card stock)
Ink:  Lindy Magicals (tibetan poppy teal, ponderosa pines olive); Peacock Feathers Distress Ink (Tim Holtz); Delicata silver (Tsukineko)
Accessories & Tools:  water mister, cling wrap, harlequin stencil (cut with my Silhouette Cameo), glass bead gel (Golden), palette knife, Daisy die (AliExpress), sponge

Challenges:
CAS Mix Up January Challenge - Cling Wrap
AAA Challenge #106 - Quote (second entry)

Thursday, June 01, 2017

CAS Mix Up June Challenge

Hi everyone.  It's the beginning of June and another start of a new challenge.  This time I'm hosting CAS Mix Up and the challenge is ...


I do love playing with all kinds of embossing pastes and gels.  These add so much wonderful dimension, either through a stencil, or on their own randomly over a card front.  The card for today uses my favourite, Glass Bead Gel made by Golden.  The gel is packed full of teeny, tiny glass beads and when dry, add sparkle like nothing else.

I started my card by using Clarity brushes to add colour over the large flower stencil. I love how the flower head has three lovely colours that just blend so beautifully.  I stamped my sentiment (a gift from a sweet friend) and called it done.

But as I kept looking at it sitting on my desk, I decided it would be perfect to have a coating of glass bead gel.  I placed the clean stencil back over top, lining it up perfectly.  Taped it down and used my palette knife to add the gel.  With this gel, you need to make the coating thick in order to accommodate the depth of the glass beads.  The sparkle is so pretty.  Here's a close-up ...


The camera doesn't catch the all the sparkle, but you can get a good idea of how pretty it is and the texture it adds.  I also added some splatters for even more interest.

We are so excited to have Marianne (Marianne's cards 'n stuff) as our Guest Designer this month.  Marianne won the CAS Mix Up April Inlaid Diecutting challenge with this beautiful card.  Welcome Marianne!

I hope you'll come join us for this fun challenge.  Don't have embossing paste in your supplies??  Not to worry, we have included links on the challenge blog on how to make your own.  And while you're there make sure to check out the beautiful cards from our wonderful  Design Team and Guest Designer, Marianne.

I'm playing along with a few challenges:
AAA Cards #91 --- they are celebrating their third birthday - congrats!
Simon Says Wednesday - Anything Goes
Time Out #84 - Flowers and Friends make life a garden - second entry
Less Is More #330 - Shimmer


Stamps:  Gratitude (Penny Black)
Paper:  White (Neenah 110 lb. card stock)
Ink:  Distress Inks:  Shabby Shutters, Peeled Paint, Mustard Seed, Spiced Marmalade, Ripe Persimmon, Brushed Corduroy (Tim Holtz)
Accessories & Tools:  Clarity Brushes, Large Lovely Flower stencil (Studio 490 - Wendy Vecchi), Glass Bead Gel (Golden), palette knife

Challenges:
CAS Mix Up June Challenge - Embossing pastes/gels
AAA Cards #91 - 3rd birthday bash
Simon Says Wednesday - Anything Goes
Time Out #84 - Flowers & Friends
Less Is More #330 - Shimmer