Showing posts with label winter. Show all posts

Monday, January 12, 2026

Winter Birthday

Hi everyone.  I'm back to card making with today's card.  I started off by sponging a background using three DI inks (Salvaged Patina, Peacock Feathers, Mermaid Lagoon) onto white cardstock.  It was then dry embossed with the Snowflake Oval Frame Folder from Simon Says Stamp and white pigment ink was tapped over top.

I topped the card front with a silver foil die-cut group of trees;  then added a simple Winter Birthday sentiment in more of the Peacock Feathers ink.

Close-up ...
The close-up shows the shine from the silver foil trees. :)  Sorry about the photos ... looks like my camera is on its' last legs. 

Today's card was made following two challenge:


Thanks for stopping by!

Stamps:  Festive snippets (Penny Black); Birthday sentiment (unknown)
Paper:   White card stock (Neenah 110 lb.) - card base;  Silver foil card stock (SU!)
Ink:   Distress Inks:  Salvaged Patina, Peacock Feathers, Mermaid Lagoon (Tim Holtz); White Unicorn ink (Hero Arts)
Accessories:   Snowflake Oval Frame embossing folder (SSS); Christmas Grove die (Temu Canada)

Challenges:
Seize the Birthday #318 - Blizzard of Snowflakes - Make your own Snowflake Background

Tuesday, January 28, 2025

Dry Embossed Highlights over Ink Blending - Group of Seven

Hi everyone.  Today's technique is a combination of techniques (sponging, dry embossing, highlighting).  You have probably done this before, but it's a good reminder to use this technique again.  There are two videos ... one has a twist on the original technique.

Please check out the details for this month's technique and link to videos on the blog ...

This is how I made the card.  I started by sponging the a card front of regular Neenah white card stock.  I used three colours of Distress Oxide inks (Mustard Seed, Abandoned Coral, Picked Raspberry).  I did it in (sort of) vertical strips; left my card front overnight to dry, but you can use a heat tool to speed things up.

I then embossed my ink blended card front using the Floral Field embossing folder (Simon Says Stamp).  I used my white pigment ink pad (Glacier White - Ranger) to lightly tap over top of the embossing, which highlights the design.  I let it dry and then did a few more coats of white ink tapping, drying in-between each time.  The ink does take on the colour from underneath, but it gives a lovely muted look to the embossing.

To finish, I added a white die-cut of flowers (Painted Flower Stems die - Memory Box) and stamped a Simply Sentiment (Lawn Fawn) to finish.
* * * * *
Here's what I learned when I experimented with this technique ...
  • DOX inks work best to get a smooth blended transition between colours, but they also take longer to dry and bleed through more than dye inks
  • Make sure to tap lightly with your white ink (or whatever colour you are using for highlights).  If too much pressure is applied, the colour will go through to the background of the embossed panel.
  • Try this with patterned paper or coloured card stock as the base.
* * * * *
I made some more cards with this fun technique.  This time I went tropical.  Info on what I used is below in the card supplies ...


.. and for Christmas ...
Sending the above card to Rudolph Days January Challenge.

... and Winter-inspired.  This time I randomly sponged the two colours instead of two separate colours that meet in the middle ...
Thanks for stopping by!

Card #1: (Spring)
Stamps:  Simply Sentiments (Lawn Fawn)
Paper:   White card stock (Neenah 110 lb.)
Ink:   Distress Oxide Inks:  Mustard Seed, Abandoned Coral, Picked Raspberry (Tim Holtz); Glazier White pigment ink (Ranger)
Accessories:  sponges, Floral Field embossing folder (Simon Says Stamp); Painted Flower Stems die (Memory Box)

Card #2: (Tropical)
Stamps:  Simply Sentiments (Lawn Fawn)
Paper:   White card stock (Neenah 110 lb.); Black card stock (SU!)
Ink:   Distress Oxide Inks:  Mowed Lawn, Peacock Feathers (Tim Holtz); Glazier White pigment ink (Ranger); Black ink (Memento)
Accessories:  sponges, Areca Palm embossing folder (Altenew); Pam tree die (AliExpress)

Card #3: (Christmas)
Stamps: Christmas Sentiments (Gina Marie Designs)
Paper:   White card stock (Neenah 110 lb.)
Ink:   Distress Oxide Inks:  Mowed Lawn, Salty Ocean (Tim Holtz); Glazier White pigment ink (Ranger)
Accessories:  sponges, Gracious Leaves embossing folder (Memory Box); Pepperberry embossed and die-cuts (Simon Says Stamp)

Card #4: (Winter)
Stamps:  n/a
Paper:   White card stock (Neenah 110 lb.)
Ink:   Distress Oxide Inks:  Speckled Egg, Iced Spruce (Tim Holtz); Glazier White pigment ink (Ranger)
Accessories:  sponges, Gracious Leaves embossing folder (Memory Box); trio of trees die (AliExpress); sentiment die-cut (gift from friend)

Challenges:

Friday, January 24, 2025

Penny Black - Resting

Hi everyone.  Today I'm sharing a card using a new image (Resting - Penny Black).  I love this image, but it was challenging to watercolour with all those little berries.  I definitely will use markers next time. :)

I stamped in black ink onto mixed media paper and heat embossed with clear.  Then watercoloured the image using Distress Inks (listed below in the supplies).  I added a wash of diluted Faded Jeans at the end.  In hindsight, I should have watercoloured the background first or sponged.  It would have been easier. :)  

To finish, I splattered with diluted white pigment ink.  Once the splatters were dry, I stamped a sentiment (Festive Snippets - Penny Black) in black ink.

Close-up ...
Sending the above card to the following challenges:

 
Thanks for stopping by!

Stamps:  Resting; Festive Snippets (both Penny Black)
Paper:   White card stock (Neenah 110 lb.); Mixed Media (Strathmore 140 lb.)
Ink:  Black (Momento); Distress Inks:  Candied Apple, Carved Pumpkin, Wild Honey, Brushed Corduroy, Gathered Twigs, Rusty Hinge, Faded Jeans (Tim Holtz); White Pigment ink (SU!)
Accessories:   Clear embossing powder (Ranger), heat tool, paint brushes

Friday, January 17, 2025

More Ombré for Gof7

Hi everyone.  More cards for December's Group of Seven - Ombré - Design Element.  Today I'm sharing two Winter / Christmas cards that use stenciling with the Ombré technique. 

Group of Seven Cardmakers

I used DOX inks for sponging the Ombré background ... they go on so smoothly and create more of an opaque look.  I used three shades of purple inks (Shaded Lilac, Wilted Violet, Villaneous Potion) over top of the stencil I made from a Tree Frame die (Gina Marie Designs), cut from Yupo paper.  Yupo makes great stencils ... it doesn't tear and you can use it many times; plus any water soluable ink will wipe off with a damp paper towel. :)

I cut my panel down a bit and then added a stamped sentiment in Wilted Violet ink to match the sponging.  Very quick and easy card to make!

Sending the above card to CAS on Friday Challenge #300 - Winter ...
* * * * *
For the next card, I used a lovely tree stencil from STAMPlorations called Christmas Trees.  I created a sponged Ombré background for the branches using only one colour of distress ink - Mowed Lawn.  The star is also Ombré using Wild Honey distress ink.  Once the sponging was dry, I placed the clean stencil back over top and used a palette knife to add a layer of Glass Bead Gel (Golden).  It's so beautiful when it dries, showing off the colour below and creating a sparkly finish on top with lots of texture.   A simple sentiment vellum banner, heat embossing with gold glitter powder, finishes this CAS design.


Thanks for stopping by!

Card #1:
Stamps:  Christmas Sampler (Paper Smooches - closed)
Paper:   White card stock (Neenah 110 lb.)
Ink:   Distress Oxide Inks: Shaded Lilac, Wilted Violet, Villaneous Potion (Tim Holtz)
Accessories:   Sponges, Tree frame die (Gina Marie Designs) for creating stencil, Yupo Paper

Card #2:
Stamps:  Christmas Sampler (Paper Smooches - closed)
Paper:   White card stock (Neenah 110 lb.)
Ink:   Distress Inks: Mowed Lawn, Wild Honey (Tim Holtz)
Accessories:   Sponges, Christmas Tree stencil (STAMPlorations), Glass Bead Gel (Golden); palette knife

Thursday, January 02, 2025

Happy New Year!!


Hi everyone.  I hope you had a wonderful Holiday season and are starting off 2025 happy and healthy!!

Last year was a tough year for me.  I had more medical issues to deal with and ended up having surgery near the end of July.  It's taken most of the remainder of 2024 for me to recovery, but I am now feeling much better. 

On a positive note ... we found our forever home and get the keys a few days ago! YAY!  We sold in May last year and weren't able to find what we wanted so leased a rental house for a year.  Thankfully, we now can take our time moving into our new house since we still have the rental house until the end of March.  It all worked out in the end!! :)

On to today's card ...
I was inspired a three challenges to create this card using some new-to-me Christmas gifts. :)

I started by sponging the background of my card front panel with distress inks (Salvaged Patina, Wilted Violet), then ran it through my Gemini with the Comfy embossing folder (Penny Black).  I used my white pigment ink pad to lightly tap over top of the embossing, which left white ink on the highlights of the texture.  I tore two strips of white card stock to create the snow hills at the bottom and added a die-cut reindeer, (Antlers - Penny Black), cut twice and glued together to create a thick die-cut.  The sentiment (Festive Snippets - Penny Black) is stamped at the bottom in more Salvaged Patina ink.

This card is made with all Penny Black products. :)  Speaking of Penny Black, I have been a contributor for them since 2018, along with many other talented card makers.  This year they have switched things up and are not using most of the past contributors.  I'm a little sad that I won't be designing for them.

Close-up ...
Sending this card to the following challenges:


Thanks for stopping by!

Stamps:  Festive Snippets (Penny Black)
Paper:   White card stock (Neenah 110 lb.)
Ink:   Distress Inks:  Salvage Patina, Wilted Violet (Tim Holtz); Unicorn pigment ink (white) - Hero Arts
Accessories:   Comfy embossing folder (Penny Black), Antlers die (Penny Black), sponges 

Friday, January 07, 2022

Cozy Cabin

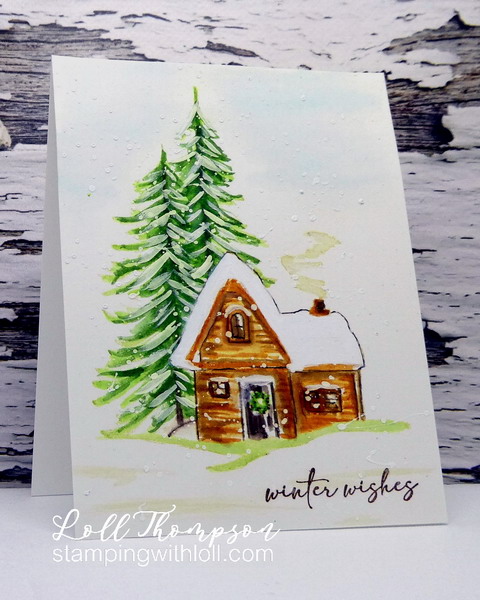
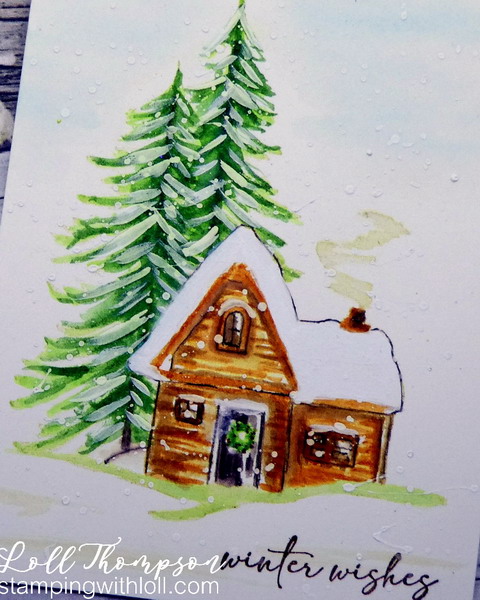
Hi everyone.  Today I'm sharing a no-line watercoloured card using a beautiful winter scene from Penny Black (Cozy Cabin).

I started by stamping the image onto Hot Press watercolour paper in Antique Linen distress ink (very light).  Then used a variety of other distress ink colours to watercolour the image and add a light blue to the sky.  Finished the card by using white acrylic paint to add snow to the trees, cabin and splattered over the whole card.  The sentiment (Snowflake Season by Penny Black) is stamped in brown.

Close-up ...

* * * * *
We have had a lot of snow over the past week.
Jessie has enjoyed hopping through the deep snow and as always,
finding the biggest stick she can carry makes her happy.


If you would like to subscribe by email,
please fill out the subscription form in the upper right sidebar.
It is also important to add sw1subscribers@gmail.com to your contact list
so Google recognizes the address and delivers the updates.


Stamps:  Cozy Cabin; Snowflake Season (both Penny Black)
Paper:   Watercolour Paper (Arches 140 lb. Hot Press)
Ink:   Distress Inks:  Antique Linen, Rusty Hinge, Gathered Twigs, Ground Espresso, Mowed Lawn, Rustic Wilderness, Fired Brick, Tumbled Glass (Tim Holtz)
Accessories:  paint brushes, splatter brush, white acrylic paint

Challenges:


Friday, January 15, 2021

CAS Challenges January Reminder

Hi everyone.  We are half way through the month, which means it's time for the CAS Challenges reminder cards. 

First up, CAS Mix Up - Splatters. This has been a fun and easy challenge.  Thanks for hosting Hilary!


As I mentioned in my blog earlier (2nd card in post), I have been working on an on-line class by Heather Telford (Heather Telford's Winter Wonder class).  I made two cards that I'm sharing today using her Snowy Vistas tutorial.  These are so much fun to make! :)

Close-up ...
This card is a morning sunrise card.  I used the same colours Heather used for her example ... LOVE these colours together!   :)  Added white splattering for falling snow, a simple frame, and stamped the sentiment to finish the card.

Sponging, masking, stamping, die-cutting, and splattering are included in the CAS design.


------------------------------------------------

Next up is the CAS Christmas Reminder with Julia as host.  My favourite thing is to make backgrounds for my silhouettes.  So fun!  Thanks Julia!

This time I made a Night Sky Snowy Vista following the tutorial in Heather Telford's Winter Wonder class.

I punched a small circle from a post-it note to mask for the moon before sponging the sky :)  Used different trees for this card than the one above.  There are so many things that could be added to create wonderul winter scenes.

Sponging, masking, stamping, and splattering are included on this card design.

I'm also going to add this card to the CAS Mix Up Challenge - Splatters ...

------------------------------------------------

I hope you'll check out the challenge blogs to see the amazing cards from our Designers, Guest Designers, and participants.  If you haven't had time to play along, there's over a week left before both challenges close on 24th at midnight PST.  Come join us!


CAS Mix Up Reminder - Winter Sunrise
Stamps:  Tannenbaum Trio (Penny Black); Christmas Sentiments
Paper:  Mixed media (Strathmore 140 lb.); White card stock (Neenah 110 lb.)
Ink:   Distress Inks:  Wild Honey, Worn Lipstick, Dusty Concord, Black Soot (Tim Holtz)
Accessories:   Blending brushes, white acrylic paint for splattering snow, post-it note masks, Simple Stackers frames (Penny Black)

CAS Christmas Reminder - Snowy Night
Stamps:  Season's Greetings (retired) - Stampin' Up!; Snowglobe Sentiments - retired (My Favorite Things)
Paper:  Mixed media (Strathmore 140 lb.); White card stock (Neenah 110 lb.)
Ink:  Distress Inks:  Tumbled Glass, Salty Ocean, Chipped Sapphire (Tim Holtz)
Accessories & Tools:  3/4" circle punch, post-it note, blending brushes, white acrylic paint, splatter brush

Challenges:

Thursday, January 02, 2020

CAS Watercolour January 2020 Challenge

Hi everyone.  Welcome to our first challenge of 2020!  This month's challenge is being hosted by the very talented and sweet, Bonnie (Stamping with Klass).  She has picked ...

Here's a sampling of cool colors

Perfect challenge for this time of year.  The above card is a birthday card for my dear friend, Karen (Snippets), who celebrated her birthday yesterday!

Happy Birthday Karen!!

About the card ... I stamped the woodland stream in weathered wood, keeping my stamp and card front in my misti.  I used a waterbrush to soften the lines of the stamping and give it more of a watercoloured look.  I then stamped again to bring back some of the details.  Added lots of powder from my embossing budy and stamped in Versamark, embossing in clear.  I then watercoloured the stream, hill tops and sky in shades of blue distress inks (salty ocean, faded jeans, chipped sapphire).  Die-cut the image with a circle die, popping it up over top of a dry embossed snowfall background (gift from friend).  Finished the card with a black sentiment banner heat embossed in white.  Inside the card is "happy birthday".  This could have been a Christmas card as well, if I changed the birthday sentiment.

Close-up ...
We are excited to have Chrissie (Simply One of a Kind) as our very first Guest Designer of 2020.  Welcome Chrissie!

Please check out the challenge blog to see the beautiful "Cool Colours" watercoloured cards from Chrissie and our talented Designers.  Come play along!


Stamps:  Woodland Stream (Inkylicious); Sentiment - Merry Up (Penny Black)
Paper:  Mixed Media (Strathmore 140 lb.); White base (Neenah 110 lb.);  Black (SU!)
Ink:  Distress Inks:  Weathered Wood, Salty Ocean, Faded Jeans, Chipped Sapphire (Tim Holtz); Versamark
Accessories & Tools:  water brush, embossing buddy, clear embossing powder, heat tool, circle nestability (spellbinders), white embossing powder

Challenges:
CAS Watercolour January 2020 - Cool Colours


Thursday, October 03, 2019

CAS Christmas October Challenge

Hi everyone.  It's the start of the October challenge for CAS Christmas.  Luckily I've been making Christmas cards all year and my stash is almost big enough.

This month's challenge is hosted by Susan (Cardmaker's Garrett) and she chose ...


I had some fun making this card.  I used four different die-cuts along with some smooshing, watercolouring and stamping part of a sentiment.  Also used coloured card base again, which I really like with this scene.

The background blue is smooshed and was sitting in my stash, just waiting for the right card.  I used a large line of tree die, splashing with two shades of green distress inks.  The line was cut in half, so I have another to make a second card.  The snow was a die-cut from Susan that had the word "winter" attached to it.  The shape was just right, so I cut off the letters.  All the parts were glued together and then splattered with diluted white acrylic paint for some falling snow.

I also used a small wreath die that had a tiny deer, cutting it off to add just in front of the trees ... it was just the perfect size.  The last was the die-cut square with MERRY attached.  LOVE it!  I masked a sentiment stamp to just use "Christmas" and heat embossed in white.  All these dies and sentiment were NBUS until today. :)

Close-up ...
We are excited to have Lyn (Lyn's Paper Petunia) as our Guest Designer this month.  Please check out the challenge post to see Lyn's and our Designers fabulous Winter Scene cards.  Then come play along!


Stamps:  Christmas Sentiments (Gina Marie Designs)
Paper:  Mixed Media (Strathmore 140 lb.); Island Indigo (Stampin' Up!)
Ink:  Distress Inks:  Salty Ocean, Twisted Citron, Mowed Lawn, Brushed Corduroy, Gathered Twigs (Tim Holtz); Versamark
Accessories & Tools: Line of Trees die (AliExpress); Deer from wreath die (AliExpress), Merry Frame die (Poppy Stamps); white embossing powder, heat tool, white acrylic.

Challenges:
CAS Christmas October Challenge - Winter Scene

Wednesday, January 16, 2019

Winter Wonderland

Hi everyone.  Sharing watercoloured card today of a NBUS (never before used schtuff ... as Dolly would say) stamp.  This is from Serendipity.  Very simple card with the stamped image watercoloured with distress inks and fussy cut.  Created a peek-a-boo window card with a sky background and popped the image over top.  I added wink of stella to the snow for a bit of sparkle but it doesn't show in the photo.

This is my reminder card for the CAS Watercolour January Challenge - Winter.  There's still over a week to play along in the challenge.


Here is a close-up ...
I hope you'll have time to check out the reminder post on the challenge blog to see new, inspiring cards from our Designers and Guest Designer, Janet.  Then come play along!


Stamps:  Cardinals (Serendipity Stamps)
Paper:  Mixed media (Strathmore 140 lb. 400 Series); White card base (Neenah 110 lb. card stock)
Ink:  Distress Inks:  Twisted Citron, Mowed Lawn, Mustard Seed, Broken China (Tim Holtz); Real Red (SU!)
Accessories & Tools:  Water brush, Clear Wink of Stella

Challenges:
CAS Watercolour January Challenge - Winter