Showing posts with label scene. Show all posts

Thursday, January 02, 2025

Happy New Year!!


Hi everyone.  I hope you had a wonderful Holiday season and are starting off 2025 happy and healthy!!

Last year was a tough year for me.  I had more medical issues to deal with and ended up having surgery near the end of July.  It's taken most of the remainder of 2024 for me to recovery, but I am now feeling much better. 

On a positive note ... we found our forever home and get the keys a few days ago! YAY!  We sold in May last year and weren't able to find what we wanted so leased a rental house for a year.  Thankfully, we now can take our time moving into our new house since we still have the rental house until the end of March.  It all worked out in the end!! :)

On to today's card ...
I was inspired a three challenges to create this card using some new-to-me Christmas gifts. :)

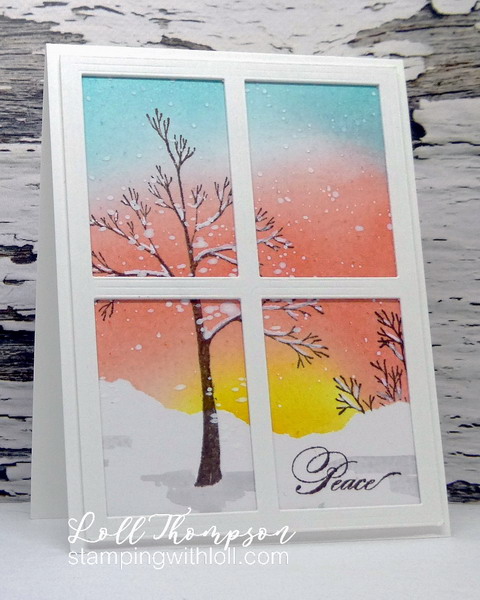
I started by sponging the background of my card front panel with distress inks (Salvaged Patina, Wilted Violet), then ran it through my Gemini with the Comfy embossing folder (Penny Black).  I used my white pigment ink pad to lightly tap over top of the embossing, which left white ink on the highlights of the texture.  I tore two strips of white card stock to create the snow hills at the bottom and added a die-cut reindeer, (Antlers - Penny Black), cut twice and glued together to create a thick die-cut.  The sentiment (Festive Snippets - Penny Black) is stamped at the bottom in more Salvaged Patina ink.

This card is made with all Penny Black products. :)  Speaking of Penny Black, I have been a contributor for them since 2018, along with many other talented card makers.  This year they have switched things up and are not using most of the past contributors.  I'm a little sad that I won't be designing for them.
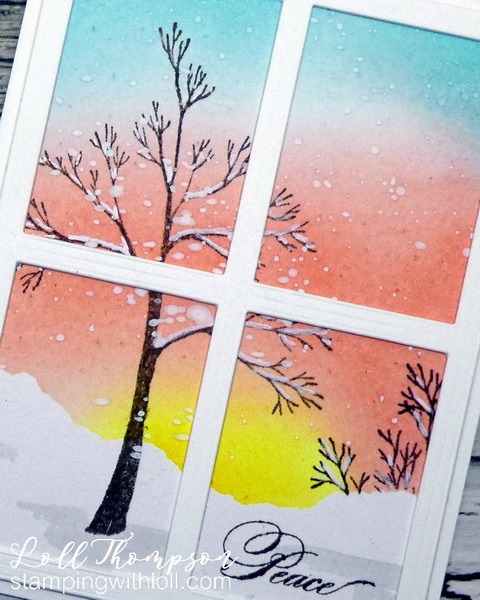
Close-up ...
Sending this card to the following challenges:


Thanks for stopping by!

Stamps:  Festive Snippets (Penny Black)
Paper:   White card stock (Neenah 110 lb.)
Ink:   Distress Inks:  Salvage Patina, Wilted Violet (Tim Holtz); Unicorn pigment ink (white) - Hero Arts
Accessories:   Comfy embossing folder (Penny Black), Antlers die (Penny Black), sponges 

Thursday, December 05, 2024

Hearth - Penny Black

Hi everyone,

Today I've used one of the newer stamps from Penny Black - Hearth.  I stamped onto mixed media paper in black pigment ink and heat set before watercolouring with Distress Inks.  I just love painting these adorable bears!! :)

Close-up ...
I used the matching die (Hearth Cut Out) to die-cut the main image, along with two gifts I had stamped and watercoloured.  I started with adding a card front of white dry embossed with Diagonals (Penny Black).  I adhered it to my card base and then added the heart scene overtop, making sure to add a few pop-dots at the top (under star, clock, candles, and trees).  The two gifts were added on top on the right side.  I cut the larger frame (Double Frames - Penny Black) from Real Red card stock and placed it over top of the image, making sure that the star on top had the frame underneath it.

To finish, I added a lovely gold foiled sentiment given to me by a sweet friend.

I'm entering this card into a few challenges:
2)  Peace on Earth #77 - inspired by the traditional colours on their mood board
 

Thanks for stopping by!

Stamps:  Hearth (Penny Black)
Paper:   White card stock (Neenah 110 lb.); Mixed Media (Strathmore 140 lb.); Real Red card stock (SU!)
Ink:  Black Pigment (Altenew Nocturne); Distress inks:  Brushed Corduroy, Gathered Twigs, Lumberjack Plaid, Aged Mahogany, Candied Apple, Mowed Lawn, Rustic Wilderness, Hickory Smoke, Black Soot (Tim Holtz); Delicata Gold (for the ribbon and bows on the presents) 
Accessories:   Watercolour Paint Brushes, Hearth Cut Out (Penny Black); Diagonals embossing folder (Penny Black); Double Frames (Penny Black); Red chalk, white acrylic pen (Posca), Crystal Glaze (Nuvo)

Sunday, August 28, 2022

Kraft and White Winter Scene

Hi everyone.  Several months ago a group of us did a Zoom call and we sponged white onto kraft to create some vintage-style cards.  I posted several of the cards HERE, but this one was missed ... so I'm sharing now.

This card uses a beautiful image Country Chapel (Stampscapes), which works so well with this technique.  I stamped in Archival Coffee ink (Ranger) and then sponged around the image with white pigment ink, creating sky and hills (using torn masks).  I used some diluted white acrylic paint to add more snow to the church and trees and then also splattered to create falling snow.  The sentiment (Deco Christmas -  Tim Holtz) is stamped in the same ink.

Thanks for stopping by!


If you would like to subscribe by email,
please fill out the subscription form in the upper right sidebar.
Make sure to add "subscribe" to the message.
It is also important to add SWL1subscribers@gmail.com to your contact list
so Google recognizes the address and delivers the updates.

To unsubscribe, please use the same form making sure to add
"unsubscribe" to the message.
Thank you.


Stamps:  Country Chapel (Stampscapes); Deco Christmas (Tim Holtz)
Paper:   White card stock (Neenah 110 lb.); Baked Brown Sugar card stock (SU!)
Ink:   Coffee (Archival ink - Ranger); White pigment (Unicorn by Hero Arts)
Accessories:   sponges, paint brushs, white acrylic paint, torn masks from post-it notes


Monday, December 20, 2021

Merry Christmas!!

Hi everyone.  Today I'm sharing something a little different.  I bought this snow globe die (Snow Globe A2 Shaker die - Honey Bee) many months ago with the plan to use it for my Christmas cards this year.  Needless to say, I have changed my mind on that. :)  This was like a card-making marathon! :)

But, I'm happy I made this.  I followed Jennifer McGuire's video "Shaker Ornaments".  I used ten layers of card stock frames, two layers of acetate centers, along with the original background center and a separate sentiment.  Whew!  That's a lot of die-cutting. :) 

Close-up ...
I hope you enjoyed seeing my snow globe shaker.  This will be a one-of this year. :)  

I'm signing off for the rest of the year.  I want to thank all my friends, followers, and subscribers for visiting my blog throughout the year.  I appreciate all of you!

Merry Christmas!
Wishing you a happy and healthy holiday season
and the best for 2022!

And a very Merry Christmas from Jessie!!

I'll be back on January 1, 2022 with my CAS Mix Up Challenge card.
See you then!


If you would like to subscribe by email,
please fill out the subscription form in the upper right sidebar.
It is also important to add sw1subscribers@gmail.com to your contact list
so Google recognizes the address and delivers the updates.


Saturday, December 11, 2021

Penny Black - Picturesque

Hi everyone.  Sharing another of the new stamps from Penny Black's Hello Winter 2021 release.  This is a clean and simple card that came together quickly (quick for me, that is). :)

Started by creating a mask for the snow, sponging above to create the rising sun and sky.  Used distress inks: Mustard Seed, Abandoned Coral, Salvaged Patina.

With the mask still in place, stamped the small tree from the Picturesque (40-811) stamp set on the right in dark brown ink.  Removed the mask and stamped the large tree in the same dark brown ink.  Tore a piece of white card stock and adhered it at the bottom to create a second snowhill.

Used diluted white gouache paint to add snow to the branches of the trees and for splattering the falling snow.  Stamped the sentiment (Christmas Moments 30-731) in more of the dark brown ink.  

Close-up ...

Entering this card into the Merry Little Christmas challenge #41 - Anything Christmas Goes.

The card above came together so quickly that I made a second one ...

Mostly the same stamps as above, with the addition of some sponged Abandoned Coral ink in the sky.  And I added the Viewpoint (51-724) window frame die, along with a sentiment from the Festive Snippets (30-387) stamp set.  

Close-up ...
Thanks for stopping by!


Penny Black Products


If you would like to subscribe by email,
please fill out the subscription form in the upper right sidebar.
It is also important to add sw1subscribers@gmail.com to your contact list
so Google recognizes the address and delivers the updates.


Stamps:  Picturesque; Christmas Moments (both Penny Black)
Paper:   White card stock (Neenah 110 lb.); Mixed Media paper (Strathmore 140 lb.)
Ink:   Rich Cocoa (Memento); Distress Inks:  Mustard Seed, Abandoned Coral, Salvaged Patina (Tim Holtz)
Accessories:   Sponge Brushes, Diluted White Gouache Paint, #2 Round Paint brush

Challenges:


Monday, October 11, 2021

Penny Black - Gorgeous Grove

Hi everyone.  Today I'm sharing another new cling stamp from the Penny Black's Making Spirits Bright release.  This image is called Gorgeous Grove (40-804).

I started by inking up my image in dark gray ink (Stampin' Up!) ink.  I then heat embossed with clear embossing powder.  I stamped the image again onto a post-it note to create a mask for the snow.

Then I did a little ink blending using blender brushes.  First the sun (Mustard Seed and Wild Honey distress inks).  Second the sky (Broken China and Chipped Sapphire distress inks).

To finish the card, I first splattered with very diluted white acrylic paint and blotted.  Once dry, I used a white Posca pen to add snow to the branches of the trees, and then splattered more (larger splatters) with diluted white gouache ink.  The sentiment (Christmas Sentiments: 30-504) is stamped on black card stock and white heat embossed.

Close-up ...
I'll be back soon with more cards using the new Making Spirits Bright release from Penny Black.


And also adding to the NBUS Challenge #31.

Thanks for coming by for a visit!

Product Links


If you would like to subscribe by email,
please fill out the subscription form in the upper right sidebar.
It is also important to add sw1subscribers@gmail.com to your contact list
so Google recognizes the address and delivers the updates.


Stamps:  Gorgeous Grove (Penny Black); Christmas Sentiments (Penny Black)
Paper:   White card stock (Neenah 110 lb.); Mixed Media paper (Strathmore 140 lb.); Black card stock (Stampin' Up!)
Ink:   Basic Gray ink (Stampin' Up!); Distress Inks:  Mustard Seed, Wild Honey, Broken China, Chipped Sapphire (Tim Holtz); White pigment ink
Accessories:   Clear embossing powder, heat tool, blending brushes, white acrylic paint, White Posca pen, White gouache paint, splatter brush, white embossing powder

Challenges:

Friday, August 06, 2021

Penny Black - Mountain Magic, Part 2

Hi everyone.  Years ago I used to love brayering cards.  I followed Michelle Zindorf ... she is amazing with this technique and I learned a lot just reading how she made her cards.  

But then I started trying all different types of techniques and I left brayering behind for several years.  I have seen some cards using this technique lately, so thought I'd see if I could remember how to do it. :)  Here is my first attempt.  Overall I'm happy with the card, but I definitely need more practise brayering.  :)

I used glossy paper so that the brayer glides on the paper.  I started by sponging the center first with Mustard Seed ink and then on top of that with Abandoned Coral ink.  Next I inked up my brayer with Chipped Sapphire, which is a deep blue.  This looks like a night sky to me.  I did add some Wilted Violet at the top but it doesn't really show.

I stamped my silhouette mountains and bullrushes (Mountain Madness 40-751) in black ink to finish.  It takes a while for the ink to dry on the glossy paper so I set it aside.  Once dry, I stamped my sentiment (Good Wishes 30-541) in black ink onto my card front before adding the popped up, inked panel.

Close-up ...
Thanks for stopping by!


* * * * *
Jessie's playday with Attalie
(First meeting and good friends already!)

* * * * *

Stamps:  Mountain Magic, Good Wishes (both Penny Black)
Paper:   Glossy Paper (SU!); White card base (Neenah 110 lb.)
Ink:   Distress Inks:  Mustard Seed, Abandoned Coral, Chipped Sapphire, Wilted Violet (Tim Holtz); Black (Memento)
Accessories:   Sponges, Brayer

Friday, January 15, 2021

CAS Challenges January Reminder

Hi everyone.  We are half way through the month, which means it's time for the CAS Challenges reminder cards. 

First up, CAS Mix Up - Splatters. This has been a fun and easy challenge.  Thanks for hosting Hilary!


As I mentioned in my blog earlier (2nd card in post), I have been working on an on-line class by Heather Telford (Heather Telford's Winter Wonder class).  I made two cards that I'm sharing today using her Snowy Vistas tutorial.  These are so much fun to make! :)

Close-up ...
This card is a morning sunrise card.  I used the same colours Heather used for her example ... LOVE these colours together!   :)  Added white splattering for falling snow, a simple frame, and stamped the sentiment to finish the card.

Sponging, masking, stamping, die-cutting, and splattering are included in the CAS design.


------------------------------------------------

Next up is the CAS Christmas Reminder with Julia as host.  My favourite thing is to make backgrounds for my silhouettes.  So fun!  Thanks Julia!

This time I made a Night Sky Snowy Vista following the tutorial in Heather Telford's Winter Wonder class.

I punched a small circle from a post-it note to mask for the moon before sponging the sky :)  Used different trees for this card than the one above.  There are so many things that could be added to create wonderul winter scenes.

Sponging, masking, stamping, and splattering are included on this card design.

I'm also going to add this card to the CAS Mix Up Challenge - Splatters ...

------------------------------------------------

I hope you'll check out the challenge blogs to see the amazing cards from our Designers, Guest Designers, and participants.  If you haven't had time to play along, there's over a week left before both challenges close on 24th at midnight PST.  Come join us!


CAS Mix Up Reminder - Winter Sunrise
Stamps:  Tannenbaum Trio (Penny Black); Christmas Sentiments
Paper:  Mixed media (Strathmore 140 lb.); White card stock (Neenah 110 lb.)
Ink:   Distress Inks:  Wild Honey, Worn Lipstick, Dusty Concord, Black Soot (Tim Holtz)
Accessories:   Blending brushes, white acrylic paint for splattering snow, post-it note masks, Simple Stackers frames (Penny Black)

CAS Christmas Reminder - Snowy Night
Stamps:  Season's Greetings (retired) - Stampin' Up!; Snowglobe Sentiments - retired (My Favorite Things)
Paper:  Mixed media (Strathmore 140 lb.); White card stock (Neenah 110 lb.)
Ink:  Distress Inks:  Tumbled Glass, Salty Ocean, Chipped Sapphire (Tim Holtz)
Accessories & Tools:  3/4" circle punch, post-it note, blending brushes, white acrylic paint, splatter brush

Challenges:

Friday, July 31, 2015

Merry Christmas


Hi everyone.  Today is the start of the Happy Little Stamper's August Sketch Challenge.


I don't have any pennant stamp or banner stamps, so this stumped me for a little while.  Then I finally came up with this idea viewing the sketch upside down.  Hmmm ... looked like hills with trees to me, albeit rainbow-coloured trees. :)

For my card, I masked the sides of my card front with large post-it notes, and also cut out my snowbank die with another post-it note to use for my hills.  The trees were inked with light green and then used a darker green marker to randomly add some interest to the trees.  I huffed on the stamp to moisten it, stamped once, and then stamped again to create a faded tree in the background (second generation stamping).  I do love this technique.

I used a sponge to add definition to the snow banks.  I added a stamped and popped up sentiment to finish.

I hope you'll check out the challenge blog HERE to see the wonderful and creative cards done by the rest of the Design Team.  And I hope you'll join us for this fun challenge!

____________________


More exciting news from Happy Little Stampers.  A few days ago I mentioned that there are now a line of Happy Little Stamps, check out the shop HERE.

We are also excited to announce the Happy Little Stampers Craft Retreat in the UK, Summer of 2016.


Click HERE to see all the details.  There is a limited number of spots, so if you'd like to attend, please fill out the "expression of interest" form before Aug. 31, 2015. Thank you!


Stamps:  Outdoor Master (Kittie Kits from Rubbernecker Stamps); Season of Joy - sentiment (SU!)
Paper:  White (Neenah)
Ink:  Soft Sky, Pear Pizzazz, Old Olive (SU!)
Accessories & Tools:  post-it notes for masking, Snow Drifts die (My Favorite Things), sponges

Challenges:
HLS August Sketch Challenge

Saturday, May 09, 2015

Layering Diecuts

Second post for today.  If you're looking for my ATCAS Challenge card, please click HERE. :)


Hi everyone.  This is another reminder for the Happy Little Stampers May CAS Challenge - Die-cuts / Punches.


Today's card is a scene created with die-cuts.  From the white picket fence, to the pink and yellow flowers, the clouds and that fun stitched sun ... this cute little garden is all die-cuts.  The only stamping is the sentiment. :)  By layering die-cuts and adding sponging around the edges, you can create lots of depth and dimension.

I sent this to a friend a while ago.  She received it and sent me a note to say that it brightened her and her hubby's day.  :)  Hugs to you both, Brenda! :)

Bonnie is our Guest Designer this month, so check out the challenge to see her latest die-cut card.  I know you'll LOVE it!

I hope I've inspired you to play along with our fun challenge.  Make a CAS card using die-cuts and / or punches, and add your link to the gallery.   I'll be back next week with a different way to use die-cuts on your cards.


I'm also going to enter this (my third entry) into Virginia's View #14 - Layers and Dimension Challenge.  The challenge is running longer than usual and is open until May 18.


Stamps:  Where the Heart Is (Simon Says)
Paper:  White (Neenah); Certainly Celery, Barely Banana, Pink Pirouette (SU!)
Ink:  Barely Banana, Soft Sky, Certainly Celery, Pretty in Pink (SU!)
Accessories & Tools:  Stitched Sun die (Lil' Inkers), Puffy Cloud dies and Tiny Tulips dies (both from Memory Box), Picket Fence die and Wildflower Patch die (both from Poppy Stamps), stylus and mat for shaping, sponges

Challenges:
HLS May CAS Challenge - Die-cuts
Virginia's View #14 - Layers and Dimension

Monday, April 06, 2015

Stencil Mask


Hi everyone.  Today's challenge at SCS for new techniques is Cluster Stamping, run by the very talented Joan Ervin.  The challenge is to take a die-cut (at least 2" wide or long ... the bigger, the easier to use), and make a stencil out of it.  Then cluster stamp inside the stencil area.  So fun!!  I had to give it a try.  Mine is basically a one layer card ... except that I always add a smaller card front - so I guess it's more like a one layer card front. :)

I used a window die to cut from a post-it note.  I placed the die-cut window on my card front and then used the rest for the cut (outside of window) as a mask over top.  Then I sponged some green for the grassy area and blue for the sky.  I used only two stamps for the window scene ... a leafy sprig that I stamped two or three times before re-inking (second generation stamping), and a branch with buds.  I love how it turned out.  Taking off the masks to reveal the card front was so exciting. :)  I stamped the sentiment in soft gray to mimic the softness of this sponged scene.

This is perfect for the Happy Little Stampers April CAS Challenge - Stenciling.  And it's a different way to use die-cuts and stencils.  Awesome!


I'm definitely going to be making more of these cards!


Stamps:  Cause a Scene - Master #1 (Kittie Kits from Rubbernecker Stamps); Branches (Inkadinkado); Elements of Style (SU)
Paper:  White (Neenah)
Ink:  Distress inks:  Shabby Shutters, Peeled Paint, Tumbled Glass (Tim Holtz); Early Espresso, Melon Mambo, Smoky Slate (SU!)
Accessories & Tools:  Small Madison Arched Window die (Poppy Stamps), post it notes for making mask, sponges


Challenges:
HLS April CAS Challenge - Stenciling
SCS TLC #528 - Cluster Stamping