Showing posts with label scoring. Show all posts

Thursday, February 10, 2022

Happy Birthday Mom!

Hi everyone.  A couple of days ago, my mom turned 93! :)  She is AMAZING!  We gathered at her house (just seven of us --- obeying Covid restrictions) to celebrate.  Every year we order in dinner from a local restaurant and just have a good visit ... no work for anyone.  Gotta love that!

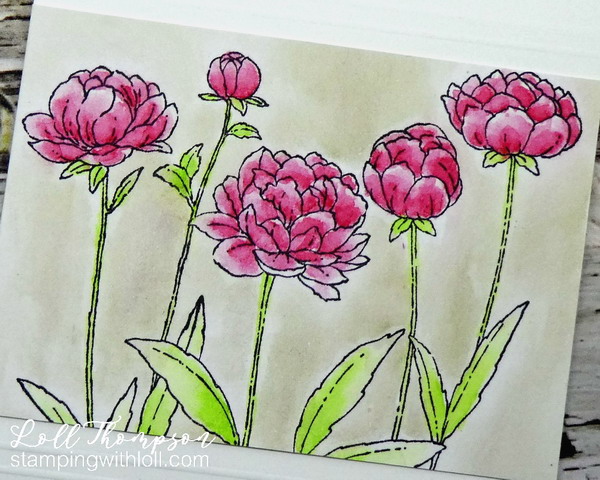
I made this card the morning of her birthday.  I know ... always late getting going, especially these days when I'm not feeling 100%.  I found a panel of flowers already stamped and watercoloured.  Cut the panel down, added a few score lines and stamped the sentiment.  Having the panel already watercoloured made it quick and easy to get her card done.

This is the Unfolding stamp from Penny Black.  It's so pretty and I love (what I am going to call peonies), watercoloured in pink.  My mom used to love working in her garden which is filled with flowers, including pink peonies. :)

The sentiment (Gratitude - Penny Black) is stamped in black to finish the card.

Close-up ...
Thanks for coming by for a visit!


If you would like to subscribe by email,
please fill out the subscription form in the upper right sidebar.
It is also important to add sw1subscribers@gmail.com to your contact list
so Google recognizes the address and delivers the updates.

To unsubscribe, please use the same form on the right sidebar, making sure to add
"unsubscribe" to the message.
Thank you.


Stamps:  Unfolding, Gratitude (Penny Black)
Paper:   White card stock (Neenah 110 lb.); Mixed Media paper (Strathmore 140 lb.)
Ink:   Black (Versafine); Distress Inks:  Worn Lipstick, Mowed Lawn, Pumice Stone (Tim Holtz)
Accessories:   water paint brushes, Scor-Pal

Challenges:
Penny Black Saturday Challenge - Anything Penny Black goes


Thursday, April 30, 2015

Happy Birthday Balloons


Hi everyone.  Time for May's Sketch Challenge at Happy Little Stampers.  I know, it's still April for a lot of us :) ... but it's already May in Australia and that's where HLS is based. :)

Here's May's sketch ...


Isn't this fun??!! :)  I love the image that Kylie has selected for this month.  I thought about doing a bokeh technique card, and I may still do that. :)

But when I saw the fun colours and the floaty-ness (is that a word??) :) of the dots, it made me think of balloons.  At first, I cut out and coloured nine balloons, but it was way too much for a small card, so I took it down to three and it seemed just right.  A smattering of sequins and a large stamped sentiment and my card was finished.  It's hard to see the "b" in "birthday", but it's there. :)

I decided after I finished the card, that I wanted to add some sparkle to the balloons. So I got out my Clear Wink of Stella pen and went over the balloons, twice.  For some reason it removed some of the colour, so I had to sponge in some more.  I managed OK, but it was risky and I almost ruined the card and had to start again.  I usually know that if I miss doing something before a card is put together, it's best to just leave it ... luck was on my side, this time. :)

Here's a close-up so you can see the sparkle ...


I hope you'll come join us for this fun challenge.  Be inspired by the sketch above and play along at HLS May Sketch Challenge.  The challenge is open for the whole month, so there's lots of time to play along.

There's also a Design Team Call for the Sketch Challenge and the upcoming new Christmas Challenge at HLS.  If you're interested in joining us, please add DT after your name on your entry this month. :)


Stamps:  The big, the bold and the Happy (Winnie & Walter)
Paper:  White (Neenah)
Ink:  Black (Memento); Distress Inks:  Picked Raspberry, Ripe Persimmon, Squeezed Lemonade (Tim Holtz)
Accessories & Tools:  Balloon die-cuts made with my Silhouette Cameo, sponges, Scor-Pal, assorted sequins, white baker's twine, clear wink of stella, white gel pen

Challenges:
HLS May Sketch Challenge


Thursday, September 19, 2013

More Autumn Maple Leaves


Hi everyone.  I have two more maple leaf cards to share with you today.  I'm holding a workshop on the Saturday ... we'll be making four cards, two of which will be maple leaves ... one from a couple of days ago that I posted with gold embossing and twine ... and one of the two cards from today - my "students" will get to choose. :)

This uses the same technique as my leaf from a couple of days ago ... click here to see.  I randomly sponged Whisper White cards stock with autumn colors and then die-cut the leaves.  I used a fine metallic gold pen to highlight the embossing of the veins ... and a thick metallic gold pen to outline the leaves.  So happy with how they turned out!


Here's a close-up:


Here's the second card using the same technique, but with a larger die-cut.


It's hard to see that I added two lines of scoring at the bottom for some interest and you can just barely make them out in the close-up photo below.


Stamps:  For You (Rubber Art Stamps)
Paper:  White (C.C. Designs); Whisper White, Early Espresso (1st card) - (SU!)
Ink:  Daffodil Delight, Pumpkin Pie, Cajun Craze, Old Olive, Early Espresso (SU!); Metallic Gold (Colorbox)
Accessories & Tools:  Big Shot, Small Leaves 2 and Large Leaves 2 dies (Cheery Lynn), Twigs and Berries die (Memory Box), gold twine, scoring tool and template, Stamp-a-ma-jig, glue, adhesives and dimensionals


My friend Nancy is hosting her first Color Challenge at SCS (CC444) and I entered a couple of days ago.  The top card will be my second entry into that challenge - I LOVE the colors that Nancy picked for her very first gig as hostess - great job Nancy!!


Thursday, December 13, 2012

Ornament Joy and Frosty


Hi everyone.  I have two more Christmas cards to share with you today.  I've actually finished making all the cards I need and have already mailed them out.  I'm now making a few for my mom to use this year.

The first one uses a free digi from Desert Diva ... thanks Hannalie!!  I love Hannalie's sentiments and used one as the only image on my first card.  I just love this Joy with the ornament dangling and so wanted to show it off by providing lots of white space around it.  I used this week's colors from Paper Players challenge (PP#125 - pool party, cherry cobbler, neutral of choice) to color in the ornament and then added clear stickles on top to make it glittery.  I cut out the ornament and popped it up to add more depth.  Two simple lines of scoring and a frame and my card was done!  Easy, peasy and pretty! 


Stamps:  Joy to the World (Desert Diva digital stamps)
Paper:  White (Neenah)
Ink:  Baja Breeze, Cherry Cobbler (SU!)
Accessories & Tools:  Clear stickles, scoring tool, Rectangle Nestabilities (Spellbinders), glue dot, and dimensionals


Here's a close-up of the main image along with the scoring lines:


____________________


The second card also uses the colors from the Paper Players challenge this week (as above).  This time I made a whimsical card using circle punches for the snowman.  I drew in his eyes, nose and mouth ... and colored the nose with Pumpkin Pie Stampin' Write marker.  A little twine, some torn snow drifts and a couple of red jingle bells finish off the card.  Hope you like.

"Frosty"


Stamps:  Frosty Sentiments (Amy R)
Paper:  Crumb Cake (SU!);  White (C.C. Designs)
Ink:  Baja Breeze, Black, Pumpkin Pie (SU!)
Accessories & Tools:  1 3/8" circle punch, Circle Nestabilities (Spellbinders), Maraschino Twine (The Twinery); mini red jingle bells ($1 Store), sponge, adhesives, glue, and dimensionals


Here's a close-up of Frosty:


Both cards are being entered into following challenge:
Paper Players color challenge (PP#125)


Friday, July 06, 2012

Red, White & Blue

I'ts another glorious day here on the Westcoast.  Sun is shining and it's warm with a nice breeze.  Perfect day for being outside ... so why am I in my art studio??!!  I didn't have any time in the studio yesterday, and I just HAD to be here today.  :)

When I saw the challenge from SCS today - Free for All (F4A124 - Wood you like a challenge? ... include wood on your card), I immediately decided to make another window and flower box card, using my recent purchase of balsa wood.  I really struggled with this card.  Not sure why ... just sometimes things take a while to come together.  This card, for some strange reason, took me 2 1/2 hours to make ... not that cards don't take me that long or longer sometimes ... but I've made these window cards before, so it should have gone a lot faster.  I blame the curtains.  I do not sew!! ... but  I had to hand-stitch this ribbon so that the ends wouldn't fray ... and then do a gathering stitch (good thing I still remember my grade eight sewing class - the only year I took any instruction on sewing).  Then I fiddled and faddled with the curtains and the flowers for ages.  In the end, it looks pretty much the way it had an hour earlier when I first attached everything.  This card is also for the Color Throwdown Challenge (CTD199 - Tempting Turquoise, Crumb Cake, Real Red, Night of Navy) ... hopefully no one will notice I subbed Baja Breeze for the Tempting Turquoise ... and the window and box were Crumb Cake colored before I sponged them with white ...  :)


"Red, White and Blue"


Stamps:  Wish You Were Here (Hero Arts)
Paper:  Night of Navy, Baja Breeze striped DP, Certainly Celery, Real Red (SU!)
Ink:  Basic Black, Whisper White (SU!)
Accessories & Tools:  Big Shot; Poppy Stamps dies (window, window box, wildflower patch), Leafy Branch die (C.C. Designs), 1" stitched Baja Breeze ribbon, crystal effects, mat, stylus, scoring tool, stamp-a-ma-jig, glue, adhesives, and dimensionals


Die-cut the window and box from balsa wood and then sponged with Whisper White ink.  Stamped the table and lamp onto the striped DP and then covered the lamp base with crystal effects.  Sewed the ends of the ribbon (to stop fraying) and then used a gathering stitch to gather the pleats.  Attached the curtain "topper" to the top inside fo the window.

Attached pieces of branches to the window box.  Die-cut the flowers in red, cut off the heads, shaped them with my stylus on a foam mat and glued them to the branches.

Used my Scor-Pal to add scoring every 1/2" on the Night of Navy card front ... to represent siding (sorry, doesn't show well in the photo).  Mounted all the pieces together, adding dimensionals between the striped DP and window frame.


Monday, January 23, 2012

Luck of the Irish and Irish Rose cards


Quick update ... I received an email that the link to the paper tole tutorial included with the rose card from yesterday, wasn't working.  Sorry about that ... I have now fixed the problem and the link is working.  Thanks Susan for letting me know ... I appreciate you taking the time to email me!!
Also I had to make another card for TLC361 - Inspired by Belleek Pottery :)
I used the same technique as the card earlier today for creating the "Belleek" background.  I've included in the photo below, the two lovely Belleek vases that my SIL has given me over the years (she's originally from Ireland), along with the card they inspired.  Hope you like.  

"Luck of the Irish"


Stamps:  Sincere Salutations (SU!)
Paper:  Garden Green, River Rock, watercolor (SU!)
Ink:  River Rock, Wild Wasabi, Garden Green (SU!)
Accessories & Tools:  Cuttlebug "Floral Screen" embossing folder, Big Shot, brayer, water mister, sponges, heart-to-heart punch, 2-step bird punch, Aqua Painter, 1/4" Garden Green grosgrain ribbon, 1/4" hole punch, sticky strips, glue dots, Tombow glue, and dimensionals

* * * * *

I made my background paper by lightly misting watercolor paper with water, wiping off excess (leaving paper damp) and placing it in the embossing folder that was inked on one side with River Rock ink (using the brayer to get it even).

I punched several small hearts from watercolor paper, misted with water and added Wild Wasabi re-inker with my Aqua Painter so that the ink "bled" into the paper.  Once dry, I sponged all the edges with more Wild Wasabi ink and used the Stampin' Write marker to add the details.

I punch the leaf sprig from the 2-step owl punch three times from River Rock cardstock.  I cut off all the leaves to make the "stem" as long as possible.  I also punched three 1/4" circles and glued them onto the tips of the stems (used as a base to glue on the hearts).  I glued three hearts onto each stem and let them dry.
I inked the sentiment in Garden Green ink and misted lightly with water before stamping onto watercolor paper.  I trimmed to size, sponged the edges with River Rock ink and then mounted on a River Rock frame (also with the edges sponged with more River Rock ink).

I wrapped two pieces of Garden Green grosgrain ribbon around the embossed panel and tied knots (offsetting them).  I used sticky strips to adhere the embossed panel to the card base of Garden Green cardstock. 

I added the shamrocks (adhering them with glue dots) and the sentiment (popped up with dimensionals) to the front of the card.

____________________


Today is the Technique Lover's Challenge (TLC361) - Inspired by Belleek Pottery.  Besides being inspired by the pottery itself, there is another part of the challenge, that is to make your background of your card look by porcelain by inking an embossing folder with a very subtle color and running it through with white cardstock.  Not sure what the name is for that particular technique ... but love the results I got using my new Cuttlebug "Textiles" embossing folder that I got for Christmas from my dear friend, Kelly.  It's hard to tell in the photo, but the background is a soft version of Crumb Cake and really makes the white raised embossing stand out.
  
I was inspired by the colors of the Belleek roses that were shown in the examples for the challenge, so I used my Spellbinder's Rose Creation die-cut and Razzleberry ink to make a purple rose.  I actually have two pieces of Belleek, given to me by my dear SIL, Moe ... I may have to make another card using them for inspiration.

"Irish Rose"


Stamps:  On the Grow (sentiment) (SU!)
Paper:  Rich Razzleberry, Whisper White, watercolor paper (SU!)
Ink:  Crumb Cake, Rich Razzleberry, Certainly Celery (SU!)
Accessories & Tools:  Cuttlebug "Textiles" embossing folder, Big Shot, brayer, water mister, ornament punch, sponges, Spellbinder's Rose Creation Die-cut, Sizzix Little Leaves die-cut, small oval punch, medium oval punch, 1/4" Rich Razzleberry grosgrain ribbon, Scor-Pal, stylus, clear stickles, brad, sticky strips, glue dots, Tombow glue, and dimensionals

* * * * *

I used watercolor paper for the background.  Just had an idea that if I used damp watercolor paper, the ink color for the background would be very soft ... it worked.  I misted the watercolor paper with water, used a brayer to add ink to the front inside panel of my embossing paper, wiped the excess water off the paper (leaving it damp, not wet) and then ran it through with the folder in my Big Shot ...I just love the look!).

I took a second piece of watercolor paper and used my Scor-Pal to create a grid.  I punched out an ornament and trimmed off the bottom.  I added just a little drop of stickle at each intersection of the grid to give the vase bling.  I sponged the edges with Crumb Cake ink so that it would stand out from the background.  I used the leftover grid cardstock for the sentiment and also sponged the edges of the small oval with Crumb Cake ink.  I mounted it on a medium oval frame of Rich Razzleberry cardstock.

I sponged Whisper White cardstock with Razzleberry ink and then die-cut four of the smallest roses from the Rose Creation Nestabilities.  I sponged more Rich Razzleberry around each petal of the four roses ... for the one I used in the middle, I sponged the underside just in case some if it would show.  I used my stylus to curl the petals on each flower and then layered them together and secured them with a brad (doesn't show).  I gathered up the first layer and pinched it together to created the middle of the flower, using Tombow glue to secure.  I then moved the other petals around until I was happy with the look.
I cut out the Little Leaves from Certainly Celery cardstock and then sponged the edges with more Certainly Celery ink to give them dimension.

I assembled the card front, adding 1/4" grosgrain ribbon about 3/4" from the bottom of the edge and tying a knot off center.  I used the ribbon as if it were a ledge to hold my vase.  I added the vase, popping it up with dimensionals to add depth.  I attached the leaf sprig and rose using glue dots.

I mounted the card front onto the card base of Rich Razzleberry and also attached the sentiment with sticky strips.

Saturday, August 13, 2011

Framed Poppies

Another beautiful day ... but the weatherman is predicting a 40% chance of showers tomorrow so I did my duty and painted my front stairs today - done!!  Hopefully this is the last time.  Hubby and I decided it was time to replace them and we've been looking into different materials.  Looks like we'll replace them next spring with treads that are a man-made material that looks like wood but doesn't require painting - SOLD!!!  The less painting to do, the better!!

Looks like I'm off the hook (no pun intended!) for cooking dinner tonight too as my SIL just dropped off a fresh sockeye salmon.  Gord will be heating up the grill and Cedar Plank Teriyaki Salmon is on the menu - yum, yum!!  Now I get a delicious dinner made for me AND more time to spend in the studio this afternoon --- win, win!

I mentioned a few days ago how I had found a great website that offers free digital images.  The artist, Beccy Muir, has generously offered her images and I downloaded her beautiful poppies a few days ago.  Today I've had time to use them ... and I ended up putting them in a frame (well, actually on top of the frame), so I'm going to post this at SCS for yesterday's challenge "Frame It Up".  I really love the distressed look, so here's another card that has a vintage feel to it.  I added scoring on both the background paper and the card base although it might be hard to see in the photo below.  Hope you like.
                  
"Framed Poppies"


Stamps:  Poppies (digital - Beccy Muir from Beccy's Place); En Francais (SU!)
Paper:  Soft Suede, Crumb Cake, Whisper White (SU!)
Ink:  Soft Suede, Old Olive, Tangerine Tango, Cajun Craze; Stampin' Write Markers: Old Olive, Cajun Craze
Accessories & Tools:  Scor-Pal, sponges, Nestabilities Classic Ovals, sticky strips and dimensionals
 
* * * * *

I printed off the poppies image onto Whisper White Cardstock.  I used sponges to sponge the poppies first with Tangerine Tango ink and then again in the center and outer edges with Cajun Craze ink.  I used the Cajun Craze Stampin' Write marker to add more color to the poppy center.

I sponged Old Olive ink on to the leaves and pod, adding it darker near the edges.  I used the Old Olive Stampin' Write marker to ink the stems.  I cut the image out.

I stamped Crumb Cake cardstock in Soft Suede ink with the En Francais stamp and then put it through my Big Shot with the largest oval from the Nestabilities set.  I ran a piece of Soft Suede cardstock through the Big Shot with the largest and third largest ovals to create the frame.  I inked the edges of the frame with Soft Suede ink to give it a aged look.  I lightly sponged Soft Suede ink randomly over the Crumb Cake oval to also age the piece.

I took the background piece of Crumb Cake and used the Scor-Pal to add vertical lines every 1/4".  I sponged the lines with Soft Suede ink to give them more definition and also sponged around the outside edges of the piece to give it an aged look.

I used the Scor-Pal to add horizontal line to the top of the front card base and also vertical lines to the bottom of the front card base.  I sponged Soft Suede ink overtop to highlight the scoring and around the outside edge to give it a distressed look.

I mounted all the pieces as shown in the picture above, popping up the oval frame with dimensionals and also adding dimensionals to the poppies so that they are "double" popped.

Tuesday, June 28, 2011

Cone Flowers


Today I'm covering off two challenges ... WT328 from last Thursday (Ways to use it - No White Cardstock) and CC329 (today's color challenge - Soft Suede, Melon Mambo, Crumb Cake).  I don't have Melon Mambo so I substituted my closest color, Regal Rose.
 
I had looked at Jackie Topa's website last year and she made "snow" for her winter cards by rolling up a piece of cardstock into a tight tube and then grating it with her kitchen grater.  What an awesome idea! ... and I thought the texture would be perfect for the centers for these Cone Flowers.  Hope you like.
 
"Cone Flowers"
 

Stamps:  Inspired by Nature, En Francais (SU!)
Paper:  Soft Suede, Crumb Cake (SU!)
Ink:  Soft Suede, Regal Rose (SU!)
Accessories & Tools:  sponges, Scor-Pal, grater, Nestabilities Classic Rectangles Large, Tombow glue, adhesives and dimensionals
 
* * * * *
 
I stamped both flower images onto Crumb Cake cardstock using Soft Suede and Regal Rose inks and cut them out.  I did a second stamping (petals only), cut them out and then sponged the edges with Soft Suede ink.  I layered the extra petals on top of the base flowers, popping up the end of the petals with dimensionals, but adhering the tops of the petals (near the center of the flowers) with adhesives so it was flush.  I rolled up a piece of Soft Suede cardstock into a tight tube, grated it and glued the "fluff" onto the center of the flowers.  Once dry, I rubbed off any loose, excess fluff.

I stamped the En Frances stamp onto Crumb Cake cardstock using Soft Suede ink and then cut out the middle with the Nestabilities.  I trimmed the edges to create a frame and then sponged with Soft Suede ink.  I cut out another piece of Crumb Cake (slightly smaller than the outside dimensions of the frame and used the Scor-Pal to add vertical lines every 1/4".  I sponged the scored cardstock with Soft Suede ink to highlight the scoring and attached it behind the frame using dimensionals.

I adhered the flowers to the frame and attached the whole main panel to the card base, again using dimensionals to add depth.  I stamped the sentiment in Regal Rose ink and cut a frame out of Soft Suede cardstock.  I sponged the edges of the sentiment and the frame with Soft Suede and adhered it to the frame.

Tuesday, April 05, 2011

Bird's Nest


A while back I started a card and once I had the background paper done, I wasn't sure what to do with it.  I had used my Little Leaves die-cut for a previous card, then kept the "stencil" that's created when die-cutting and used it to sponge a backdrop of leaves on white paper.  I added a grid with the Scor-Pal and then ran out of ideas of what to do.  I had tried adding some flowers and they just didn't look right, so I filed away the background and today, it just came to me what to do with it.  Viola ... my bird's nest card.  Hope you like.
 
"Bird's Nest"
 
 
Stamps:  Pendant Park (sentiment) (SU!)
Paper:  Whisper White, Not Quite Navy (SU!)
Ink:  Kiwi Kiss, Old Olive, Soft Suede, Early Espresso, Night of Navy (SU!)
Accessories & Tools:  Two-step bird punch, Little Leaves die-cut (stencil), raffia, Word Window punch, Scor-Pal, white gel pen, sticky strips, adhesives and dimensionals
 
* * * * *
 
Using the stencil that's left over after cutting out the Sizzix Little Leaves, I sponged Kiwi Kiss and Old olive to create the leafy backdrop on the Whisper White cardstock.  I then used the Scor-Pal to create a grid (see Splitcoaststampers for tutorial on how to create a grid).  I finished the background paper by sponging around the outside edges with Old Olive and Kiwi Kiss inks.

I sponged two strands of raffia with Soft Suede ink and then added random patches of Early Espresso ink to give the raffia some color.  I wound one strand around two fingers several times, pulled in off and then started wrapping the other way.  Once one strand was used up, I added a second strand and kept wrapping until I was happy with the look of my "nest".  I tied the two strand ends together at the back to secure and hold everything in place.  I used sticky strips to glue the nest to the background, placing it on one branch.  I punched the bird out of Not Quite Navy cardstock and sponged with Night of Navy ink around the edges.  I glued the back wing to the body of the bird and popped up the front wing with a dimensional.  I then placed the bird sitting in the nest and popped it up with another dimensional.  I used the white gel pen to add an eye on the bird.

I stamped the sentiment in Night of Navy ink and punched it out with the Word Window punch and added it below the nest.

Wednesday, March 30, 2011

Butterfly Grid


Today I held an advanced brayering class with Lili and Natasha.  We had so much fun!!!  Lots of laughs, a few mistakes (oophs!), and a few "creative" ways to fix them.  We did a brayering refresh, an emboss resist and a multi-step masking.  After three hours in the studio, Lili and Natasha were "brayering experts"! 
I love that Natasha likes to make the cards her own, changing up details and adding elements - just awesome!  Lili surprised me with more copper sheets from Cherish the Thought in Port Moody.  Can't wait to play with my butane torch again :)  Thanks Lili!!  And, I love the yellow roses they brought - so pretty!

On to the card for today ...  I made the card below a few months ago.  It was my first attempt at making a grid (so easy ... but so effective!).  Hope you like.

"Butterfly Grid"


Stamps:  Silhouette Sentiments (SU!)
Paper:  Rich Razzleberry, Cottage Wall Designer Series paper, Whisper White, Orchid Opulence (SU!)
Ink:  Versamark
Accessories & Tools:  Sizzix Butterfly die-cut, Scor-Pal, 1/2" Polka-dot Rich Razzleberry grosgrain ribbon (approx. 10"), 6" wire, five mauve half-pearls, small oval punch, white embossing powder, heat tool, sticky strips, adhesives, and glue dots

* * * * *

I took one of the 3" square of Whisper White and used the Scor-Pal to score lines on the diagonal, 1/2" apart.  I turned the cardstock and made 1/2" diagonal lines going in the opposite direction.  I mounted this onto the 3 1/4" square of Rich Razzleberry and then tied the ribbon around the bottom.  I adhered the framed panel on to the Cottage Wall Designer Series paper and then mounted the whole thing onto the card base.

I cut out two butterflies (one in Rich Razzleberry; one in Orchid Opulence).  I mounted the lighter butterfly onto the top left-hand corner of the grid.  I used needle-nosed pliers to twist the wire and used a glue dot to secure it on top of the first butterfly.  I folded the second butterfly (Rich Razzleberry) in half and then glued the body part only on top of the lighter butterfly.  I added the small half-pearls, making sure the "head" was glued on top of the tip of the wire.

I stamped the sentiment in Versamark, heat embossed with white powder, and adhered on top of the ribbon.

I used the second squares of Cottage Wall, Rich Razzleberry and Whisper White and mounted them for the inside panel of the card.