Showing posts with label masking. Show all posts

Friday, September 05, 2025

Christmas Star

Hi everyone.  I'm back with another Christmas card using the Posted stamp and die set (Penny Black).

I stamped the postage outline in soft gray and then masked off the outside border.  The sweet image (The Star - Penny Black) was stamped on the inside of the masked area with black ink and clear heat embossed before watercolouring with distress inks.  Diluted white paint was splattered for falling snow before popping up the panel onto my card front, which is covered in dark green paper.  A simple white embossed sentiment finishes the card.

Close-up ...

Sending this card to:
Merry Little Christmas Challenge #64 - Anything Christmas Goes

Thanks for stopping by!

Stamps:  Posted (Penny Black); The Star (Penny Black); Jolly Snippets (Penny Black)
Paper:   White card stock (Neenah 110 lb.); Mixed Media (Strathmore 140 lb.); Green paper (unknown)
Ink:   Shadow Grey Archival Ink (Ranger); Black (Memento); Distress inks:  Salvaged Patina, Candied Apple, Lumberjack Plaid, Shabby Shutters, Peeled Paint, Mustard Seed, Wild Honey, Brushed Corduroy, Gathered Twigs (Tim Holtz)
Accessories:  Posted die (Penny Black), masking tape, Clear embossing powder (Ranger), watercolour paint brushes, White embossing powder (Ranger), heat tool, diluted white acrylic paint

Challenges:

Monday, July 28, 2025

Northern Lights

Hi everyone.  I tried out a new-to-me technique ... Northern Lights.  I have never seen Northern Lights in person, but have seem them on TV and in photos.  They are spectacular!

I've made three cards following the same video, Ink Blended Northern Lights by Lydia Fiedler (7:17).  For my card above, I randomly sponged areas of Mowed Lawn and areas of Wilted Violet Distress inks, trying not to have them overlap, which would give me brown ink. :)  I used Villaneous Potion distress ink for the dark part of the sky, sponging over top of my colours, but leaving areas where the colours in the background showed through.  

I masked off the sky and then used SU! inks for the silhouette of the mountains.  First used Basic Gray ink, and then finished along the top of the mountains with Basic Black.  I found SU! inks covered the Distress Ink colours better to give the mountains a consistent darkness.  I removed the mask and stamped Pine Row (Stampscapes) along the top of the mountain (first and second generation stamping).  To finish, I stamped a retired sentiment stamp in Versamark and heat embossed with white embossing powder.


* * * * *
Second card follows the same video ...
I followed Understand Blue's video using the same colours she did (Distress Inks: Mustard Seed, Twisted Citron, Mowed Lawn, Chipped Sapphire).  I added a die-cut scene (Winter Village - Penny Black) and a torn hill, stamped with sentiment (Bright & Light - Penny Black) to finish.  I'm happy how it turned out. :)


.. and one more ...


This time I sponged Mustard Seed and Picked Raspberry distress inks before sponging Chipped Sapphire ink over top, leaving areas where the colour underneath showed.  I used the Pine Row Stamp (Stampscapes) to create a forest ... I'm obsessed with this stamp lately! :)  Again, I used first, second, and third generation stamping to create depth to my forest. :)  To finish, I used a stamp gifted from a friend to white heat embossed the sentiment and then splattered with diluted white acrylic paint to depict stars.

* * * * *
My friend Susan (Cardmaker's Garret) is also posting Northern Lights cards today ... click HERE.  Aren't they AMAZING??!!  

Link to other recommended videos:
2) Beautiful Northern Lights by Ciara T. Designs (16:19)
3) Northern Lights Demo by Marilyn G. (31:19)
4) Quick Northern Lights by Kevin Nakagawa (19:32)

Thanks for stopping by!

Card #1:
Stamps:  Pine Row (Stampscapes); Birthday Blowout (Poppy Stamps - retired)
Paper:   White card stock (Neenah 110 lb.); Black card stock base (SU!)
Ink:   Distress Inks:  Mowed Lawn, Wilted Violet, Villaneous Potion (Tim Holtz); Basic Black & Basic Gray (SU!); Versamark
Accessories:  Sponges, White embossing powder (Ranger), heat tool, diluted white acrylic paint for splattering

Card #2:
Stamps:  Bright and Light (Penny Black)
Paper:   White card stock (Neenah 110 lb.)
Ink:   Distress Inks:  Mustard Seed, Twisted Citron, Mowed Lawn, Chipped Sapphire (Tim Holtz); Basic Black & Basic Gray (SU!); Versamark
Accessories:  Sponges, Winter Village die (Penny Black), diluted white acrylic paint for splattering

Card #3:
Stamps:  Pine Row (Stampscapes); Signature Greetings (Memory Box)
Paper:   White card stock (Neenah 110 lb.)
Ink:   Distress Inks:  Mustard Seed, Pink Raspberry, Chipped Sapphire (Tim Holtz); Basic Black & Basic Gray (SU!); Versamark
Accessories:  Sponges, White embossing powder (Ranger), heat tool, diluted white acrylic paint for splattering

Monday, February 03, 2025

Inspiring Iris

Hi everyone.  Before I get to today's card, I will be signing off for a few of weeks as we move to our new home.  I'll be back before you know it! :)

Today's card is a CAS design using a lovely stamp set from SU (Inspiring Iris).  I've had this stamp in my NBUS (never-before-used-schtuff) box for a LONG time! :)

I started by masking a rectangle using Background Basics stencil (Penny Black) and a sponge brush with Salvaged Patina Distress Ink to create an ombre background.  Then I stamped the outline image of the irises.  There is a matching stamp for the flower heads, but I couldn't get it to line up, so I watercoloured with more Distress Inks (Milled Lavender, Wilted Violet, Mustard Seed, Mowed Lawn).

To finish, I stamped the sentiment (Super Day - Penny Black), in black ink.

Close-up ...
I'm sending the above card to the following challenges:


Thanks for stopping by!

Stamps:  Inspiring Iris (SU!); Super Day (Penny Black)
Paper:   White card stock (Neenah 110 lb.); Mixed Media (Strathmore 140 lb.)
Ink:   Distress Inks:  Salvage Patina, Milled Lavender, Wilted Violet, Mustard Seed, Mowed Lawn (Tim Holtz); Black (Memento)
Accessories:   Background Basics stencils (Penny Black), sponges, watercolour paint brush


Friday, August 30, 2024

Multiple Makes #3 - Christmas

Hi everyone.  Welcome to my third post on multiple makes.  My Christmas stash of cards is building and I'm really happy with the progress, thanks to my multiple makes. :)  I'm sharing six CAS (clean and simple) cards today. :)

I'm featuring the Festive Finesse die from Penny Black.  I've had this for over a year and have only used it once --- shame on me!!  

For the card above, I watercoloured the Festive Finesse die with Distress re-inkers, adding shaping with a mat and stylus.  I also stamped and die-cut a watering can from the Country Charisma set (Penny Black), watercolouring with Rusty Hinge Distress Re-inker.  A extacto knife was used to cut a slit in the watering can lid so I could slip the stem through to the back.  The lower leaf and berries were cut from the die-cut and then added back into the bouquet mix.  A simple stamped sentiment (Christmas Sentiments - Penny Black) is stamped in more red ink and the bouquet was popped up for added dimension.
* * * * *
The next card is very CAS, with just a simple sponged rectangle using the Background Basics Stencil - 25-21 (Penny Black) with Mowed Lawn and Peacock Feathers Distress inks.  I diluted white gouache paint and splattered over top, along with splattering over the Festive Finesse die-cut from mixed media paper.  I stamped "peace" from the Full of Christmas stamp set (Penny Black) in versamark and heat embossed in white.  I adhered the sprig to the top right corner of the sponged rectangle to finish the card. 

* * * * *
This time I dry embossed (Dots & Dashes - Penny Black) a piece of vellum and adhered onto my card base.  I cut a rectangle frame, stamped the sentiment (Believe - Penny Black) in Versamark and heat embossed with Princess Gold embossing powder.  I adhered the frame over top of the embossed vellum card front, adding the Festive Finesse sprig die-cut from gold metallic paper in the rectangle frame.  Very simple card to make that doesn't really look simple! :)  For some reason the camera doesn't show how pretty the vellum is ... it looks very dreamy in the background in real life. :(

Sending the above card to the following Challenges:
Die-cut Diva's August Challenge.  I used dry embossing on my card.
Can you Handle the Pressure - twist of leaves


* * * * *
For the next card I pulled out my Gilding Flakes that I haven't used for a while (Red Blaze - Cosmic Shimmer).  I used double-sided tape to adhere to a piece of card stock, then die-cut the Festive Finesse.  Removed the cover and sprinkled gilding flakes over top.  I used a Rub 'n Scrub pad to remove excess flakes and burnish the remainder to my die-cut.

I layered it over top of a white die-cut to give it more texture and depth and then added a black sentiment border which has been foiled in copper, using the Stick & Shine - Xmas Classics (Penny Black).  To finish, I added a very thin piece of copper glitter paper.

* * * * *
For the card above, I die-cut two of the Festive Finesse sprigs and watercoloured them with Distress Re-inkers.  I cut them up into individual stems and layered them on my card front, placing the (NBUS - never-before-used-schtuff) basket die (Berry Basket - Penny Black) over top.  The basket was die-cut from kraft card stock and pounced lightly with my Gathered Twigs stamp pad to add highlights to the embossed design.  A simple sentiment (Full of Christmas - Penny Black) is stamped three times in Candied Apple Distress ink.  I splattered white paint to finish the card.

Sending the above card to NBUS Challenge #65:

* * * * *
For my last card I used the Immense Joy die (Penny Black).  I die-cut two of the Festive Finesse die from mixed media paper and then watercoloured with Distress Re-inkers.  I used one whole die, plus I cut one up for pieces, and arranged them together to fill the "O".  

The card base is black card stock, with the black JOY secured in place.  I die-cut a second JOY from brown buffalo plaid and glued it on top of the black.  I splattered white for snow over top.  I love how the greenery and berries pop against the black. :)

Thanks for stopping by!

Card #1:
Stamps:  Country Charisma (Penny Black); Christmas Sentiments (Penny Black)
Paper:   White card stock (Neenah 110 lb.); Mixed Media (Strathmore 140 lb.)
Ink:   Distress Inks:  Shabby Shutters, Peeled Paint, Candied Apple, Aged Mahogany, Rusty Hinge (Tim Holtz)
Accessories:   Paint brushes, exacto knife, White acrylic pen (Posca)

Card #2:
Stamps:  Full of Christmas (Penny Black)
Paper:   White card stock (Neenah 110 lb.); Mixed Media (Strathmore 140 lb.)
Ink:   Distress Inks:  Mowed Lawn, Peacock Feathers (Tim Holtz); Versamark
Accessories:   Festive Finesse die (Penny Black); Rectangle Mask (Penny Black); sponges, White embossing powder (Ranger), white gouache paint

Card #3:
Stamps:  Believe (Penny Black)
Paper:   White card stock (Neenah 110 lb.); Thick Vellum (Oplymio); Gold Metallic Paper (Tonic)
Ink:   Versamark
Accessories:  Festive Finesse die (Penny Black); Dots & Dashes embossing folder (Penny Black); Rectangle die (Spellbinders),  Princess Gold embossing powder (Ranger)

Card #4:
Stamps:  Xmas Classics - Stick & Shine(Penny Black)
Paper:   White card stock (Neenah 110 lb.); Black card stock (SU!); Copper Glitter Paper (SU!)
Ink:   n/a
Accessories:  Festive Finesse die (Penny Black); Copper Foil

Card #5:
Stamps:  Full of Christmas (Penny Black)
Paper:  White card stock (Neenah 110 lb.); Mixed Media (Strathmore 140 lb.); Kraft Card Stock (Carta Bella)
Ink:  Distress Re-inkers:  Cracked Pistacio, Pine Needles, Candied Apple, Aged Mahogany; Distress Ink:  Gathered Twigs (Tim Holtz)
Accessories:  Festive Finesse die (Penny Black); Berry Basket die (Penny Black), watercolour brushes

Card #6:
Stamps:  n/a
Paper:   White card stock (Neenah 110 lb.); Mixed Media (Strathmore 140 lb.); Black card stock (SU!); Buffalo Plaid Designer Paper (Carta Bella)
Ink:   Distress Re-inkers:  Mowed Lawn, Candied Apple (Tim Holtz)
Accessories:   Immense Joy (Penny Black); Festive Finesse die (Penny Black); watercolour brushes, white acrylic pen (Posca)

Thursday, March 14, 2024

More Masked Stenciling for Group of Seven

Hi everyone.  Another card for February's Group of Seven technique - Masked Stenciling.

This time I die-cut a "hello" mask and adhered it temporarily to my card front.  Peacock Feathers Distress ink was lightly sponged over the card front before adding the Wander & Find stencil (Carta Bella) over top.  I added more sponging over the stencil with Distress Inks: Peacock Feathers, Rusty Hinge, and Gathered Twigs.  Sponging the masked background first with a light colour allows the masked area to pop.  Adding stenciling overtop gives the background so much interest.

I'm adding this card to the linky on the Group of Seven - Masked Stenciling post.

Close-up ...

Thanks for stopping by!

Stamps:  n/a
Paper:   White card stock (Neenah 110 lb.)
Ink:   Distress inks:  Peacock Feathers, Rusty Hinge, Gathered Twigs (Tim Holtz)
Accessories:   Wander & Find stencil (Carta Bella), sponge brushes, hello die for mask (AliExpress)

Wednesday, February 28, 2024

Masked Stenciling - Group of Seven

Hi everyone.  Welcome to a new month at Group of Seven Cardmakers.  The group is having fun playing with new-to-us techniques and products and love sharing our experiences with you.

Please check out the details for the technique on the blog ...

This month, the Group of Seven have been inspired by an amazing card artist, Pat (Colourful Card Creations)!  Welcome Pat!  Thanks for joining us this month!

I first saw this beautiful card below on Pat's blog.  The Group of Seven were excited to try out this uniquely creative technique.

I have admired Pat's cards and followed her blog for many years.  

Here's what I learned when I experimented with this technique ...
  • The masked shape is part of the design of the card.
  • It's important to add the mask first, then add stencil over top before sponging the design.
  • To make your masked area pop, sponge a light colour once your mask is in place BEFORE you add your stencil over top.  Then add more sponging over the stencil.    
  • I die-cut the curved masks for my designs but you can also hand-cut (or die-cut) any shape you like.
* * * * *

For the card above, I die-cut a curve and used it as a mask over my card front.  I placed a splash stencil  over top.  I thought it worked perfectly as large raindrops falling on my little girl with her rubber boots and umbrella (Rainy Days die - Simon Says Stamp).  I used Zigs to colour the girl's boots, coat and legs, but it was easier to sponge colour (Carved Pumpkin, Ripe Persimmon DIs) onto the umbrella.  I used my white Posca paint pen to add the dots.   I finished with a fun sentiment (retired), stamped in black and heat embossed with clear.

This is the first time using this sweet die (I've had it for a while!).  Sending this card to NBUS Challenge #59.
 
* * * * *

I made a second masked stencil card using a curved mask cut with a snowdrift die. :)  I used the Fading Florals stencil (Simon Says Stamp), sponging with Distress inks (Shabby Shutters, Ripe Persimmon, Mustard Seed, Crackling Campfire).  I used my white Posca paint pen to add a few details to the stenciling and then stamped the sentiment (Gratitude - Penny Black) in more Crackling Campfire ink.

Sending the above card to Seize the Birthday Challenge #278.  No topping this time. :)

* * * * *
... and one more card ...
I first cut two masks from the same curve die.  Placed one over the bottom of the card (for a snowhill), and the second one on the right side of the card as part of the overall design.

For the stencil, I used a tree die (Tree Frame - Gina Marie Designs) that I cut from Yupo.  Yupo is made of plastic and it makes great stencils from dies because it never rips and after inking you can wipe the ink off with a damn cloth or paper towel ... and then it's ready to use again! :)

I used the colours of the rainbow to sponge over the tree stencil (Distress Inks:  Salty Ocean, Wilted Violet, Fired Brick, Picked Raspberry, Carved Pumpkin, Mustard Seed, Mowed Lawn ... then a little more of the Salty Ocean).  I removed the stencil and splattered with diluted white acrylic paint and gold acrylic paint.  Once dry, I stamped the sentiment (Believe - Penny Black) in gold delicata ink.

... and sending it also to Rudolph Days Challenge.  Thanks to Helen for taking over for Maureen!!

I had a lot of fun with this technique.  Thanks for the inspiration Pat!!

Thanks for stopping by!


If you would like to subscribe by email,
please fill out the subscription form in the upper right sidebar.
Make sure to add "subscribe" to the message.
It is also important to add SWL1subscribers@gmail.com to your contact list
so Google recognizes the address and delivers the updates.

To unsubscribe, please use the same form making sure to add
"unsubscribe" to the message.
Thank you.


Card #1:
Stamps:  Rainy Day Play (Clearly Besotted)
Paper:   White card stock (Neenah 110 lb.); Mixed Media (Strathmore 140 lb.)
Ink:   Distress inks:  Salvaged Patina, Salty Ocean,Carved Pumpkin, Spiced Marmalade (Tim Holtz); Zigs:  Bright yellow, Flesh 
Accessories:   Curve die (My Favorite Things), Splash stencil (Silhouette America), sponges, scrap paper for curve mask;  Rainy Days die (Simon Says Stamp), Clear embossing powder (Ranger), heat tool

Card #2:
Stamps:  Gratitude (Penny Black)
Paper:   White card stock (Neenah 110 lb.); Mixed Media (Strathmore 140 lb.)
Ink:   Distress inks:  Shabby Shutters, Ripe Persimmon, Mustard Seed, Crackling Campfire (Tim Holtz)
Accessories:  Fading Florals stencil (Simon Says Stamp), detail sponge brushes, Snowdrift die (MFT), scrap paper for curve mask, white Posca pen

Card #3:
Stamps:  Believe (Penny Black)
Paper:   White card stock (Neenah 110 lb.); Mixed Media (Strathmore 140 lb.); Yupo
Ink:   Distress inks:  Salty Ocean, Wilted Violet, Fired Brick, Picked Raspberry, Carved Pumpkin, Mustard Seed, Mowed Lawn (Tim Holtz); Delicata Gold Ink (Tsukineko)
Accessories:   Tree Frame die (Gina Marie Designs), sponges, scrap paper for curve masks, white acrylic paint, gold acrylic paint, splatter brush

Friday, October 20, 2023

CAS Thinking of You

Hi everyone.  A quick post with a quick and easy card. :)

My dear friend's dad (he's 90+) is not well so I wanted to send him a card to let him know I was thinking of him.

I kept it very clean and simple by masking my Bamboo stencil (The Crafter's Workshop - retired) to sponge only two pieces of bamboo, plus some leaves on top in Shabby Shutters distress ink.  A border was masked before lightly sponging Salvaged Patina ink partially along the bottom and up one side, fading out as I went along.  To finish, I stamped a simple sentiment (A Little Sentimental from Clear Besotted - retired) in black ink.


* * * * *

I received a lovely email yesterday which included two photos of Jessie.  These were taken by my SIL Alejandro at our Thanksgiving dinner (Oct. 9th).  I didn't know he took photos, so getting the email was a wonderful surprise.  Definitely brightened my day. :)


Thanks for stopping by!


If you would like to subscribe by email,
please fill out the subscription form in the upper right sidebar.
Make sure to add "subscribe" to the message.
It is also important to add SWL1subscribers@gmail.com to your contact list
so Google recognizes the address and delivers the updates.

To unsubscribe, please use the same form making sure to add
"unsubscribe" to the message.
Thank you.


Stamps:  A Little Sentimental (retired)
Paper:   White card stock (Neenah 110 lb.); Mixed Media (Strathmore 140 lb.)
Ink:   Distress Inks:  Shabby Shutters, Salvaged Patina (Tim Holtz); Black (Memento)
Accessories:   Bamboo Stencil (The Crafter's Workshop), sponge brushes, removable tape for masking

Sunday, September 10, 2023

Fall Colours

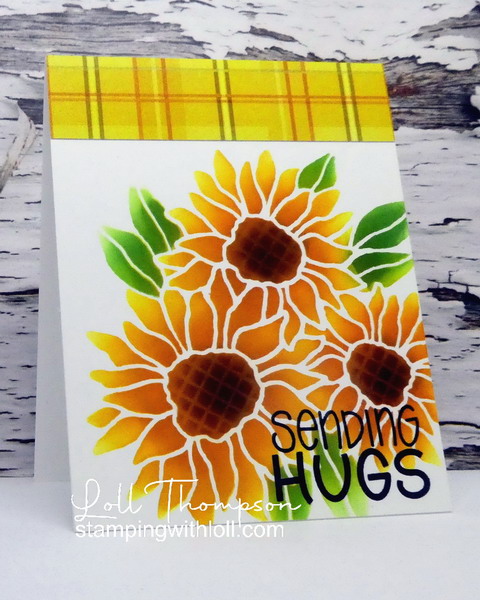
Hi everyone.  I'm back with another sunflower card to celebrate that fall is almost here.  And thank goodness for that.  We've had the worst summer on record for fires burning in B.C. with about 2M hectares of land distroyed and over 400 structures, many of those people's homes.  The cooler weather that we've had this week has helped a lot, but what we really need is rain.  But not too much rain ... with the current drought conditions, lots of rain will most likely cause excessive flooding.  We are so thankful to all the hard working firefighters and to those firefighters that have come from all over the world to help us.

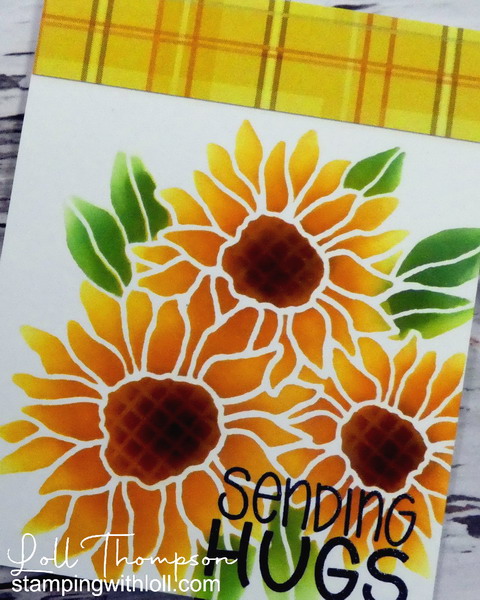
On to the card.  I LOVE this stencil from Magenta and was happy to pull it out and make a card with it.  I was inspired by the mood board at Triple B September Challenge ... the flowers and the colours.


... and then I saw the mood board at Double D challenge - beautiful Fall Plaids.  A great combo for a card. :)  The plaid paper I found is long retired from SU! ... and it was a bit dull, so I sponged over top with Mustard Seed DI to brighten it up.

... and one more challenge

The stencil is done with Distress Inks as well:  Mustard Seed, Ripe Persimmon, Rusty Hinge, Gather Twigs, Walnut Stain, Mowed Lawn, and Rustic Wilderness.  I just kept adding layers of colours until I was happy with the look. :)

I thought it needed something more, so took the Textured Mesh stencil (retired - Memory Box) and sponged over top of the centers of the flowers.  The final step, stamp the sentiment in black ink and heat emboss with clear embossing powder --- helps it to stand out more against the sunflower background.

Close-up ...

Thanks for stopping by!


If you would like to subscribe by email,
please fill out the subscription form in the upper right sidebar.
Make sure to add "subscribe" to the message.
It is also important to add SWL1subscribers@gmail.com to your contact list
so Google recognizes the address and delivers the updates.

To unsubscribe, please use the same form making sure to add
"unsubscribe" to the message.
Thank you.


Stamps:  Sending Hugs (Impression Obsession)
Paper:   White card stock (Neenah 110 lb.); Patterned paper (SU! retired)
Ink:   Distress Inks:  Mustard Seed, Ripe Persimmon, Rusty Hinge, Gathered Twigs, Walnut Stain, Mowed Lawn, Rustic Wilderness (Tim Holtz); Black (Memento)
Accessories:   Three Flowers Sunflower Stencil (Magenta), sponge brushes, Clear Embossing powder (Ranger), heat tool

Tuesday, June 06, 2023

Love, Kisses & Birthday Wishes

Hi everyone.  I had fun making the above card ...

I used the Painted Flowers Wreath stencil (Simon Says Stamp), masking and sponging two colours of Distress Inks (Shabby Shutters, Picked Raspberry).  To finish, I stamped a sentiment (Good Wishes - Penny Black) in Lost Shadow distress ink

A fun and quick card to make. :)

Close-up ...
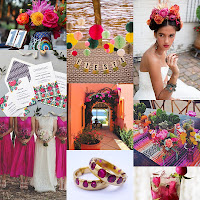
I LOVE the vibrancy of the beautiful flowers in the top left photo and pink is my favourite colour. :)

I'm also sending this card to Stencil Fun June Challenge - Optional:  Layered Stencils.  Happy to be playing along.  Didn't use the Optional this time. :)


Thanks for stopping by!


If you would like to subscribe by email,
please fill out the subscription form in the upper right sidebar.
Make sure to add "subscribe" to the message.
It is also important to add SWL1subscribers@gmail.com to your contact list
so Google recognizes the address and delivers the updates.

To unsubscribe, please use the same form making sure to add
"unsubscribe" to the message.
Thank you.


Stamps:  Good Wishes (Penny Black)
Paper:   White card stock (Neenah 110 lb.)
Ink:   Distress Inks:  Picked Raspberry, Shabby Shutters, Lost Shadow (Tim Holtz)
Accessories:   Painted Flowers Wreath (Simon Says Stamp), sponge brushes