Showing posts with label gilding flakes. Show all posts

Monday, April 28, 2025

Gilding Flakes on Acetate - Group of Seven

Hi everyone.  Today's technique is a fun one ... Gilding Flakes on Acetate.  Another great way to make use of the beautiful Gilding Flakes you have stashed in your craft room.  The acetate gives the card a light, airy feel and also lots of shine.

Please check out the details for the Gilding Flakes on Acetate post with link to video on the blog 

For the birthday card above, I used a stencil over acetate, adding the glitter flake glue with a sponge.  The glue needs to dry clear (it will remain tacky even when dry).  I added gilding flakes (Mulled Wine - Cosmic Shimmer) over top.  A Rub it-Scrub it sponge was used to burnish the flakes and remove any excess.  For the final step, I used a damp paper towel to remove any small bits of lose flakes or dust on the acetate, wiping again with a dry paper towel.  

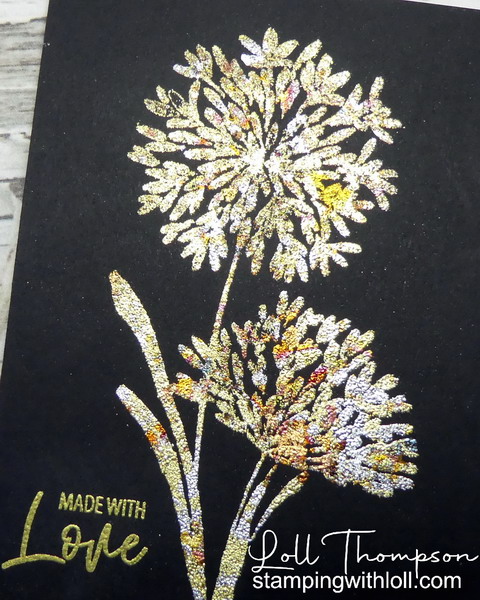
I stamped a new-to-me flower, (Love Blooms - Penny Black) in black ink, heat embossing with clear.  I watercoloured using Distress Inks and then used the matching die (Love Blooms Cut Out - Penny Black) to die-cut the image.

I put the card together, placing the gilding flakes stenciled acetate behind the front panel which is die-cut with a rectange aperture.  I popped up the panel over my card base.  The die-cut flower was popped up over top and a simple sentiment (Special Sentiments - Penny Black) is stamped in black ink to finish the card.

Sending this card to the following challenges ...
1)  NBUS #73 - My flower and matching die-cut were NBUS items
2)  CAS on Friday #307 - Use a Stencil.  A stencil was used with gilding flakes on acetate for the background.
3)  Seize the Birthday #304 - Stenciling - Gilding Flake background  


Here's what I learned when I experimented with this technique ...
  • Acetate gives your project a look of transparency and lets light through
  • When using glue over a stamp or stencil, make sure to clean the stamp or stencil right away after stamping.  
  • You can use double-sided tape instead of glue to easily attach the gilding flakes to your acetate
* * * * *

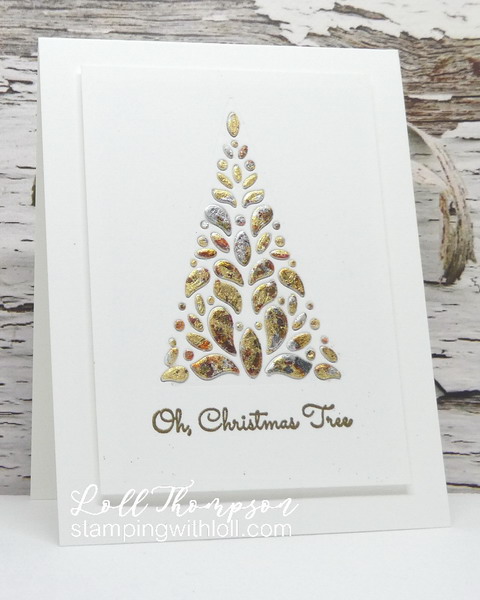
A second card using double-sided tape to adhere gilding flakes to acetate ...
I started with a piece of acetate and different sizes of double-sided tape.  I added strips of the tape near the bottom of my acetate panel, varying the sizes.  I removed the covers and added gilding flakes (Red Blaze - Cosmic Shimmer) on top.  I followed the same procedure as above to burnish the flakes, using a textured sponge to remove any excess flakes, and then wiping the whole surface with a damp cloth. 

The double flower die (gift from a friend), was cut from black card stock and popped up over the acetate panel, which was also popped up over the card front.  I used pop dots and hid them behind the flower petals and strips of gilding flakes so they didn't show through the acetate.  Gold pearls were added to the centers of the two flowers and a simple sentiment was stamped in black ink to finish the card. 

Thanks for stopping by!

Card #1:
Stamps:  Special Sentiments; Love Blooms (both Penny Black)
Paper:   White card stock (Neenah 110 lb.); Acetate; Mixed Media (Strathmore 140 lb.)
Ink:   Black (Memento); Distress Inks:  Lumberjack Plaid, Ripe Persimmon, Shabby Shutters, Peeled Paint (Tim Holtz)
Accessories:   Starburst stencil (cut from my silhouette cameo); Flake & Glitter Glue (Cosmic Shimmer), Mulled Wine Gilding Flakes (Cosmic Shimmer), Rub it-Scrub it (Ranger); Love Blooms Cut Out (Penny Black), rectangle die (Spellbinders)

Card #2:
Stamps:  Hero Arts (retired)
Paper:   White card stock (Neenah 110 lb.); Acetate; Black card stock (SU!)
Ink:   Black (Memento)
Accessories:   Double-sided tape (different widths), Red Blaze Gilding Flakes (Cosmis Shimmer), Rub it-Scrub it (Ranger), gold pearls, Flower die (unknown - gift from a friend)

Friday, August 30, 2024

Multiple Makes #3 - Christmas

Hi everyone.  Welcome to my third post on multiple makes.  My Christmas stash of cards is building and I'm really happy with the progress, thanks to my multiple makes. :)  I'm sharing six CAS (clean and simple) cards today. :)

I'm featuring the Festive Finesse die from Penny Black.  I've had this for over a year and have only used it once --- shame on me!!  

For the card above, I watercoloured the Festive Finesse die with Distress re-inkers, adding shaping with a mat and stylus.  I also stamped and die-cut a watering can from the Country Charisma set (Penny Black), watercolouring with Rusty Hinge Distress Re-inker.  A extacto knife was used to cut a slit in the watering can lid so I could slip the stem through to the back.  The lower leaf and berries were cut from the die-cut and then added back into the bouquet mix.  A simple stamped sentiment (Christmas Sentiments - Penny Black) is stamped in more red ink and the bouquet was popped up for added dimension.
* * * * *
The next card is very CAS, with just a simple sponged rectangle using the Background Basics Stencil - 25-21 (Penny Black) with Mowed Lawn and Peacock Feathers Distress inks.  I diluted white gouache paint and splattered over top, along with splattering over the Festive Finesse die-cut from mixed media paper.  I stamped "peace" from the Full of Christmas stamp set (Penny Black) in versamark and heat embossed in white.  I adhered the sprig to the top right corner of the sponged rectangle to finish the card. 

* * * * *
This time I dry embossed (Dots & Dashes - Penny Black) a piece of vellum and adhered onto my card base.  I cut a rectangle frame, stamped the sentiment (Believe - Penny Black) in Versamark and heat embossed with Princess Gold embossing powder.  I adhered the frame over top of the embossed vellum card front, adding the Festive Finesse sprig die-cut from gold metallic paper in the rectangle frame.  Very simple card to make that doesn't really look simple! :)  For some reason the camera doesn't show how pretty the vellum is ... it looks very dreamy in the background in real life. :(

Sending the above card to the following Challenges:
Die-cut Diva's August Challenge.  I used dry embossing on my card.
Can you Handle the Pressure - twist of leaves


* * * * *
For the next card I pulled out my Gilding Flakes that I haven't used for a while (Red Blaze - Cosmic Shimmer).  I used double-sided tape to adhere to a piece of card stock, then die-cut the Festive Finesse.  Removed the cover and sprinkled gilding flakes over top.  I used a Rub 'n Scrub pad to remove excess flakes and burnish the remainder to my die-cut.

I layered it over top of a white die-cut to give it more texture and depth and then added a black sentiment border which has been foiled in copper, using the Stick & Shine - Xmas Classics (Penny Black).  To finish, I added a very thin piece of copper glitter paper.

* * * * *
For the card above, I die-cut two of the Festive Finesse sprigs and watercoloured them with Distress Re-inkers.  I cut them up into individual stems and layered them on my card front, placing the (NBUS - never-before-used-schtuff) basket die (Berry Basket - Penny Black) over top.  The basket was die-cut from kraft card stock and pounced lightly with my Gathered Twigs stamp pad to add highlights to the embossed design.  A simple sentiment (Full of Christmas - Penny Black) is stamped three times in Candied Apple Distress ink.  I splattered white paint to finish the card.

Sending the above card to NBUS Challenge #65:

* * * * *
For my last card I used the Immense Joy die (Penny Black).  I die-cut two of the Festive Finesse die from mixed media paper and then watercoloured with Distress Re-inkers.  I used one whole die, plus I cut one up for pieces, and arranged them together to fill the "O".  

The card base is black card stock, with the black JOY secured in place.  I die-cut a second JOY from brown buffalo plaid and glued it on top of the black.  I splattered white for snow over top.  I love how the greenery and berries pop against the black. :)

Thanks for stopping by!

Card #1:
Stamps:  Country Charisma (Penny Black); Christmas Sentiments (Penny Black)
Paper:   White card stock (Neenah 110 lb.); Mixed Media (Strathmore 140 lb.)
Ink:   Distress Inks:  Shabby Shutters, Peeled Paint, Candied Apple, Aged Mahogany, Rusty Hinge (Tim Holtz)
Accessories:   Paint brushes, exacto knife, White acrylic pen (Posca)

Card #2:
Stamps:  Full of Christmas (Penny Black)
Paper:   White card stock (Neenah 110 lb.); Mixed Media (Strathmore 140 lb.)
Ink:   Distress Inks:  Mowed Lawn, Peacock Feathers (Tim Holtz); Versamark
Accessories:   Festive Finesse die (Penny Black); Rectangle Mask (Penny Black); sponges, White embossing powder (Ranger), white gouache paint

Card #3:
Stamps:  Believe (Penny Black)
Paper:   White card stock (Neenah 110 lb.); Thick Vellum (Oplymio); Gold Metallic Paper (Tonic)
Ink:   Versamark
Accessories:  Festive Finesse die (Penny Black); Dots & Dashes embossing folder (Penny Black); Rectangle die (Spellbinders),  Princess Gold embossing powder (Ranger)

Card #4:
Stamps:  Xmas Classics - Stick & Shine(Penny Black)
Paper:   White card stock (Neenah 110 lb.); Black card stock (SU!); Copper Glitter Paper (SU!)
Ink:   n/a
Accessories:  Festive Finesse die (Penny Black); Copper Foil

Card #5:
Stamps:  Full of Christmas (Penny Black)
Paper:  White card stock (Neenah 110 lb.); Mixed Media (Strathmore 140 lb.); Kraft Card Stock (Carta Bella)
Ink:  Distress Re-inkers:  Cracked Pistacio, Pine Needles, Candied Apple, Aged Mahogany; Distress Ink:  Gathered Twigs (Tim Holtz)
Accessories:  Festive Finesse die (Penny Black); Berry Basket die (Penny Black), watercolour brushes

Card #6:
Stamps:  n/a
Paper:   White card stock (Neenah 110 lb.); Mixed Media (Strathmore 140 lb.); Black card stock (SU!); Buffalo Plaid Designer Paper (Carta Bella)
Ink:   Distress Re-inkers:  Mowed Lawn, Candied Apple (Tim Holtz)
Accessories:   Immense Joy (Penny Black); Festive Finesse die (Penny Black); watercolour brushes, white acrylic pen (Posca)

Thursday, February 15, 2024

More Alcohol Inks with Gilding Flakes for Gof7

Hi everyone.  Another card for January's Group of Seven technique - Alcohol Inks with Gilding Flakes.

Today I'm sharing hubby's Valentine's Day card. :)

I used an alcohol ink panel from my stash, adding thin lines of glue and then adding gilding flakes over top; letting it dry before brushing off the excess flakes.  I cut the heart die (Streaming Heart - Simon Says Stamp) from black card stock and again from my alcohol ink panel and then pieced them together. 

The heart is popped up with foam over a black card base to give it some dimension.  To finish, the sentiment is heat embossed with Princess Gold embossing powder.  I love the vibrancy of these alcohol ink colours! :)  


Thanks for stopping by!


Stamps:  From the Garden (Penny Black)
Paper:   Black card stock (SU!); Yupo paper
Ink:   Alcohol Inks (Ranger); Versamark
Accessories:   Streaming Heart die (Simon Says Stamp); Princess Gold embossing powder, heat tool

Sunday, January 28, 2024

Alcohol Inks with Gilding Flakes - Group of Seven

Hi everyone.  I LOVE alcohol inks for their vibrancy ... add gilding flakes and you have a winning combination!  

Please check out the details for the technique and link to video on the blog ...

* * * * *

Here's what I learned when I experimented with this technique ...
  • It's best to stick with 2 colours of Alcohol Inks (or 3 colours in the same colour family) so that the background doesn't become too busy (my first card was really busy, but I found something that complimented it.  Took me a while to figure it out. :)
  • I found using a fine-tip glue bottle to add random lines of thin glue and then pressing gilding flakes lightly into the glue, worked the best to get the gilding flakes to stick.  You need to let the glue dry completely before burnishing them to remove the excess.  Only the last card in this post uses glue to stick the gilding flakes.
* * * * *

For the card above ...

When the gilding flakes wouldn't stick to my panel above, I added more rubbing alcohol and moved the ink around with my puffer tool, then quickly added flakes.  Just a few stuck (silver) that you might see on the background.  This piece turned out to be a very busy design even though I only used three colours of alcohol inks.  Adding the large die-cut Laurel Leaves Background Plate (Simon Says Stamp), seemed to tone it down a bit.  I'm happy with the finished card.


Below is a Christmas card using Poppfield, Watermelon, and Shell Pink alcohol inks to create this design.  I added Verdigris gilding flakes as soon as I finished with the AIs and lots stuck this time.  A die-cut (Layered Poinsettia from Penny Black) cut from real red card stock and sponged with real red ink around the edges finishes the card, along with sentiment (My Favorite Things - retired) stamped in delicata gold ink.
Sending this Christmas card to Rudolph Days January Challenge - Anything Christmas Goes.  Sadly this is the last challenge for Rudolph Days as Maureen is closing it's doors.  Thank you Maureen, for all your hard work running this challenge.  I have enjoyed playing along.  All the best to you and Al for your future and I hope you find the perfect new home soon. Take care.


And, my last card ... I used Black Metallic Card for the base of my alcohol inks panel, smooshed with Pearl Alcohol inks.  I used my fine-tip bottle to apply really thin lines of glue, pressed gilding flakes overtop (pressing lightly) and then left it to dry for an hour.  Brushed off the excess and am happy with how it turned out.  Definitely an easier way for me to get the gilding flakes to stick. :)

The Lake Loon die - Gina Marie Designs is cut from gold metallic card stock.  It is popped up with foam and placed over the AI/Gilding Flakes panel onto a black card base.  To finish I stamped Happy Birthday and heat embossed with Princess Gold embossing powder.

Thanks for stopping by!

Card #1
Stamps:  Happy Birthday (Cavallini & Co)
Paper:   White card stock (Neenah 110 lb.); Yupo Paper; Silver Foil card stock (SU!); Black card stock (SU!)
Ink:   Alcohol Inks:  Mermaid Lagoon, Sunset Orange, Teakwood (Ranger)
Accessories:   Rubbing Alcohol, Puffer Tool, Persian Dawn Gilding Flakes (Cosmic Shimmer); Laurel Leaves Background Plate (Simon Says Stamp), Silver Embossing Powder, heat tool
  
Card #2
Stamps:  Snowglobe Sayings (My Favorite Things - retired)
Paper:   White card stock (Neenah 110 lb.); Yupo Paper
Ink:   Alcohol Inks:  Poppyfield, Watermelon, Shell Pink (Ranger); Real Red (SU!); Delicata Gold (Tsukineko)
Accessories:  Rubbing Alcohol, Hair Dryer, Verdigris Gilding Flakes (Cosmic Shimmer); Layered Poinsettia die (Penny Black), gold beads  

Card #3:
Stamps:  Greetings (Cavallini & Co.)
Paper:   Black card stock (SU!); Black Metallic card stock (Tonic); Gold Metallic card stock (SU!)
Ink:   Pearl Alcohol Inks (Ranger); Versamark
Accessories:   Lake Loon die (Gina Marie Designs); Fine-tip Glue applicator, Tombow Mono glue, Persian Dawn Gilding Flakes (Cosmic Shimmer), Princess Gold embossing powder (Ranger), heat tool

Challenges:

Tuesday, March 28, 2023

Dry Embossed Gilding Flakes - Group of Seven

Hi everyone.  

First, I want to thank everyone for the well wishes and lovely cards I received.  I am thankful to have so many people pulling for me through my heart surgery and recovery.  I'm doing OK ... hubby is taking great care of me. :)

This month our Group of Seven Cardmakers tried Dry Embossed Gilding Flakes following a video from Technique Junkies, Embossed Gilding Flakes and led by Susan.

Please check out the details for the technique and link to video on the blog ...

I actually did this technique in late-February.  This is such a fun technique (as long as the gilding flakes don't get away from me!).  I love the shimmer and shine of gilding flakes ... they always make an elegant card.  

I used Warm Sunshine (Cosmic Shimmer) gilding flakes to make two small panels.  For the first panel, I die-cut the Moonlight Butterfly (Memory Box).  I then dry embossed my butterfly with Musical Flourish embossing folder (Cuttlebug).  I have mini archival inks in several colours, this time using Sepia to lightly swipe (direct from ink pad to gilding flakes panel) over top, catching the highlighted design.  This has to be done carefully so that you don't get a lot of ink on the background.  I did three coats before being happy with the contrast.  

To finish the card, I smooshed Ripe Persimmon and Gathered Twigs Distress Inks using a piece of acetate.  Adding the inks and spritz of water onto the acetate allows me to lightly dab onto my card front with a little bit of control.  I stamped the sentiment (Happy Messages - Stampendous) in the same Sepia archival ink as well as using that ink on the antennae.  

Close-up ...

The second panel is done with the same gilding flakes (Warm Sunshine) and embossed with Courrier (Carabella Studio) embossing folder.  This time, Vermillion (dark red) archival ink was lightly swiped to pick up the highlighted, embossed design.  I used the panel for the background, adding a die-cut branch (sponged with Gathered Twigs DI) and punched flowers (coloured with more of the Vermillion Archival ink).


In all, I found this to be a simple technique that gave beautiful results.  The video used black ink and that would have worked on both panels, but I wanted subtler colours and I'm happy with the results.

If you have gilding flakes in your stash, I hope you'll try out this technique and share your card in the linky on the Group of Seven blog.

Thanks for stopping by!


If you would like to subscribe by email,
please fill out the subscription form in the upper right sidebar.
Make sure to add "subscribe" to the message.
It is also important to add SWL1subscribers@gmail.com to your contact list
so Google recognizes the address and delivers the updates.

To unsubscribe, please use the same form making sure to add
"unsubscribe" to the message.
Thank you.


Card #1:
Stamps:  Happy Messages (Stampendous - retired)
Paper:   White card stock (Neenah 110 lb.)
Ink: Sepia Archival ink (Ranger)
Accessories:   Double-sided sticky sheets cut to size, Warm Sunshine Gilding Flakes (Cosmic Shimmer), Rub-it Scrub-it piece for burnishing flakes, Musical Flourish embossing folder (Cuttlebug),

Card #2:
Stamps:  Many Everyday Messages (Hero Arts)
Paper:   White card stock (Neenah 110 lb.)
Ink:   Vermillion Archival Ink (Ranger)
Accessories:   Double-sided sticky sheets cut to size, Warm Sunshine Gilding Flakes (Cosmic Shimmer), Rub-it Scrub-it piece for burnishing flakes, Courrier embossing folder (Carabelle Studio); Hydrangea punch (Martha Stewart), Lavish Branch die (Memory Box)

Challenges:

Friday, January 20, 2023

Together

Hi everyone.

A few days ago, I posted a card using Mica Powder stenciling onto black card.  I set the mica powders using Sticky embossing powder (Ranger) and it worked really well.  Then my friend Susan suggested that the same sticky powder might work with gilding flakes.  I had to give it a try.

It worked so well!  No mess and fussing with glue.  I added Versamark to my image (Together - Penny Black), stamped onto black card stock, sprinkled Sticky powder over top and then heat set.  I pressed some gilding flakes into the image and burnished using Rub-it Scrub-it pad (Ranger).  I briefly reheated to set everything.

I used Cosmos Gilding Flakes - Persian Dawn.  The sentiment (Smiles - Penny Black) is heat embossed with Princess Gold embossing powder to finished the card.

Close-up ...

Thanks for stopping by!


If you would like to subscribe by email,
please fill out the subscription form in the upper right sidebar.
Make sure to add "subscribe" to the message.
It is also important to add SWL1subscribers@gmail.com to your contact list
so Google recognizes the address and delivers the updates.

To unsubscribe, please use the same form making sure to add
"unsubscribe" to the message.
Thank you.


Stamps:  Together, Smiles (both Penny Black)
Paper:   White card stock (Neenah 110 lb.); Black card stock (SU!)
Ink:   Versamark
Accessories:   Sticky Powder (Ranger), heat tool; Persian Dawn gilding flakes (Cosmos), Rub-it Scrub-it Pad (Ranger), Princess Gold embossing powder

Challenges:

Monday, June 27, 2022

Oh, Christmas Tree

Hi everyone.  I've made a Christmas Tree card to play along with a couple of fun challenges.  I used a pretty tree die called Corbel Tree Collage (Simon Says Stamp).  The die cuts away the design leaving the card front with the aperture.  I cut it from both white card stock and from card stock layered with Persian Dawn (Cosmic Shimmer) Gilding Flakes.  I love the beautiful colours from these gilding flakes. :)  It took me a while to add all the little bits on top of the background, but I'm happy with how it looks finished.

Close-up ...
The photo from above shows a lot more of the shimmer of these beautiful gilding flakes. :)


And sending it to Rudolph Days June Challenge - Anything Christmas Goes.

I so appreciate all the hard work of the Owners and Designers from these challenges.  They help keep my Christmas card stash growing throughout the year.  Thank you!

And thank you for stopping by!


If you would like to subscribe by email,
please fill out the subscription form in the upper right sidebar.
Make sure to add "subscribe" to the message.
It is also important to add SWL1subscribers@gmail.com to your contact list
so Google recognizes the address and delivers the updates.

To unsubscribe, please use the same form making sure to add
"unsubscribe" to the message.
Thank you.


Stamps:  Love Bug Christmas (sentiment) - Unity
Paper:   White card stock (Neenah 110 lb.)
Ink:   Versamark
Accessories:   Corbel Tree Collage die (Simon Says Stamp), Persian Dawn Gilding Flakes (Cosmic Shimmer, Gold Embossing powder (Ranger), heat tool

Challenges:

Tuesday, June 07, 2022

Metallic Butterfly ... and Jessie

Hi everyone.  Playing along with a two challenges today, both which determined my card design.

First, "Can You Handle the Pressure?" - which is Anything Goes Dry Embossing with an optional twist of Butterflies.  I hope one butterfly is OK. :)  I've used two embossing folders for my main panel to create a double embossed panel.  First, Woodgrain planks (SU!) and then embossed on top with Layered Leaves (SU!) - both folders are retired.

And also the Memory Box June Challenge - Metallic Mania.  I used Gilding Flakes for the butterfly and gold ink for the sentiment and to add a tiny bit of sparkle to the background of the main panel.  I used Memory Box Moonlight Butterfly die (retired) and Memory Box sentiment from Watching Bloom stamp set (also retired).

Seems like I used all retired items for this card.  I find that companies now seem to retire their items quite quickly.  SU! has always done that, but the other manufacturers are following suit.  Too bad in my opinion.  I hold on to ones that I love and continue to use them.  The only company that rarely retired products if Penny Black - thank goodness!

Close-up ...
After double embossing my panel, I used a small sponge dauber to add a bit of Shabby Shutters distress ink on top of the leaf embossing, followed by a light dab of gold paint on top of the green.  Hard to see in the photo, but the gold ink has a little sparkle in it and it shows up in real life.

Thanks for coming by for a visit!


* * * * *
Jessie - 3 years old
Photo Shoot


Photographs by
Alejandro Garcia Photography
Email:   sendtodreambox@gmail.com


If you would like to subscribe by email,
please fill out the subscription form in the upper right sidebar.
Make sure to add "subscribe" to the message.
It is also important to add SWL1subscribers@gmail.com to your contact list
so Google recognizes the address and delivers the updates.

To unsubscribe, please use the same form making sure to add
"unsubscribe" to the message.
Thank you.


Stamps:  Watching Bloom - retired (Memory Box)
Paper:   White card stock (Neenah 110 lb.); Mixed Media paper (Strathmore 140 lb.)
Ink:  Shabby Shutters distress ink (Tim Holtz); Delicata Gold ink (Tsukineko) 
Accessories:   Woodgrain embossing folder and Layered Leaves embossing folder - both retired (SU!), Moonlight butterfly die - retired (Memory Box), Verdigris Gilding Flakes (Cosmic Shimmer), Sookwang double sided tape, sponges

Challenges:
Can You Handle the Pressure? - optional twist of Butterflies


Saturday, April 04, 2020

CAS Stencil April Challenge

Hi everyone.  Today's card is for the new CAS Stencil April Challenge, hosted by the talented Cathy (Cathy's Card Spot).  The gallery will be filled with shiny and elegant cards this month!!

Our Guest Designer this month is Mac (Sweetest of Peas).  Mac is an amazing mixed media artist and she is GD this month at CAS Stencil and CAS Mix Up!!  Welcome Mac!

So this card is actually very simple.  I used a large flower stencil, sponged gilding flake glue over top and then removed stencil to let glue dry.  Once clear (the glue is still a bit tacky), I applied two colours of gilding flakes.  The center is Red Blaze ... I love all the pretty colours in this mix (gold, bronze, pink, orange, etc.).  The outer layer of the petals is done with Warm Sunrise (gold and bright copper).  It justs a little something different to have the two colours.  I cut my panel to size and stamped a large sentiment, then heat embossed in black so it would show up over top of the gilding flakes.

Close-up ...
I hope you'll come play along with us this month.  Pull out those gilding flakes and get a bit messy!


Stamps:  Thoughtful Messages (Simon Says Stamp)
Paper:  White card stock (Neenah 110 lb.)
Ink:  Versamark
Accessories & Tools:  Bloom stencil (Mayco); Flake & Glitter Glue (Cosmic Shimmer); Gilding Flakes - Red Blaze & Warm Sunset (Cosmic Shimmer); Rub & Scrub, Black embossing powder, heat tool.

Challenges:
CAS Stencil April Challenge - Gilding Flakes