Showing posts with label Stampscapes. Show all posts

Sunday, August 28, 2022

Kraft and White Winter Scene

Hi everyone.  Several months ago a group of us did a Zoom call and we sponged white onto kraft to create some vintage-style cards.  I posted several of the cards HERE, but this one was missed ... so I'm sharing now.

This card uses a beautiful image Country Chapel (Stampscapes), which works so well with this technique.  I stamped in Archival Coffee ink (Ranger) and then sponged around the image with white pigment ink, creating sky and hills (using torn masks).  I used some diluted white acrylic paint to add more snow to the church and trees and then also splattered to create falling snow.  The sentiment (Deco Christmas -  Tim Holtz) is stamped in the same ink.

Thanks for stopping by!


If you would like to subscribe by email,
please fill out the subscription form in the upper right sidebar.
Make sure to add "subscribe" to the message.
It is also important to add SWL1subscribers@gmail.com to your contact list
so Google recognizes the address and delivers the updates.

To unsubscribe, please use the same form making sure to add
"unsubscribe" to the message.
Thank you.


Stamps:  Country Chapel (Stampscapes); Deco Christmas (Tim Holtz)
Paper:   White card stock (Neenah 110 lb.); Baked Brown Sugar card stock (SU!)
Ink:   Coffee (Archival ink - Ranger); White pigment (Unicorn by Hero Arts)
Accessories:   sponges, paint brushs, white acrylic paint, torn masks from post-it notes


Saturday, January 15, 2022

CAS Mix Up January Reminder

Hi everyone.  I'm back with a reminder card for this month's CAS Mix Up Challenge - Loose Watercolouring, hosted by Jenny.  I'm a "colour inside the lines" kinda gal, so Loose Watercolouring is a little bit of a stretch for me.  The best thing was to find a technique that worked for me, and I did on YouTube (see link below).


Click HERE to see Simple Misty Loose Watercolouring.  I think it's a great way for a beginner (like me) to try Loose Watercolouring.  I did change it up a little, using a stamp for my trees (Stampscapes Pine Row) and not hand painting them.  I then used re-inkers to colour my trees, brushing the highly pigmented inks directly onto my tree stamp (Mowed Lawn, Rustic Wilderness, and Blueprint Sketch re-inkers).   I still added water to the watercolour paper before stamping, with a little at the top and heavier water at the area that would become the bottom of the trees.  A simple sentiment  and die-cut frame finishes the card.

Close-up ...

I'm so happy how my card turned out and look forward to making more cards using this very easy technique for Loose Watercoloured cards.  Thanks for this great challenge Jenny!

Please check out the challenge blog to see the amazing cards from our Designers.  Then come play along if you haven't already.  Hope to see you in the gallery!


If you would like to subscribe by email,
please fill out the subscription form in the upper right sidebar.
It is also important to add sw1subscribers@gmail.com to your contact list
so Google recognizes the address and delivers the updates.


Stamps:  Pine Row (Stampscapes); Greetings - retired (Cavallini & Co.)
Paper:   Watercolour Paper (Arches 140 lb. Hot Press)
Ink:   Distress Re-inkers:  Mowed Lawn, Rustic Wilderness, Blueprint Sketch;  (Tim Holtz)
Accessories:   Paint Brushes, Rectangle Frame die (retired)

Challenges:
CAS Mix Up January Reminder - Loose Watercolouring

Sunday, October 24, 2021

Zoom with Crafty Friends - Brayering

Hi everyone.  Our Crafty group had our monthly Zoom a couple of days ago.  Brayering was on the agenda, with Brenda in IN (Inkspired to Stamp)  leading the technique.  

It was so much fun!  I used to brayer quite a bit about 10 years ago.  It's still a fabulous technique with a unique look.  I made two cards ... the one above is Sunset.  Using Mustard Seed, Carved Pumpkin, and Salvaged Patina distress inks, I brayered the background to look like the sun was rising for the day.  I stamped  the Pine Tree (Stampscapes) three times in black ink and clear heat embossed.  To finish, I stamped the sentiment (Smiles - Penny Black) in the same black ink with clear embossing.

Below is the Sunset version ...
Changing just one of the ink colours gives it a totally different feel than the first card.  This is the same coloured distress inks as the top card except for swapping out Salvaged Patina for Seedless Preserves.  Love it! :)

During the Zoom session, I made another card.  This time with Candied Apple and Wilted Violet distress inks for the brayering at the top.

I stamped a Penny Black image (Scarved Sweeties 30-758) and then watercoloured with more distress inks.  The sentiment is from Festive Snippets (30-387).  I thought the sentiment was perfect for the scene. :)


Thanks for coming by for a visit!


If you would like to subscribe by email,
please fill out the subscription form in the upper right sidebar.
It is also important to add sw1subscribers@gmail.com to your contact list
so Google recognizes the address and delivers the updates.


Card 1 & 2:  Sunrise / Sunset
Stamps:  Large Pine Tree (Stampscapes); Smiles (Penny Black)
Paper:   White card stock (Neenah 110 lb.); Mixed Media paper (Strathmore 140 lb.)
Ink:   Distress Inks:  Mustard Seed, Carved Pumpkin, Salvaged Patina, Seedless Preserves (Tim Holtz); Black ink: Obsidian Pigment Ink (Altenew)
Accessories:   Brayer, clear embossing powder, heat tool

Card 3:  Time for Joy
Stamps:  Scarved Sweeties; Festive Snippets (both Penny Black)
Paper:  Bristol paper (Strathmore); White card base (Neenah 110 lb.)
Ink:  Distress Inks:  Candied Apple, Wilted Violet; Brushed Corduroy, Gathered Twigs, Ground Espresso, Mowed Lawn, Black Soot, Tumbled Glass (Tim Holtz)
Accessories:  Brayer, clear embossing powder, heat tool, paint brushes, white Posca pen

Challenges:
Jingle Bells - Not a Creature was Stirring

Thursday, September 10, 2020

Twofer Challenge #31

Hi everyone.  Today is the start of the Twofer Challenge #31.  I used some backgrounds that had been in my stash for a while.  Always great to have them handy to make some quick cards.


This first card is coloured with leftover inks from another project.  I don't want them to go to waste so always smoosh the leftovers with a piece of mixed media paper.

I have had this stamp for a very long time.  It's Pine Tree (Stampscapes) and it's so beautiful.  I stamped a few of the trees in black (1st and second generation stamping) and used a light gray ink for the background trees.  I have already sent this off to a dear friend who lost his mother recently.

The second card started with another piece from my stash - watercoloured tissue paper.  I love the colours and bit of texture from the wrinkled tissue paper.  Stamped Pine Tree (Stampscapes) again twice and then mounted my image on a black card base with circle aperture.  A simple "HELLO" finishes the card.

Edited to add:  Several of you have mentioned that these cards remind you of the fires burning in Oregon and California.  I made these cards a few months back, long before the fires started and did not intend on making cards to reflect the terrible devastation that is happening now.  Sorry if my post has upset anyone.


Card #1: Your in my Thoughts
Stamps:  Pine Tree (Stampscapes); Best Thoughts - retired (Stampin' Up!)
Paper:  Mixed Media (Strathmore 140 lb.)
Ink:  Black (Memento); Smoky Slate (SU!)
Accessories & Tools:

Card #2: Hello
Stamps:  Pine Tree (Stampscapes); Happy Messages (Stampendous)
Paper:  White card stock (Neenah 110 lb.); Tissue Paper; Black card stock (SU!)
Ink:  Black (Memento); Smoky Slate (SU!)
Accessories & Tools:  Circle Nestability die - retired (Spellbinders)

Challenges:
Twofer Challenge #31

Sunday, November 17, 2019

Warm and Cozy Lake Cabin

Hi everyone.  Today is the reminder for CAS Christmas November Challenge - Warm and Cozy, hosted by the super talented Trina.

I used an old stamp I've had for at least 15-20 years, but haven't inked up for almost that many years.  This is from Stampscapes and it's such a lovely image to watercolour.  I added snow to the ground, cabin, and on the trees, as well as falling from the sky.  It looks so cold!!  I thought being inside with the fire roaring would definitely be warm and cozy.  I added a small chimney to the cabin and some smoke rising, but it's hard to see. :)  I was so surprised to find a sentiment stamp that matched the challenge. :)

Close-up ...
I hope you'll check out the challenge blog to see the reminder cards from our wonderful Guest Designer, Bobby ... as well as the lovely cards from our Designers.  There's still a week left to play along before the challenge closes on Nov. 24th.

Hope to see you in the gallery!


Stamps: Lake Cabin (Stampscapes); Merriment (Penny Black)
Paper:  Mixed Media (Strathmore 140 lb.); White card base and frame (Neenah 110 lb.)
Ink:  Arcival Grey Shadow (Ranger): Distress Inks:  Peeled Paint, Forest Moss, Salty Ocean, Tumbled Glass, Squeezed Lemonade, Pumice Stone, Frayed Burlap, Barn Door (Tim Holtz)
Accessories & Tools:  Paint Brushes, White acrylic paint, Rectangle die (AliExpress)

Challenges:
CAS Christmas November Challenge - Warm and Cozy

Saturday, June 02, 2018

CAS Watercolour June Challenge

Hi everyone.  Welcome to the start of the CAS Watercolour June Challenge.  This month, the very talented Bonnie (Stamping with Klass) is our host.


I love being at the ocean or looking out at the ocean.  I find it very peaceful and calming.   Hubby and I always spend our vacations doing just that. :)

Today I'm sharing a card that doesn't have a lot of stamping.  I started by splash watercolouring the sand.  See my video HERE for instructions on this technique.  I used smooshing for the sky and acetate smooshing for the water.   A water stamp and reed stamp from Stampscapes added a bit of interest and birds were hand drawn with a black pen.  I used my white gel pen to add a few highlights to the waves (we call those white caps here). :)  The sentiment was stamped several times using the misti in the same colour of ink as the sand, producing a dark brown sentiment.

Here's a close-up ...
We are thrilled to have Robyn (Waterlily Cards by Robyn) as our Guest Designer this month.  Please check out the challenge blog to see the watercoloured Ocean cards from Robyn and our talented Designers.  Then come play along.  The challenge is open until June 24th.


Stamps: Reeds - Large, Water Pattern - Small (Stampscapes
Paper:  Mixed Media paper (Strathmore 140 lb. 400 Series); White card base (Neenah 110 lb.)
Ink:  Distress Inks:  Brushed Corduroy, Tumbled Glass, Broken China, Peeled Paint (Tim Holtz)
Accessories & Tools:  water mister, post-it notes for masking, black pen, white gel pen

Challenges:
CAS Watercolour June Challenge - Ocean

Friday, January 06, 2017

Alcohol Ink Landscape

Today I'm sharing an alcohol ink landscape.  This card was sent to dear friends who are dealing with a tragic loss in their family.  I hope that my card and words of support gave them some comfort.

I have been having some success working with alcohol inks lately.  This time I used Yupo paper and tried to create layers of colours to mimic a sunset.  Not sure I succeeded, but I am happy with how this turned out.

I really was just "winging it" to get the colours.  I made a few different ones, but this was the only one I really liked,  The others are still on my worktable and I may just turn them over and try again on the back. :)

I squirted the purple and blue first, adding blending solution to make the colours move across the paper.  Once they seemed settled (not dry), I added the other two colours.  Right now I don't have any tips on this technique ... it's trial and error for me, but I'm hoping to learn as I make more. :)


Stamps:  Pine Tree (Stampscapes); Bloom of Hope sentiment (SU!)
Paper:  White card base (Neenah 110 lb); Yupo
Ink:  Alcohol Inks:  Passion Purple, Baja Blue, Calabaza Orange, Lime Green (Pinata); Archival Black Ink (Ranger)
Accessories & Tools:  Blending solution (Tim Holtz)

Thursday, July 02, 2015

HLS July CAS Challenge - Stamping


Hi everyone.  It's the start of the  July CAS Challenge at Happy Little Stampers, and it's the start of our new Design Team.  Yay!!  Kylie and I are thrilled to have eight talented designers joining us.  Welcome to Anita, Bonnie, Chrissie, Hazel, Linda, Sue, Toni and Valentyna. :)


Today is my friend, Dolly's (aka Darnell) birthday .  Hopefully she received this card in time and this is not the first time she's seeing it! :)

Happy Birthday Dolly!


This card is all about the wonderful technique of generation stamping (or second generation). Basically you stamp an image and then stamp again (and possibly again) without reinking your stamp.  Multi-generation stamping can create the illusion of depth or movement.

I inked my tree trunk and then used a paper towel to randomly removed some of the ink from the top branches, stamped off once onto scrap paper, and then stamped onto my card front.  This gave me a general outline for the tree without having dark branches that would show through the leaves.

Then I stamped the leaves three times before re-inking and stamping again.  It really creates the look of leaves in the background and foreground, giving the tree visual dimension.  So cool! :)

I hope you'll be inspired to join in our fun challenge.  It's open for the whole month of July, so there's lots of time to play along.  Simply make a CAS card that includes stamping and join the challenge.

This card actually works perfectly for the HLS July Sketch challenge that began two days ago, so I'm adding it over there as well.  Here's the sketch ...


And Virginia's View Challenge for July is 100% Stamping, so I'm linking up there.


Stamps:  Leafless Limbs (Stampscapes); Leaf sprig (Kittie Kits Outdoor Master from Rubbernecker), Be Happy Sentiments (Amy R)
Paper:  White (Neenah)
Ink:  Distress Inks:  Squeezed Lemonade, Shabby Shutters, Peeled Paint, Brushed Corduroy (Tim Holtz)
Accessories & Tools:  sponges

Challenges:
HLS July CAS Challenge - Stamping
HLS July Sketch Challenge
Virginia's View #16 - 100% Stamping


Tuesday, June 09, 2015

Stencil Monoprint


Hi everyone.  Just a reminder of the current Happy Little Stampers CAS Challenge - Sprays / Mists.


Today I'm sharing the birthday card I made for my youngest son, Jeremy.  We share a love of art and I knew he'd love this artsy background ... and he did! :)

For my card today, I used the Stencil Monoprint technique. I used distress inks for the background, tapping them onto the back of my stencil, misting with water and then placing it over my mixed media card front.  The excess moisture was then blotted up with a paper towel.  Once dry, I simply stamped the branches in Pine Needles distress ink.

I really love this technique!  It works well with spray inks as well.  :)

We have lots of fantastic entries in the HLS June CAS Challenge so far.  I hope you'll join us.  Remember, you don't have to have ink sprays to play along ... just pull out a water mister and join in the fun!! :)

The challenge is open until the end of the month, so there's still lots of time left to enter.  Hope to see you in the gallery!! :)


Stamps:  Prickly Branches (Stampscapes); A Little Sentimental (Clearly Besotted)
Paper:  White card base (Neehan); Mixed Media Paper (Strathmore)
Ink:  Distress Inks:  Mustard Seed, Crushed Olive, Peacock Feathers, Pine Needles (Tim Holtz)
Accessories & Tools:  Mini Tile Texture Stencil (Crafter's Workshop), water mister

Challenges:
HLS June CAS Challenge - Sprays

Wednesday, April 30, 2014

Happy Birthday Jer


Hi everyone.  Today I'm sharing a card I made for my son's birthday.  He is an artist and I always show him all the cards I make and he gives me valuable feedback.   I showed him this card I made a last week, using this watercolored background.  He loved it ... and I hadn't even thought that I should have kept it to myself to give to him for his birthday which is in a couple of weeks - duh!! :)

So today I made a second card very similar, but added some special effects.  This time, I made it look like a piece of art hanging on a wall ... at least that's what I was going for :)  I made a trip to an art store yesterday and picked up some new-to-me supplies, one that I used on this card.  It is a gel medium that is filled with tiny glass beads.  I used my palette knife to scrap it over top of the watercolored background (a leftover piece from my card from last week).  I LOVE how it looks.  It adds texture, sparkle and shine to the image.  It dries clear, so the colors show through - I just love it and look forward to experimenting more with this product.

I'm including a couple of close-ups so hopefully you can see the texture and shine from this glass bead coating.


I'm entering this card into three challenges ... CAS on Sunday (#32 - Sparkle and Shimmer), Simon Says Anything Goes, and CAS-ology (#93 - Electric) ... I think these colors are electric :)


Stamps:  A Little Sentimental (Clearly Besotted)
Paper:  Black (SU!); Watercolor
Ink:  Tempting Turquoise, Tangerine Tango (SU!); Versamark
Accessories & Tools:  Water Mister, White embossing powder, heat tool, Glass Beads Gel Medium (Golden)


Challenges:
CAS on Sunday #32
Simon Says Anything Goes
CAS-ology #93


__________________


Today I'm also sharing two more cards from my Dirty Dozen Design Team for last October - theme "It's about Time".


The sentiment is computer generated, so I printed that onto my card front first.  Then I splattered the background with a toothbrush loaded with diluted re-inker.  I didn't have a clock image or die, so I printed off this clock face from the internet, adding a bit of brown sponging around the edges to give it even more of an aged look, and then mounted it on a circle of heated copper.  I mounted the "clock" onto a banner cut from burlap ribbon.


The second card is celebrating "vacation time" ... now I would like to be in a place like this! :)  I brayered the sky and stamped a silhouette of palm trees.  I then mounted it behind a square cut-out so that it's like you are looking through a window at a beautiful sunset.


Lost in Time card:
Stamps:  computer generated
Paper:  White (Neenah)
Ink:  Early Espresso (SU!)
Accessories & Tools:  copper metal sheet .005 thickness (K&S Precision Metals), mini butane torch, burlap ribbon, toothbrush

Paradise card:
Stamps:  Palm Island (Stampscapes)
Paper:  White (Neenah); Whisper White (SU!)
Ink:  Black, Pumpkin Pie, Melon Mambo, Rich Razzleberry (SU!)
Accessories & Tools:  Big Shot, Square Nestabilities (Spellbinders), Rubber Brayer


Saturday, November 02, 2013

All Decorated for Christmas


Hi everyone.  Today I have a special Christmas card that I made to honor Susie from Splitcoaststampers.  Susie (Australia) was the Queen for the Day (QFTD186) a few weeks ago.  I've been so busy, that I am just now able to make a card in her honor.  Susie leaves the most wonderful comments and I appreciate her support.  I hadn't seen any of her cards until recently and was just blown away by she artistic talent.  Each of her cards tells a story ... they are truly amazing and here's a link to her gallery so you can take a look.

I didn't CASE a particular card from Susie's gallery, instead I was inspired by many of her cards.  Congrats Susie ... I hope you enjoyed your special week.  Thank you so much for sharing your beautiful and creative cards!

Here's a close-up of the window:


I used the colors from the SCS Color Challenge from last week (CC449 - cherry cobbler, old olive, sahara sand).  I thought they would work perfect for a Christmas card.  This was a challenging card for me as I tend to mostly make CAS cards, so it was a little difficult to keep adding details.  But in the end, I'm happy with how it turned out.

As luck would have it, today the November Christmas Challenge for the Fan Club was announced and this card works perfectly.

Very little stamping on this card (just the Christmas tree) ... the rest are die-cuts.


Stamps:  Pine Tree (Stampscapes)
Paper:  White, Cherry Cobbler, Old Olive (SU!); dark green
Ink:  Sahara Sand, Old Olive (SU!)
Accessories & Tools:  Big Shot, Small Madison Window, shutters and flower box dies (Poppy Stamps); picket fence die (Poppy Stamps), Wreath strip die (Cherry Lynn), Holly Vine die (Memory Box), brick embossing folder (Tim Holtz), white gel pen, sponge, mini rhinestones in red, green and blue.


Edited to add:  I'm entering this into Crafty Hazelnut's Christmas Challenge Extra for November - anything goes.


Sunday, February 17, 2013

Wishing you a Lovely Day


Hi everyone.  ... And I am wishing you all a lovely day!! :)  Here is a card to honor Mary Marsh.  Mary is the Featured Stamper at Splitcoast Stampers this week (FS315 - MaryR197) ... congrats Mary!!  I love Mary's style and found many cards in her gallery that I would like to CASE (copy and share everything).  But when I saw 
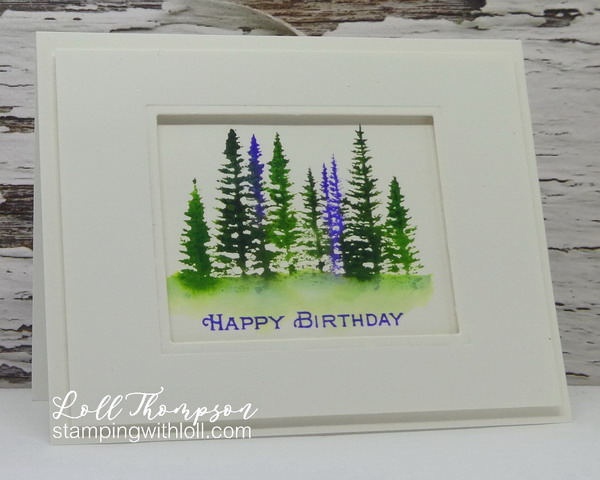
this card, I knew I wanted to get out my brayer ... it is such a beauty!

My plan was to use Mary's card for inspiration, but in the end, it is almost a complete CASE, just changing up the pine tree stamp.  I did some second generation stamping with the two smaller trees (ink stamp, stamp off once and then stamp) to create trees in the background, but I found it hard to do that with black ink and they don't look much lighter in color.  I should have inked the background stamps with gray ink instead.  At least I learned something ... which I do most times I make a card ... always learning, but not necessarily retaining that knowledge :)

I have had fun the past two days, spending time in my studio, creating cards - my favorite hobby!  I took a couple of days off from hospital visits.  I'm finding that my energy is low right now, so staying home for a couple of days has really helped to rejuvenate me.  Today (as with most Sunday's), my kids are coming for dinner.  Gord and I really love that we have this time together with them.  Tonight's menu:  Roast Beef, Yorkshire Pudding, Roasted Potatoes, Steamed carrots, Zucchini with Parmesan ... and Coconut Cake for dessert.  The recipe for the coconut cake is under the "Baking with Loll" tab above ... and if you love coconut, give this cake a try - it's easy to make and delicious!

Speaking of recipes, I'm going to include a few recipes from our Valentine's Day dinner (I had a few requests).  They will be at the bottom of this post.

On to the card details ...


Stamps:  Large Pine Tree (Stampscapes); Be Happy Sentiments (Amy R)
Paper:  Whisper White (SU!)
Ink:  Bashful Blue, Tempting Turquoise, Not Quite Navy, Old Olive, Basic Black
Accessories & Tools:  Speedball Rubber Brayer, scrap paper for masking mountains, sponges, Stamp-a-ma-jig, and adhesives


I brayered the sky in this order ... Bashful Blue, Tempting Turquoise, Not Quite Navy.  I ripped a mask from scrap paper and sponged the tops of the mountain range.  I sponged Old Olive ink at the bottom, followed by a little Basic Black at the edge of the bottom.  I used my Stamp-a-ma-jig to position my trees.  The two largest are stamped in Basic Black.  The two smallest are also stamped in Basic Black, but after they were stamped off once (second generation stamping).  I stamped one tree on the inside of the card for interest.

I'm having a bit of trouble with the light these days ... my pictures are not turning out very clear (could also be my camera - it's really old).  Anyways, I took a couple of extra shots from different angles so you can hopefully see it better.


Here's more photos:


____________________


Here's a quick run down on how Gord makes Cedar-Plank Salmon ...

Marinate your salmon fillets for up to 4 hours if possible (6-8 oz. per person).  Marinade is a mix of lots of Thick Teriyaki sauce (we use Golden Dragon brand), with a little soy sauce and a pinch of garlic salt.  About 1 hour before you want to BBQ, soak a cedar plank in water (make sure to weigh it down so it is immersed in the water).  You can get cedar planks from your lumber store (cedar fence boards), just make sure at least one side is smooth (not rough cut).  Heat your BBQ to 350 degrees, place the wet cedar plank in the BBQ until you start seeing smoke (approx. 5-10 mins).  Remove salmon from marinade and place skin side down on smooth side of cedar plank.  Close lid and BBQ until desired doneness - don't open lid!  We like ours well done so cook it for approx. 40 minutes.  Remove salmon from cedar plank and remove skin before serving (lots of time the skin sticks to the cedar).  Enjoy!!


Fruit and Nut salad:

Mixed baby greens or chopped Romaine hearts, fruit of choice (I used sliced strawberries for Valentine's Day, but sliced apples, pears or halved grapes also work well), toasted nuts of choice (I used pine nuts, but sliced almonds or pecans work well too), sweet vinaigrette (recipe follows).  Also really good if you add a few ounces of chopped unripened (soft) goat cheese.

My Favorite Sweet Vinaigrette: (shake well to combine)
Equal parts:
Sugar (or to taste)
Grapeseed Oil
White Balsamic Vinegar

plus pinch of salt and freshly ground pepper

Variations:  add chives, minced red onion or mustard to the vinaigrette to bump up the flavor


Wednesday, February 08, 2012

Snowy Cabin

It's my mom's birthday today and we're having a family dinner tonight at my place.  Love you Mom!!  Hope you are having a wonderful day and looking forward to spending the evening with you!
I have made her something for her birthday and will share it with the next post, because I know that she'll be reading this and I want it to be a surprise!

On to the card.  I wanted to focus on making a card with my new stamps sets that I got from Rubbernecker (Kittie Kits).  I decided to make a winter scene and will enter it for the "Craft a Scene" challenge for February ... check out this challenge blog here.  I've never done this type of link because it's not possible on my website ... so I am starting up a blog and will be posting today's card on both. 

I had a lot of fun making the main image for this card.  My new stamps are fun to work with and I love the way the brayered sky turned out.  The tough part was figuring out a backdrop for the main image.  After trying several different ideas, I decided on a forest of trees that are hand-stamped onto Whisper White cardstock using the Large Pine Tree stamp from Stampscapes (their stamps are awesome!).  Hope you like.

"Snowy Cabin"


Stamps:  Kittie Kits - Outdoor Master, Moose Is Loose (Rubberneck); Large Pine Tree (Stampscapes)
Paper:  Not Quite Navy, Whisper White (SU!)
Ink:  Baja Breeze, Sahara Sand, Not Quite Navy; Stampin' Write markers:  Early Espresso, Crumb Cake, Soft Suede, So Saffron, Old Olive, Always Artichoke, Basic Gray; Whisper White Re-inker (SU!)
Accessories:  Stamp-a-ma-jig, post-it notes for masking, Dreamweaver Embossing Paste, small paint brush, Rubber Brayer, toothbrush, sponge, adhesives and dimensionals


I inked the cabin stamp with Stampin' Write markers and stamped onto my Whisper White card front.  I then stamped all the different sized trees by inking the stamps with Old Olive ink and then adding random swipes of Always Artichoke on top using a Stampin' Write marker.  I masked the cabin and tree with post-it notes and brayered the sky ... first with Baja Breeze, then with Sahara Sand (I wanted it to have a bit more gray in the sky so it appears to be a cold day) and lastly with Not Quite Navy.  I removed the two masks and then used the tree mask a second time to mask the tree at the bottom right corner.  I used my Stamp-a-ma-jig for positioning, and stamped the fence posts in Soft Suede ink across my card front.  With masking the tree, it appears the fence is in-behind the tree.  I removed the mask.

I mixed some Dreamweaver Embossing Paste with Whisper White re-inker (to thin out the paste) and added it (snow) to the main image using a small paint brush.  I took a damp toothbrush and "smushed" it into another pool of Whisper White re-inker.  I ran my thumb across the wet bristles and sprayed white paint all over the main image so it looks like it's snowing.

I mounted the main image onto a frame of Not Quite Navy cardstock.

For the background I inked the Large Pine Tree with Old Olive ink, added random swipes of Always Artichoke on top (Stampin' Write marker) and stamped onto the Whisper White cardstock, I stamped again (without re-inking) and litter higher and off to one side from the first stamping (second generation stamping).  I repeated the inking, stamping, stamping across the page until it was full.  I mounted the background paper onto a card base of Not Quite Navy cardstock.
  
I mounted the main image onto the card front, popping it up with dimensionals to add depth.


Friday, November 25, 2011

Lone Winter Tree


I haven't made a brayered card for a while ... so yesterday afternoon I went surfing the 'net for inspiration.  There are wonderful photography sites that have hundreds of pictures of nature scenes, some of which would translate nicely into a brayered card.  I found a picture of a lone winter tree in a snow-covered field.  The coloring of the sky turned out very close to the picture ... and definitely conveys a cold, winter day.  Stampscapes has incredible stamps and I used two for the card below (Leafless Limb & Old Fence).  Hope you like.

"Lone Winter Tree"


Stamps:  Leafless Limb, Old Fence (Stampscapes)
Paper:  Basic Gray, Whisper White (SU!)
Ink:  Sahara Sand, Basic Gray, River Rock, Basic Black (SU!)
Accessories & Tools:  Speedball Rubber Brayer, post-it notes for masking, sponge, Stamp-a-ma-jig, and adhesives

* * * * *

I ripped a mask from the post-it note and used it to cover the snow area.  I inked my brayer with Sahara Sand and brayered from the post-it note edge, upwards ... creating a gray haze above the snowline.
Next I brayered in River Rock, starting at the top of the sky and moving downwards until it reached the gray area.  I used a small sponge dauber to add Basic Gray ink along the horizon line.

I removed the mask (keep for later use) and stamped the leafless limb tree in Basic Gray ink just off-center.
Using the Stamp-a-ma-jig for placement, I inked the Old Fence stamp in Basic Black and stamped it a couple of times.

I placed the post-it note mask from earlier along the bottom of the fence and sponged more Basic Gray ink to create a shadow under the fence.  I also sponged a little at the bottom of the tree.

To finish, I sponged more Basic Gray ink along the bottom, top and sides of my main panel.  I mounted the panel onto a card base of Basic Gray cardstock.

Saturday, November 05, 2011

Pine Trees

Taking it pretty easy today.  Just a little light housecleaning and baking for tomorrow's workshop.  I made gingersnaps for tomorrow ... another family favorite.  This recipe comes from a good friend of my mom's, Eva Kettley.  When I was little, Eva lived a couple of doors down from us.   She was a very generous, loving person who made everyone feel welcome in her home.  She was also a master baker and loved to decorate cakes.  For years she would sell her cakes in Burnaby to friends and neighbors.  I was so honored when Eva agreed to decorated my wedding cake when I got married in 1979.  When I make these cookies, I think of her.  I've included the recipe in the baking section if you're interested in trying it ... you won't be disappointed!

____________________ 


On to the card for today.  I made a third card using the color challenge from this week (More Mustard, Always Artichoke, Bravo Burgundy).  These three colors are so beautiful together.  Hope you like.

"Pine Trees"


Stamps:  Pine Tree (Stampscapes); Vintage Labels (SU!)
Paper:  Always Artichoke, Bravo Burgundy, Whisper White (SU!)
Ink:  Always Artichoke, Bravo Burgundy, More Mustard (SU!)
Accessories & Tools:  Cuttlebug "Forest Branches" embossing folder, Big Shot, sponges, small eye-makeup sponge applicator, small oval punch, medium oval punch, sticky strips and dimensionals

* * * * *

I stamped the tree three times in Always Artichoke ink onto Whisper White cardstock.  I sponged  More Mustard ink around the trees.  I sponged Bravo Burgundy ink in the sky.  I took the small eye-makeup sponge applicator and inked it with Always Artichoke and sponged on top of the trees to fill them in and give them some depth.  I framed the stamped image with Always Artichoke cardstock.

I sponged a small piece of Whisper White cardstock with More Mustard ink, stamped the sentiment on top with Bravo Burgundy ink and punched it out with a small oval.  I framed the sentiment on a medium oval of Always Artichoke cardstock.

I ran a large piece of Bravo Burgundy cardstock through my Big Shot with the Forest Branches embossing folder.  I lightly sponged Bravo Burgundy ink on top of the embossing to highlight it.  I mounted the embossed cardstock onto a card base of Always Artichoke.

I mounted the framed main image on top, weighting it at the bottom, and popping it up with dimensionals to add depth.

I mounted the framed sentiment on top of the main image.