Showing posts with label Silhouette Cameo. Show all posts

Thursday, August 25, 2022

Snowflake

Hi everyone.  Today's card is for the Rudolph Days August Challenge - Anything Christmas Goes. 

I'm sharing a card made from my stash of card fronts.  Over the years I have made several card fronts when crafting with friends (in-person or on-line).  I have been inspired by my sweet friend, Bonnie (Stamping with Klass) to finally make these card fronts into cards. :)  She has been working for months going through her box of unused items and has made so many amazing cards.  Thanks for inspiring me, Bonnie! :)

The card above was made using the stenciling monprint technique (ink'ing the stencil background (acetate cut with my Silhouette Cameo), spritzing with water, turning it over onto a piece of mixed media paper).  It's a great way to stretch the use of your stencils by getting a negative image.  You need to blot with paper towel to absorb any stray ink so that the stencil image is clean and shows the colour of your card front.  I used magicals to make this background ... you can see all the variations of colours.  Once dry, I used a permanent silver pen (Pilot) to outline the snowflake.  The panel is popped up on foam for added dimension and the sentiment Christmas Sentiments (Penny Black) is silver heat embossed on my card base.
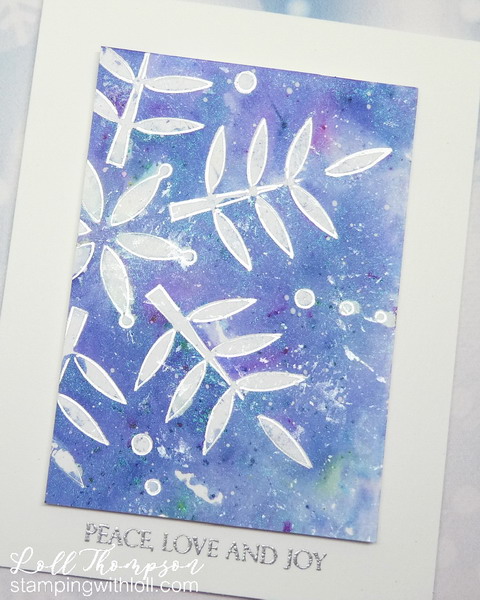
Close-up ...
You can see the shimmer from the magicals in this photo, along with the shine from the silver pen.

Thanks for stopping by!


If you would like to subscribe by email,
please fill out the subscription form in the upper right sidebar.
Make sure to add "subscribe" to the message.
It is also important to add SWL1subscribers@gmail.com to your contact list
so Google recognizes the address and delivers the updates.

To unsubscribe, please use the same form making sure to add
"unsubscribe" to the message.
Thank you.


Stamps:  Christmas Sentiments (Penny Black)
Paper:   White card stock (Neenah 110 lb.); Mixed Media paper (Strathmore 140 lb.)
Ink:   Magicals (Lindy's); Versamark
Accessories:   Snowflake stencil (cut file from Silhouette America), acetate sheet, Silhouette Cameo, water mister, silver pen (Pilot), silver embossing powder (Ranger), heat tool

Challenges:
Rudolph Days August Challenge - Anything Christmas Goes


Wednesday, January 13, 2021

Zoom Call Card

Hi everyone.  Today I'm sharing a card I made as a sample for a Sponging Techniques Zoom call held earlier today with a few of my dear stamping friends.

I followed one of Eileen Godwin's techniques for this card (click HERE for link to Eileen's video).

For the background I used a Flourish stencil from Tim Holtz.  The Tulip stencil is one I cut with my silhouette cameo a few years back.  The sentiment is from a retired set from Technique Tuesday.

Close-up ...
I'm entering this card into the Just For Girls Challenge #566 - Use a stencil.  I've actually used two on this card. :)

I will be back later this month with a few more cards using the techniques from today's session.  Thanks for stopping by!

Product Links


Stamps:  Cosmos - retired (Technique Tuesday)
Paper:   Mixed Media (Strathmore 140 lb.)
Ink:   Distress Inks:  Mustard Seed, Ripe Persimmon, Seedless Preserves (Tim Holtz); Black (Memento)
Accessories:  Low-tac tape for masking, Flourish stencil (Tim Holtz), Gesso, sponges, Tulip stencil (Silhouette America image),  Clear Wink of Stella, POSCA white acrylic paint pen  

Challenges:
Just for Girls #566 - Use a Stencil

Wednesday, July 01, 2020

CAS Mix Up July Challenge

Hi everyone.  Today is the start of the CAS Mix Up challenge for July and it's all about Stenciling!  Nancy (scandinancy creates) is our host and she wants us to do some stencil tracing.  Basically you do your stenciling, and then with the stencil back over the image, outline it using any pen colour you want ... or outline the stenciled design free-hand.
The above card starts with a bright yellow splashed background.  Click HERE to see my video on splash watercolouring.  The stencil image is from Silhouette America and it is cut with my Silhouette Cameo machine using a piece of acetate.  I sponged through the stencil and once dry, went over the stencil again with a coating of matte gel (clear).  It makes the colours more vibrant.  Outlining was a bit of an issue with the gel, so I ended up outlining around the outside of the gel, rather than using the stencil as a guide.  It worked well.  A black sentiment banner with white heat embossing finishes the card.

My card has Splash Watercoloured Background, Stenciling, Sponging, Embossing Gel, Stencil Tracing, and Heat Embossing.  Whew!  That's a lot on a card that is still CAS. :)

Close-up ...
We are so happy to have THREE Guest Designers this month.  Please check out the challenge blog to see Greta (GG Creations), Sandie (London Days), and Kia (Kia's Art Bits) wonderful Stencil Tracing cards and the lovely cards from the rest of our Designers.  I know you'll be inspired to give this a try!

Products
Birthday Blowout (sentiment) - Poppy Stamps
Poppy Field cut file - Silhouette America (Donna Downey)


Stamps:  Birthday Blowout (Poppy Stamps)
Paper:  Mixed Media (Strathmore 140 lb.); White card stock (Neenah 110 lb.); Black card stock (SU!)
Ink:  Distress Inks:  More Mustard, Spiced Marmalade, Ripe Persimmon, Peeled Paint, Wilted Violet (Tim Holtz); Versamark
Accessories & Tools:  Spring flowers stencil (cut wtih Cameo), acetate, sponges, Clear Matte Gel (Goldens), Black Micropen, White embossing powder, heat tool

Challenges:
CAS Mix Up July Challenge - Stencil Tracing


Thursday, June 25, 2020

Rustic Christmas

Hi everyone.   Today's card is another technique that I saw on my friend, Colleen's blog - make sure to check our her cards made with this technique!  She played along with Gina K's video - Carved Wood Technique.  I just loved her cards.  So I watched the video -  and gave it a try.

Happy with how this turned out.  I dry embossed my main panel with a snowflake stencil, turned it over and scored lines every 1/2".  I used the underside with the debossed snowflakes for my main panel.  I did direct to paper with two distress ink pads (Antique Linen and Brushed Corduroy), dragging the edge of the ink pads in the direction of the "grain".  I love the warm colour of the "wood" panel.  The ink also reveals the debossed snowflakes.  Cut my panel to size, added a torn snow hill, deer (cut from my Silhouette Cameo several years ago, sponged with gathered twigs and antlers with walnut stain inks).  To finish, stamped the sentiment in red before popping up the whole panel on my card front.

Close-up ...
Another fun technique and another Christmas card made. :)

Sending this card over to June's Rudolph Days Challenge, which is Anything Goes - Christmas.

Thanks for stopping by!

Products
Snowflake Stencil (Paper Artsy)


Stamps:  ? (Hero Arts)
Paper:  Mixed Media (Strathmore 140 lb.); White card stock (Neenah 110 lb.)
Ink:  Distress Inks:  Antique Linen; Brushed Corduroy; DOX ink:  Candied Apple (Tim Holtz)
Accessories & Tools:  Snowflake Stencil (Paper Artsy), Scoring tool, sponges,  Deer die-cut (Silhouette Cameo)

Challenges:
June Rudolph Days - Anything Goes Christmas


Friday, October 18, 2019

Wedgwood Blue

Hi everyone.  It's time for the reminder post for the CAS Stencil October Challenge - Patterned Paper, hosted by me!


I dug through my many containers of patterned paper and came across an "old-fashioned" look of designer paper.  I love the soft blue and cream.  I wanted to have the look of "Wedgwood Blue" china which has a very dry look to it.  I used embossing paste, coloured with distress ink Stormy Sky.  I didn't have the re-inker, so smooshed the ink pad on my palette several times, mixing with the white paste until I got the colour I wanted.  Worked great.  I used my Stencil Pal to spread the paste evenly and you can easily scrape the leftovers off to use again later.  Once dry, I fussy-cut the heart and popped it up on my card front with a simple sentiment stamped below.

Everytime I mix up paste with colour I always end up with way too much (better than too little). :)  So this time I used it all up and ended up with three pretty cards.

Second card - using another stencil cut with my silhouette cameo.

For the last card I used a large piece of the designer paper so there isn't very much white space on my card, so it's not for the CAS challenge, but wanted to share with you.  I used the Layered Roses stencil from Tim Holtz.  Works perfectly with this old-fashioned looking patterned paper.
Please check out the reminder post to see new cards from our talented Designers, and this month's wonderful Guest Designer Gundi.

Challenge is still open for another six days.  Come play along!


Stamps:  Fond Expressions (STAMPlorations); Large Fancy Sentiments (Just Write Stamps)
Paper:  White card stock (Neenah 110 lb.); Patterned paper ?
Ink:  Black (Memento); Stormy Sky Distress Ink (Tim Holtz)
Accessories & Tools:  White embossing paste (Dreamweaver); palette knife, stencil pal, Stencils: Layered Roses (Tim Holtz); Leafy Heart and Tulips - Silhouette America cut files, Silhouette Cameo, Acetate sheets

Challenges:
CAS Stencil October Challenge - Patterned Paper


Friday, January 18, 2019

Get Well Soon

Hi everyone.  Back with a reminder for the CAS Stencil January Challenge.  Make sure to check out the challenge blog to see the beautiful reminder cards from our talented Designers.

I started by sponging over a honeycomb stencil onto regular card stock.  This is from my stash, so not sure the colours I used for sponging, but most likely Distress Inks:  Squeezed Lemonade, Mustard Seed.  I only wanted the center to be sponged and so faded out as I got towards the edges.

I used a NBUS stamp set that I bought from AliExpress.  I stamped the image in Versafine Black (Permanent ink) onto a scrap piece of mixed media paper.  I set the colour with my heat tool and fussy-cut the image.  The image is watercoloured with zigs and popped up over the sponged card front.  I stamped the sentiment from the same set.

Here's a close-up ...

Here's a photo of the inside of the card.  I used more stamps from the same set.  The honey jar was stamped on a piece of scrap mixed media, fussy-cut and glued to the inside of the card.

I hope you'll come join us for the very first CAS Stencil Challenge.  If you haven't played along yet, there's still lots of time.  Challenge closes January 24th at midnight PDST.


Stamps:  Get Well Soon (AliExpress)
Paper:  Mixed Media (Strathmore 140 lb. 400 Series); White (Neenah 110 lb.)
Ink:  Versamark Black; Zigs (Kuretake); Distress Inks:  Squeezed Lemonade, Mustard Seed (Tim Holtz)
Accessories & Tools:  Honeycomb stencil (cut with my Silhouette Cameo), sponge, water brush, heat tool

Challenges:
CAS Stencil January Challenge - Sponging


Tuesday, November 28, 2017

CASEing Susan

Hi everyone.  Today I'm sharing a card that I CASEd (copy and share everything) from my dear friend, Susan (Cardmaker's Garret).

It's also Susan's birthday!  I sent her the card above a week ago, but she hasn't received it yet.  Hopefully today!! Happy Birthday, Susan!!

Click on the link below to check out her gorgeous card that I CASEd.  And please leave her some happy birthday wishes!! :)
I started by die-cutting my partial circle die from regular card stock.  Don't do all the colouring and adding gel paste before die-cutting --- it will stick to your cutting plate.  Ask me how I know!! :)

This is my second time making this card front! :)  I placed my stencil over top, masking and sponging the different colours.  The stencil needs to be washed and dried for the next step.  Placed the stencil back over the image, lining up and taping to secure.  Then spread a layer of heavy gel medium over top (I used matte gel so it doesn't really show in the photo).

The gel adds dimension to the image, helps to intensify the colours, and has the side benefit of protecting the image if further work is being done on the card (example, adding a watercolour wash background).  Bonus!  

I popped up the die-cut with foam for more dimension and then added a black sentiment banner with white heat embossing.  Love this technique.  Have not used heavy gel (clear) for this before.  Usually use it to add colour when wanting to stencil with coloured gel.  You can mix with ink, paint, mica powders, etc. to create a beautiful coloured gel.  Another great way to use this product!


Stamps:  Many Everyday Message (Hero Arts)
Paper:  Neenah White card stock (110 lb.); Black card stock (SU!)
Ink:  Distress Inks:  Broken China, Salty Ocean, Spiced Marmalade, Fired Brick, Mustard Seed, Wild Honey, Peeled Paint, Forest Moss (Tim Holtz); Versamark
Accessories & Tools:  Flower stencil (cut with my Silhouette Cameo), sponges, Heavy matte gel (Golden), palette knife, white embossing powder, heat tool


Thursday, April 06, 2017

Joy

Hi everyone.  Today I'm playing along with Merry Monday Challenge #242 (Twigs and/or Branches).

I took my cue from the inspiration photo.  I used my Silhouette Cameo to cut out the branches, ornament and hanger from watercolour paper.  I then smooshed the branches with two shades of  green ink, and smooshed the ornament with two shades of red ink.  I pressed the hanger into my Delicata Silver ink pad and also used it to stamp the Joy sentiment.  The snowflake was inked with white paint and a layer of wink of stella was added for a little sparkle.

Thanks to Debbie of Merry Monday for the fun challenge.  I was happy to have time to play along this week. :)  The challenge is open until noon on Sunday, so there's still lots of time to join in.

Thanks for stopping by for a visit!


Stamps:  Merriest (Avery Elle)
Paper:  White card base (Neenah 110 lb. card stock); Watercolour paper (Arches 140 lb. cold press)
Ink:  Distress Inks:  Twisted Citron, Mowed Lawn, Festive Berries, Candy Apple (Tim Holtz); Delicata Silver (Tsukineko)
Accessories & Tools:  Silhouette Cameo cutting machine, water mister, Picket Fence white Distress Paint, Wink of Stella

Challenges:
Merry Monday #242 - Twigs and/or Branches

Friday, March 31, 2017

Playing with Bister Powders

Hi everyone.  I'm back with another masculine card.

Today I was playing with some Bister powders that I've had for ages ... I think over a year!!  Yep, they have been patiently waiting for me. :)  My friend Christine, picked them up in the UK when she was there.  They come in small resealable bags, so I found it hard to get out just a little to sprinkle on my card front.  Found some plastic containers (similar to the brushos pots) and spent last night putting them into the new containers, labeling, and adding a colour swatch (on watercolour paper with sticky backing) on top along with piercing a hole so the powders could easily be sprinkled.  The push pin holds everything in place and I can just pull it out and sprinkle easily.  Here's a pic of my containers ...


The colours are very muted compared to Brusho or Color Burst powders.  And they all contain a bit of walnut in with each of the colours, so they have very earthy tones.  LOVE them.  And perfect for creating a masculine card.  I simply sprinkled two colours (green and natural) over my fern stencil onto mixed media paper, spritzed with lots of water and quickly removed the stencil.  I got a very clean image. Added a simple tone-on-tone stamped sentiment banner to finish.


Stamps:  Fun Birthday Sentiments (HLS)
Paper: Mixed Media (Strathmore 140 lb.); Soft Suede (SU!)
Ink:  Bister Powders:  Green, Natural; Soft Suede (SU!)
Accessories & Tools:  Fern stencil made with my Silhouette Cameo, water mister

Sunday, November 20, 2016

Stencil Masking


Hi everyone.  Today I'm sharing another way to mask, which is CAS Mix Up's November challenge.


This time I'm masking a stencil.  This can stretch the use of your stencils and you will get a lot more mileage from them.  To see what the full stencil looks like, click HERE to see a card I made a few months back.

I used a yellow watercolour spray to add a bit of texture for the background.  I wanted to use this flower stencil, but it is large and has five flowers on it.  So I masked off three of the flowers and just used two.  I sponged the flowers with three shades of distress inks and the stems with one.  Then I used my scissors to distress the edges of my main panel.  My CAS Mix Up card has stamping, masking, stenciling, sponging, and distressing. :)

There are lots of ways to mask, and I hope you'll make a CAS Masked mixed media card and join our challenge!


Stamps:  Chit Chat (Paper Smooches)
Paper:  White card base (Neenah); Mixed Media (Strathmore 140 lb.)
Ink:  Distress Inks: Wild Honey, Spiced Marmalade, Ripe Persimmon, Peeled Paint, Walnut Stain (Tim Holtz)
Accessories & Tools:  Yellow watercolour spray made from Liquid Watercolor Concentrate (Dick Blick), Bloom Group Stencil (cut with my Silhouette Cameo), sponges

Challenges:
CAS Mix Up November Challenge - Masking

Thursday, August 11, 2016

Part Two of Brushos and Ferns


Hi everyone.  Today I'm sharing the second part of a play with Brushos.  Click HERE to see Christine's Birthday card from yesterday.  I sprinkled brushos on top of my fern leaf stencil, spritzed with water, and once dry fussy-cut and placed it in a frame ... that's the card I posted yesterday.

After taking a print of my fern, the stencil still had lots of colour on it (from errant Brusho crystals and water) ... so I flipped it over and placed it onto a piece of clean mixed media paper to take a Stencil Monoprint.  I pressed it down onto the card, blotting with a paper towel to absorb any colour that strayed into the open parts. This leaves me with a coloured background, and my stencil image is white.  After it was dry, I place the fern stencil back over top, matching up the design and then spread a layer of Crackle Paste over top.  A black with white heat embossed sentiment banner was added to finish the card.  Easy peasy and I got two cards for the price of one. :)

Adding this to the Take It Make It August Challenge at Craft Stamper Magazine where this time they are wanting us to Take a Technique - Stencils and Masks.

Going to add this to the CAS Mix Up August Challenge - Sprays gallery.    My CAS Mix Up card has stamping, Brushos, stenciling, stencil monoprint, embossing paste and heat embossing.  Come play along!!


* * * * *

A couple of days ago, I had a play day with my friends Susan and Christine.  We experimented with more stenciling techniques and products.  Lots of fun!  Susan brought her puppy, Tessa ... and my son Jeremy came over with Violeta.  The pups had so much fun playing with each other.  :)

Jer quickly snapped some pictures with his phone.  Susan is holding her Tessa, and Christine is holding Violeta.   Aren't the pups adorable??!!


Thanks to Susan, Christine and Tessa for coming over to play!!


Stamps:  Sentiment - Painted Butterflies (Altenew)
Paper:  Mixed Media (Strathmore 400 Series)
Ink:  Brushos:  Lime Green, Leaf Green; Versamark
Accessories & Tools:  Fern stencil (cut with my Silhouette Cameo), water mister, White Crackle Texture Paste (Finnabair), palette knife, corner rounder, white embossing powder, heat tool

Challenges:
Take It Make It August Challenge - Stencils and Masks
CAS Mix Up August Challenge - Sprays

Wednesday, August 10, 2016

Happy Birthday Christine!


Today is my dear friend Christine's birthday!  Hope you are having a wonderful day Christine!!

This card is another experiment with stencils that I haven't tried before.  I used Brushos through a fern leaf stencil onto mixed media paper. See my video tutorial on how I stencil using Brushos.

After it was dry, I fussy-cut the leaf.  Basically my stencil became a stamped image, fussy-cutting to create the focal point for my card.  It worked well and now I will be looking at my stencils in a whole new way. :)

I thought the fern was so pretty, I didn't want to add anything to take away from it, so just used a simple white frame to add some dimension and interest.

My CAS Mix Up card has stamping, spraying (brushos and water mister), and die-cut frame, to I'm adding it to the CAS Mix Up August Challenge - Sprays.


Thanks for coming by for a visit.


Stamps:  Sunny Sentiments (Amy R)
Paper:  Mixed Media (Strathmore 140 lb.)
Ink:  Brushos:  Turquoise. Leaf Green, Lime Green; Smoky Slate (SU!)
Accessories & Tools:  Fern stencil cut with my Silhouette Cameo, water mister, Rectangle Nestabilities (Spellbinders)

Challenges:
CAS Mix Up August Challenge - Sprays

Friday, August 05, 2016

Thank You and Have a Great Day!


Hi everyone.  Sharing a card I made as a sample for a challenge being run by my good friend Nancy (scandinancy creates).  Splitcoaststampers has a big yearly event (Dare to Get Dirty), with a week of challenges (5+ per day) run by past and present design team members, called "Dirty Girls".  Lots of fun for the Fan Club Members who support Splitcoaststampers with their membership fees.  Nancy is hosting one of the challenges, so I'm helping out with a sample card ... well, two actually --- I was having so much fun! :)

I started by sponging randomly over a stencil in soft green.  I stamped my hibiscus and leaves onto mixed media paper in black archival ink, and watercoloured them with distress markers in soft colours (spun sugar and worn lipstick for the flower, shabby shutters for the leaves).  I fussy-cut them out and mounted then over the stenciling, along with a few black die-cuts I received as a gift from my good friend Hazel (My Card Attic).  Love how dramatic the black is again the soft green and pinks.

I splattered diluted black acrylic paint for the background and added a white heat embossed black sentiment banner.  Had lots of fun making this card.

Here's my second card ...


This time I used two stencils for my card.  The background is a stencil monoprint of honeycombs done with watercolour sprays.  The design is subtle, but makes a great background for my bold sunflower.  The sunflower was sponged over top of the honeycomb monoprint, then I spread Glass Bead Gel over the sunflower.  It's so pretty and sparkly as the glass beads catch the light.  I added a simple stamped sentiment to finish.

Another fun product to use with stencils.  There's just nothing like glass bead gel ... it's so unique and beautiful.

Since the background of this card is sprayed, I'm adding this to the CAS Mix Up August Challenge - Sprays. :)  Hope you'll come join us!


Thanks for coming by for a visit!


Thank You Card:
Stamps:  Wild Hibiscus (Altenew); Sentiment - Painted Butterflies (Altenew)
Paper:  White card base (Neenah 110 lb.); Mixed Media for flower and leaves (Strathmore 140 lb.)
Ink:  Distress ink:  Shabby Shutters and Distress Markers:  Shabby Shutters, Spun Sugar, Worn Lipstick (Tim Holtz); Versamark
Accessories & Tools:  Quadrefoil stencil cut with my Silhouette Cameo, sponge, paintbrush, black acrylic paint, black die-cuts (gifted)

Have A Great Day Card:
Stamps:  A Little Sentimental (Clearly Besotted)
Paper:  White card base (Neenah 110 lb.); Mixed Media card front (Strathmore 140 lb.)
Ink:  Distress ink:  Squeezed Lemonade, Mustard Seed, Spiced Marmalade, Ripe Persimmon, Picked Raspberry, Vintage Photo (Tim Holtz)
Accessories & Tools:  Watercolour sprays made from Liquid Concentrate in Yellow, Orange and Magenta (Dick Blick), Honeycomb stencil cut with my Silhouette Cameo, Mini Joyful Sunflower stencil (The Crafter's Workshop), sponges, glass bead gel

Challenges:
CAS Mix Up August Challenge - Sprays